Text in Illustrator is represented by a software container called a Type object, which is basically a special class of Group that contains characters rather than paths or other groups. Characters are software objects that have properties, which you can modify via the Character panel and the Paragraph panel.
You can apply most kinds of Effects to Type Objects, just as you can apply Effects to Groups. See the Live Effects page for descriptions and examples of common ways to enhance the appearance of text with Effects.
You cannot Ungroup a Type Object, but you can convert a Type Object into a Group in which each character is converted into a closed path, which you can then edit with the Pen tool, the Direct Selection tool, or any of the tools for Modifying Paths. See especially the articles on Cutting Tools and Transformations.
Illustrator provides two basic kinds of Type objects: Point Type and Area Type objects. The corresponding visual representation of these objects is often called Point Text and Area Text. This page focuses on creating and editing these two types of text objects. Ai also has a Path Type object, which is a subtype of Area type that shares some Area Type properties, but also has specific features for creating and editing Text on a Path.
Creating Text Objects
Point Text
The Points in Point Text
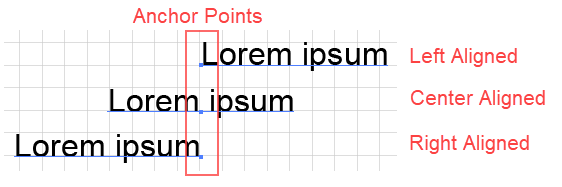
The term, Point Text, comes from the fact that, rather than sitting inside of a bounding area, point text sits on a line that has a single anchor point. That point remains fixed as you change the paragraph alignment settings. The point text container expands to fit the text. Hence, point text does not wrap, because it does not have a fixed bounding area. The term Point Text contrasts with the term Area Text.
Create Point Text
To create a Point Text object in Adobe Illustrator:
Get the Text tool.
Click on the artboard. Ai creates the insertion point cursor (a box with an (I in it) and will insert and select the placeholder text "Lorem ipsum."
Type over the text. The text will not wrap; so, to create a second line, you must hit Enter.
Hint
Filling newly created text objects with placeholder, "Lorem ipsum," text is optional. To toggle the behavior on or off, click the check box at Preferences > Type > Fill New Type Objects with Placeholder Text.
Area Text
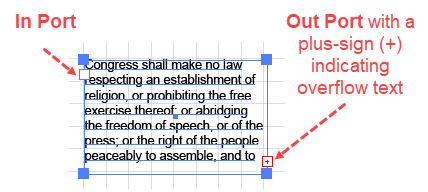
Text Frame with In Port and Out Port
In contrast to Point Text, Area Text is an object that is made up of: (A) a container, called a Text Frame, that defines a bounding area and is typically a rectangle but may be another shape) and (B) text that flows within the container and re-flows when you change the text properties or change the container dimensions. In addition to having character properties, which may be modified via the Character panel, Area text may have paragraphs, which may be modified via the Paragraph panel. Finally, you can arrange area text to flow (or thread) through several containers.
Create Area Text in a Standard Text Frame
To create Area text in a standard, default, rectangular container in Adobe Illustrator:
Get the Type Tool ().
Click and drag diagonally to define a rectangular area. Ai will: (A) make the area into a Text Frame that has an in port and an out port, and (B) fill the frame with placeholder text (i.e., Lorem ipsum...).
Type over the selected placeholder text or copy text to the clipboard and paste it over the selected placeholder text.
Hint
Use Bounding Boxes with Area Text. Enabling Bounding Boxes will allow you to:
Easily change the dimensions, and orientation of the Text Frame.
Shrink-wrap the Text Frame around the text.
Convert Area Text to Point Text and vice versa.
Filling newly created text objects with placeholder, "Lorem ipsum," text is optional. To toggle the behavior on or off, click the check box at Preferences > Type > Fill New Type Objects with Placeholder Text.
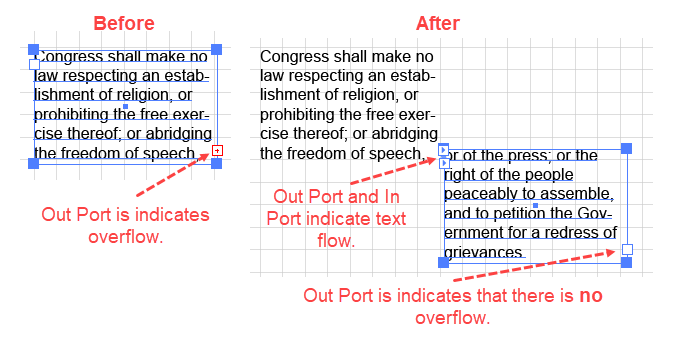
If the text does not fit into the rectangle, Ai will place a plus sign (+) in the Out Port to indicate that you have overflow text. You then have two choices:
Thread text into a second text frame, or
Shrink-wrap the text frame to the text.
Thread Text among Text Frames
How the Text Frame Ports enable you to Thread Text over Two Text Frames
If you have overflow text, you can create additional linked text frames to contain the text that does not fit into the first Text Frame.
To spread text over two or more Text Frames in Adobe Illustrator:
Get the Selection tool (not the Text tool).
Select the first Text Frame and click on its out port which will have an overflow indicator. Ai will create and select another rectangle of the same size and place text in it. If the text still does not fit, you can repeat the process.
Reposition the rectangles with the selection tool. You will see that the are linked by line, which symbolizes that the text is threaded between the two frames. Now the Text Frames are linked and text flows from one to another. For example, if you shrink one of the frames, more text will flow to the frames after it, and if you expand one of the frames, more text will flow into it, reducing the amount of text in last frame.
To remove one Frame from a series of threaded Frames:
Select the Frame that you want to unlink from the others.
Execute the Type > Threaded Text > Release Selection command. Ai will remove (release) the threading links to and from the Frame that you released, but the empty Text Frame itself will remain. Ai will then reconnect the threading links to the remaining Frames and the text will flow into them.
To remove the text thread that is connecting threaded Text Frames:
Select the Frames.
Execute the Type > Threaded Text> RemoveThreading command. Ai will remove just the threading links among the Frames, but the Frames with their text will remain. However, if you now add text to one of the remaining Frames so that it overflows, since the thread has been removed, the overflow text will not flow to the other Frames.
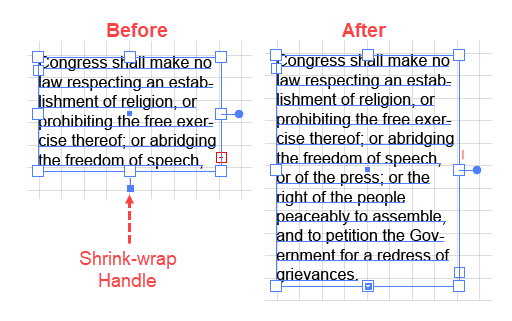
Shrink-wrap a Text Frame to the Text
Shrink Wrap Text inside its Text Frame
To fit a Text Frame to its contentin Adobe Illustrator:
Turn on the bounding box (View > Show Bounding Box, Ctrl + Shift + b).
Select the Area text. With the Bounding box on, Ai will show the area container with control handles.
Click the control handle that is dangling from the bottom of the bounding box. Ai will expand or contract the text frame so that it just fits the text.
Note: the control handle that sticks out from the side of the bounding box is for converting the text to point text. These control handles only appear on a bounding box when it contains text.
Put Area Text into an Arbitrary Shape
Text Pasted from the Clipboard into an Ellipse
To put Area Text into a Live Shape in Adobe Illustrator:
Get a Shape tool and create the Shape.
With the Shape still selected, get the Type Tool and click on the path's boundary (not on its interior). Ai will fill the path with placeholder, Lorem ipsum, text, which will remain Selected. Type over the Selected placeholder text or replace it with text pasted from the Clipboard.
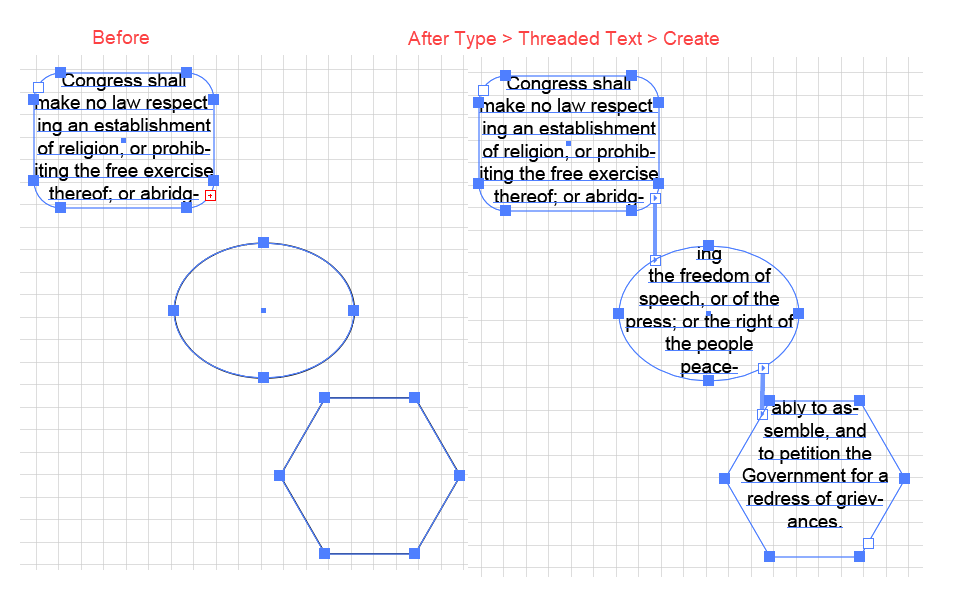
Put Threaded Text in Shapes
Threading Text among Shapes
Illustrator not only allows you to thread Area Text among several standard Text Frames, but you can also thread text among arbitrary shapes, ellipses, stars, polygons, etc. As with text in standard Text Frames, threading text among shapes will cause the text to flow from one shape to the next. That is, adding text to one of the frames, will cause additional text to flow into subsequent frames.
To thread text among several shapes via a menu command in Adobe Illustrator:
Execute the Type > Threaded Text > Create command. Now you will see that (as with threaded text boxes) the shapes are linked by line, which symbolizes that the text is threaded between the shapes. For example, if you shrink one of the shapes, more text will flow to the shapes after it, and if you expand one of the shapes, more text will flow into it, reducing the amount of text in the last shape.
To undo the threading between two shapes:
Select the objects:
Execute the Type > Threaded Text > Release Selection command.
To remove the text thread among shapes:
Select the objects.
Execute the Type > Threaded Text> Remove Threading command. Ai will just remove the threading links among the shapes, but the shapes with their text will remain.
Editing Text Objects
This section focuses on editing text containers and those character and paragraph properties that are related to using Point Text and Area Text.
Example showing a Text Frame's Fill Color Changed to Orange
Edit Area Text Containers
To change the properties of the Text Frame in Adobe Illustrator:
With the Direct Selection tool, hover over the container's border until you see the cursor display a small black box under its arrow.
Click to Direct Select the container.
In the Appearance panel, select the fill (to target the object's interior) or the stroke (to target the object's border).
Change the fill or stroke color, the line weight, or add an effect.
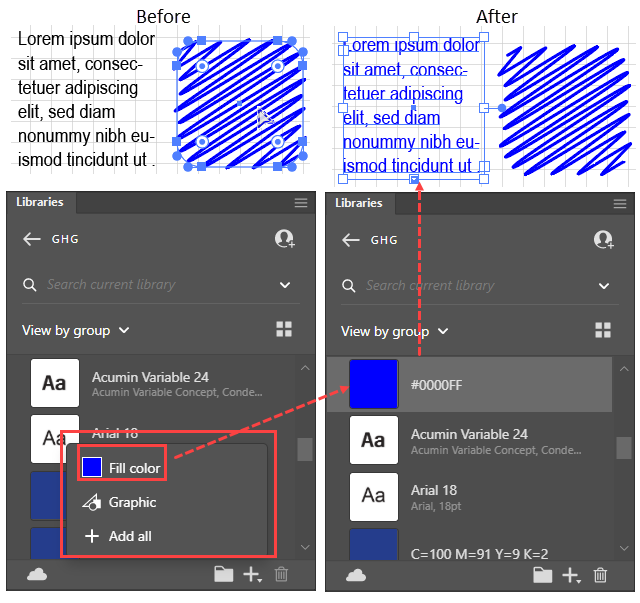
Copy Text Color from a Related Object
Example showing that you can copy the color from an object's fill and past it to color some text.
Direct Select the other object.
Go to the Window > Libraries panel and click the plus (+) icon, and then from the menu that pops up, click the Fill Color icon to add it as a swatch to the Library panel.
Select or Direct Select the Text Frame.
In the Library panel, click the newly added swatch. Ai will change the text color to the swatch color.
Area Type Dialog
Change Area Text Properties
You can change several properties of Area Type easily and precisely via the Area Text Options dialog. For any property you simply:
Select the Area Text object.
Go to Type > Area Type Options. Ai will display the Area Type Options dialog box.
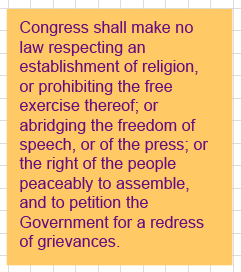
Add Margin to an Area Text Frame
Example of a Text Frame with Margins
To add margin around the Text inside of a Text Frame or other Area Type container in Adobe Illustrator:
Select the Area Text object.
Execute the Type > Area Type Options command. Ai will display the Area Type Options dialog box.
Update the Insert Spacing field and click OK.
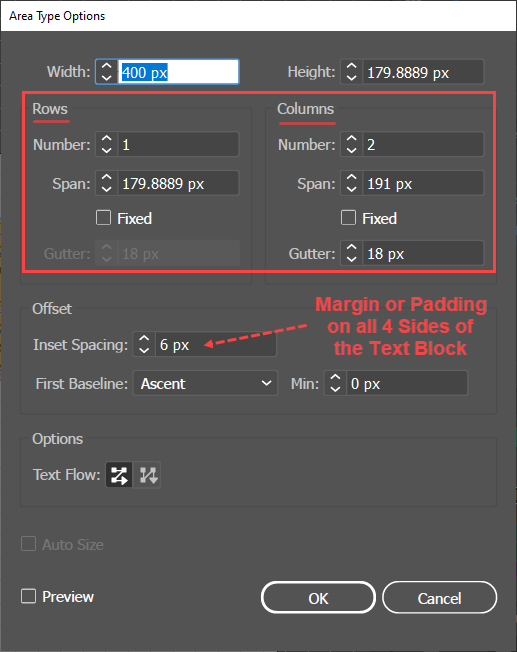
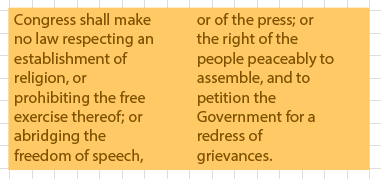
Area Text with Multiple Rows or Columns
Example of a Two Column Text Frame.
To create an Area text container that has several rows or columns, use the Area Type Options dialog box in Adobe Illustrator:
Select the Area Text object.
Go to Type > Area Type Options. Ai will display the Area Type Options dialog box.
Go to the Rows and Columns areas of the dialog box and update the fields for:
Number of rows or columns,
Span (i.e., Width) of the rows or columns, or
Fixed checkbox. If you select Fixed, the rows or columns retain a fixed width (but may increase in number). If you select Fixed, the row or column widths will scale with the Area object container.
Changing Uncommon Character Properties
Assuming that the reader is familiar with using the common character properties, this section provides some how-to articles about a few useful but less frequently used character properties and techniques.
Example of Hanging Punctuation
Hanging Punctuation
Hanging punctuation is end-of-line punctuation that hangs out of the Text Frame into the margin. When you use flush-right or justify-all-lines paragraph justification, you can use hanging punctuation to ensure that all the characters in the right column are aligned and free from the dents that would be created by dashes, periods, etc. To specify hanging punctuation for the last word in a paragraph in Adobe Illustrator:
Place the Type tool in the paragraph that you want to end with hanging punctuation.
Triple-click to select the entire paragraph (Ctrl + Shift > down-arrow) that contains the cursor.
Go to the Paragraph panel, click the dropdown menu, and choose Roman Hanging Punctuation. Ai will now allow you to position the punctuation outside the bounding box.
Edit the characters to ensure that the punctuation moves outside the bounding box.
Change Kerning
Kerning is an adjustment to the normal amount of space between specific pairs of characters. For example, the space between an "A" and a "V" can look abnormally large. In this case a font designer would want to reduce the space between these two characters so that they do not look odd. Font designers specify such custom spacing adjustments between specific characters (kerning pairs) in the files that define the font. In the Character panel, you can make additional adjustments. The options are:
Auto: the kerning pairs specified in the font.
Optical: An adjustment value that is based on Illustrator's estimate of the spacing that would be most pleasing to the observer.
Metrics – Roman Only: A manually entered positive or negative integer that increases or decreases the space by the corresponding number (thousandths of an inch - not applicable to double-byte characters, such as those used in Japanese, or Chinese.
To change the kerning between two characters in Adobe Illustrator:
With the Type tool active, place the cursor between two characters.
In the Character panel, click the Kerning (V/A) icon, and select or enter a value.
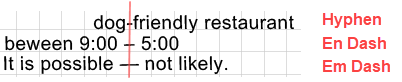
Insert an em dash or en dash
To insert an en dash or an em dash, as opposed to a normal hyphen character in Adobe Illustrator:
Type > Insert Special Character > Hyphens and Dashes
Select Em Dash (Alt + Shift + -) or En Dash (Alt + -).
Visual definition of Hyphens vs. En Dashes vs. Em Dashes
Hyphens are used in compound words such as "dog-friendly restaurant".
En Dashes are used in time ranges (e.g., between 9:00 - 5:00) and in compound phrases with more than two components or with capitalized elements.
Em Dashes are used for parenthetical statements where you want to signal a longer pause than would be implied by parentheses.
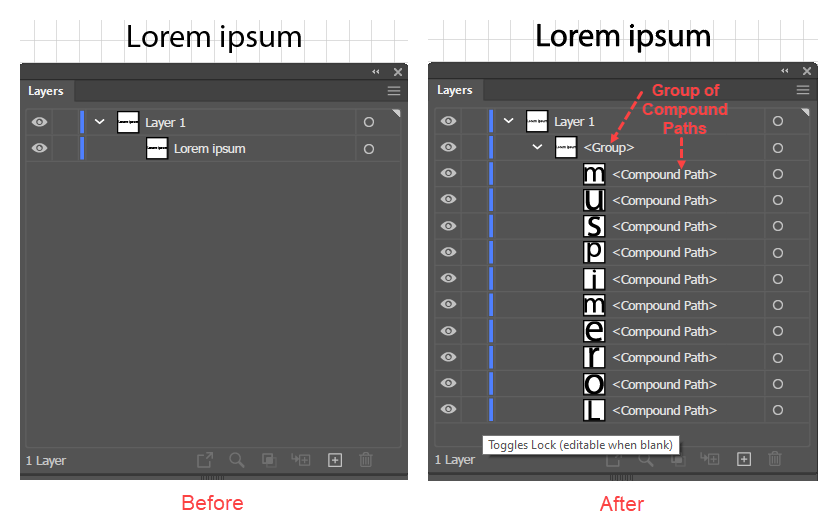
Result in the Layers panel of converting Text to a Group of Paths using the Type > Create Outlines command.
Convert Text to Paths
Converting text to paths has two advantages:
You get direct access to each character's Anchor Points and Control Handles so that you can edit them as you would any other paths.
The user does not need to have the font.
The disadvantage of converting text to paths is that the type is no longer editable with the Type tool.
To convert text characters to paths in Adobe Illustrator:
Select the text.
Execute the Type > Create Outlines (Ctrl + shift + o) command. This creates a Group of Compound Paths that have (A) no stroke, and (B) a fill of the same color as the text. You can now, Ungroup the paths and either (A) change a character path's fill or stroke, or (B) access a path's Anchor Points and Control Handles to modify its shape.
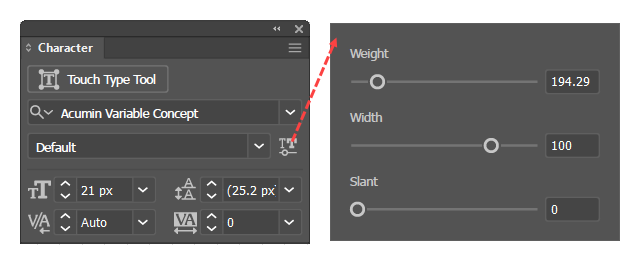
Using Variable Font
Setting Variable Font Properties
Variable Fonts enable you to set the value of text characters' width, height, or slant, attributes in very small, fractional increments.
To use Variable Fonts in Adobe Illustrator:
Select the Area Text.
In the Character panel, select a Variable Font type, such as Acumin.
Click the Variable Font button. Ai will display a panel of sliders that allow you to specify the character weight, height, or slant and to see the result in real time. Real time update is useful, for example, when you want to visually fit the width of text to the dimensions of a container.
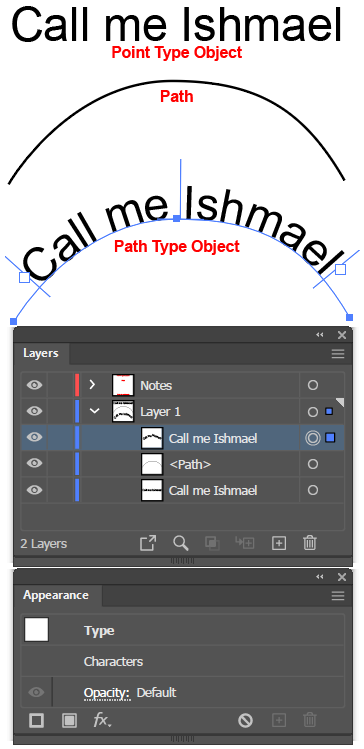
Text on a Path
Path Type object made up of the Path, the Text Frame, and the Text Block,
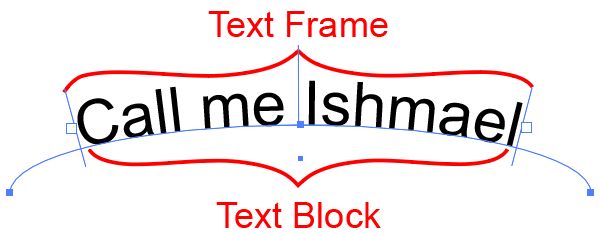
In addition to a Point Type object and an Area Type object, Ai provides a Path Type object, which allows you to attach editable text to a previously created path. A Path Type object is made up of the Path, the Text Frame, and the Text Block, as shown in the accompanying illustration.
Putting editable text on a path is easy, but positioning text along a path is a bit trickier because the Text Frame has two types of controls: Positioning Lines and Ports:
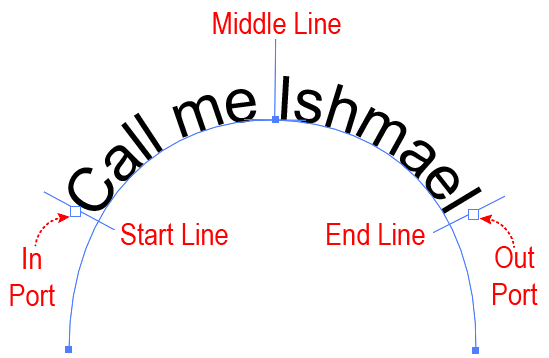
Path Type object controls: 3 Positioning Lines and 2 Ports
Positioning Lines. The three positioning lines, the (Start Line, Middle Line, and End Line), which stick up perpendicular to the path, allow you to adjust the beginning, middle and ending position of the Text Block on the path.
Ports. Like Area Type objects, Path Type objects have an In Port, and an Out Port, that allows you to create threaded text that flows among Path Type objects or among Path Type and Area Type objects.
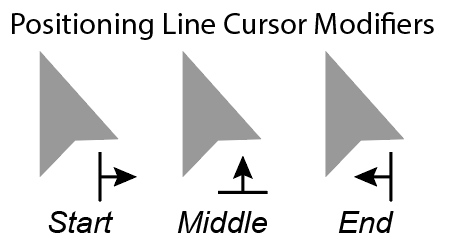
To position the text along the line, you must grab the Positioning Lines (not the Ports). You can tell that you are correctly targeting a Positioning line when you see a change in the cursor's modifiers, which are illustrated in the accompanying figure.
Cursor modifiers that confirm that you have targeted the correct Path Positioning Line.
The tricky bit is that the Ports or the text can obscure the Positioning Lines, and the positioning Lines do not always stay a uniform size relative to the text. If that happens, you can simply zoom in on the text until you can see the Lines clearly and hover over them. Zooming works because the Lines scale as you zoom in or out, but the Ports stay approximately the same size.
The Positioning Lines work as follows:
Dragging the Start Line moves the starting position of the text left or right. As you drag, the End line remains fixed, but the Middle Line will remain at the middle of the distance between the Start Line and the End line. Thus dragging the Start line increases, or decreases the space available for the Text Block and could make the Frame too small to accommodate all the text.
Dragging the Middle Line left or right moves the text, the Start line, the End line, the In Port, and the Out Port, as a block along the path. Dragging the Middle Line down, across the path, flips the text to the opposite side of the path.
Dragging the End Line moves the end boundary of the Frame. The Start Line remains fixed, and the Middle Line moves so that it is always at the center.
Note that moving the Start Line or the End Line into their proper positions may not leave enough room for the entire Text Block. In that event, the Out Port will display a plus sign to show that there is a "text overflow." If that happens, you can modify the path or thread the text to another path or shape. To create threading, you simply select the paths or shapes through which you want the Text Block to flow and then execute the Type > Threaded Text > Create command.
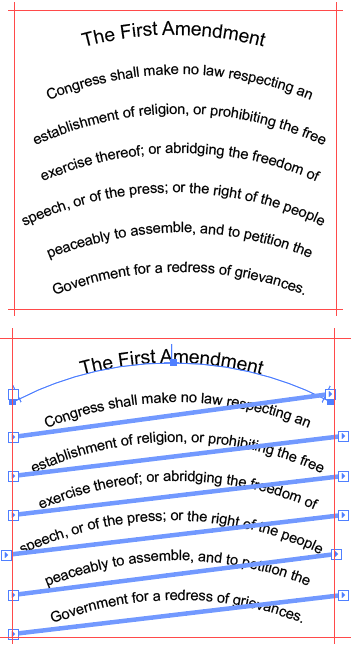
Ai also provides a shortcut. If you click on the Out Port's plus sign, Ai will create another copy of the path and place the overflow text on the new copy, threading the Text Block among the two paths. The accompanying figure illustrates a scenario where this process has been repeated several times.
Add Text to a Path
The original text and path, and the resulting Path Text object, as represented on the Artboard and in the Layers and Appearance panels.
To create a Path Type object and add text to a path in Adobe Illustrator:
Select the target path, the one on which you want to put the text.
Optionally, set the text formatting properties in the Character panel, or Paragraph panel.
Get the Type on a Path tool (), which is under the Type tool. When you hover over the target path Ai will show an I-beam cursor with a curved-path modifier symbol.
With the modified I-beam cursor, click on the path. Ai will:
Add Lorem ipsum, placeholder text to the Path.
Remove the path's Fill and Stroke attributes.
Combine the Path and the Text into a single Path Type object, which Ai will represent in the Layers panel as a snippet of text.
Replace the Lorem ipsum text with text that you type or with text that you have previously saved to the clipboard. The Layers panel will display the Path Type object as a snippet of the replacement text, and will indicate that the object has been selected and targeted. The Appearance panel will show that the targeted object is a Type object that contains Characters. You can double-click on the "Characters" notation to select the Text Block for editing.
Optionally, while the new object is still targeted, change the settings in the Character panel or in the Paragraph panel.
Position Text on a Path
To position text on a path in Adobe Illustrator:
Get the Selection tool (not the Type on a Path tool) and click on the Text Block (not on the path). Ai will display the Path Type object, which is made up of:
The Start, Center, and End positioning lines.
The In and Out Ports, which for purposes of positioning the Text Block, you can ignore, unless the text block does not fit in the Text Frame. If the Text Block does not fit, you may (as described below) either try to expand the Frame or implement threading.
Cursor modifiers that confirm that you have targeted the correct Text on a Path Positioning Line.
Position the Start Line:
With the Selection tool, hover over the Start Line until the cursor changes from the normal Selection cursor to one that looks like a line with an arrow pointing to the right.
Drag the line to approximately where you want the Text Block to start (the In Port will follow it).
Position the End Line:
With the Selection tool, hover over the End Line until the cursor changes from the normal Selection cursor to one that looks like a line with an arrow pointing to the left.
Drag the line to the end of the Text Block (the Out Port will follow it).
Position the Text Block:
With the Selection tool, hover over the Middle positioning line until the cursor changes from the normal Selection cursor to one that looks like a line with an arrow pointing upward.
Drag the center line so that the Text Block is positioned as you like. When you drag the Center line, Ai will move both the Start Line and the End Line along with it.
Edit Text on a Path
To edit a Path Text object in Adobe Illustrator:
On the Artboard, Triple-click on the Text Block. Ai will:
Highlight the Text block to show that you can now edit the text in the usual way and can update its properties in the Character panel and in the Paragraph panel.
In the Layers panel, Select and Target the entire Path Type object.
In the Appearance panel, click on the Characters row, to open it so that you can change the text's color, size, or opacity.
Format Text on a Path
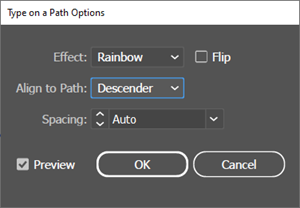
Type on a Path Dialog and its Options
Ai provides four options for formatting Text on a Path. You can access all of them from the Type on a Path Options dialog.
To format Text on a Path in Adobe Illustrator:
With the Selection tool active, click once on the Type Block to select the Path Type object (if it is selected properly, you should be able to see the Text Frame controls).
Execute the Type > Type on a Path > Type on a Path Options command. Ai will launch the Type on a Path Options dialog.
Check the Preview checkbox.
Modify any of the four options in the dialog. Each option (Effect, Flip, Align to Path, and Spacing) is described below.
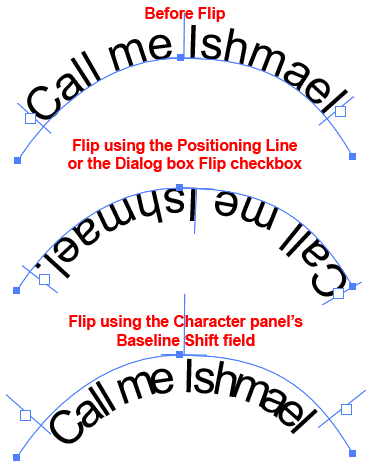
Flip Text
Result of flipping Text on a Path with the Center Positioning Line, or the Dialog box's Flip checkbox, versus using the Character panel's Baseline Shift parameter
There are three ways to flip the Text Block perpendicularly across the path: (A) via the Center Positioning Line, (B) via the Type on a Path dialog box, or (C) via the Character panel's Baseline Shift parameter. The Positioning Line method and the dialog box method, not only flip the text, but also reverse its direction. To flip the text without reversing its direction, use the Character panel's Baseline Shift method.
To Flip Text in Adobe Illustrator do any of the following:
Flip Text using the Positioning Line
Select the Path Type object.
Grab the Center Positioning Line and drag it across the path. Ai will flip the text across the path and reverse its direction.
Flip Text using the Type on a Path Options dialog
Select the Path Type object.
Access the Type on a Path dialog box (Type > Type on a Path > Type), check the Preview checkbox and then check the Flip checkbox. Ai will flip the text across the path and reverse its direction.
Flip Text using the Character panel Baseline Shift parameter:
Select the Path Type object.
Go to the Character panel, place the cursor in the Baseline Shift field, and press either the up-arrow or down-arrow key to move the base line to the opposite side of the path. Ai will flip the text across the path, but will not reverse its direction.
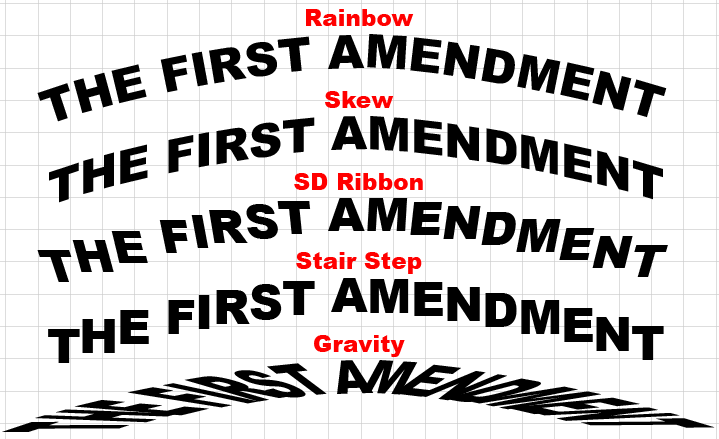
Effect
The 5 types of Effects that you can apply to Type on a Path.
You cannot apply effects from the Effects menu to Path Type objects. You must use the Type on a Path Options dialog.
To apply effects to text on a path in Adobe Illustrator:
Select the Path Type object.
Access the Type on a Path dialog box (Type > Type on a Path > Type), and check its Preview checkbox.
Open the Effect dropdown and select one of the Effects shown in the accompanying figure.
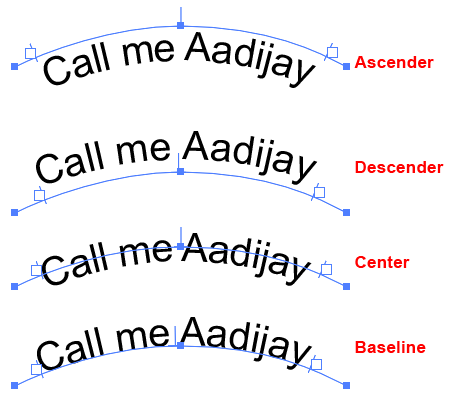
Align
Options for aligning font characteristics relative to the path along which Text on a Path flows.
Alignment of Text on a Path refers to how the font's vertical architecture features (Ascender line, Descender line, Center line and Base line) are positioned vertically on the path.
To align Text on a Path verticallyin Adobe Illustrator:
Select the Path Type object.
Access the Type on a Path dialog box and check its Preview checkbox.
Open the Align to Path dropdown and select one of the preset options shown in the accompanying figure. Alternatively, you can go to the Character panel, place the cursor in the Baseline Shift field, and press either the up-arrow or down-arrow key to shift how the font's base line sits vertically on the path.
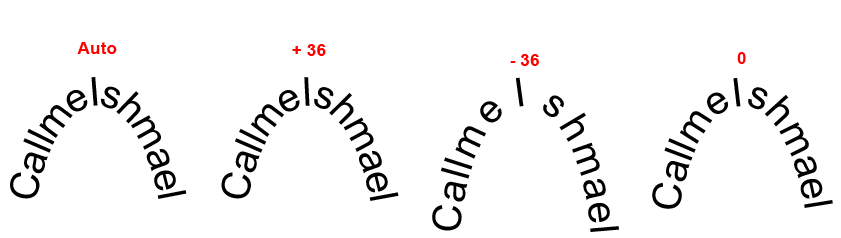
Spacing
Examples of Text on a Path Character Spacing Options
If text on a path goes around a sharp bend, the characters may look "gap toothed." You can fix this by adjusting the spacing.
To adjust the spacing of Text on a Path in Adobe Illustrator:
Select the Path Type object.
Access the Type on a Path dialog box and check its Preview checkbox.
Open the Spacing dropdown and select one of the preset options shown. Alternatively, place the cursor in the field, and press either the up-arrow or down-arrow key to adjust the spacing. The accompanying figure shows four illustrative settings.
Thread Text among Several Copies of a Path
Text on a Path threaded among several copies of the same path. Top image shows the result. Bottom image shows the result Selected in order to expose the paths and the threading lines.
To distribute a single block of text among multiple copies of a path in Adobe Illustrator:
Draw the path and make copies (e.g. Click + Alt + Drag on the draw path to create a copy and then press Ctrl + d several times to create multiple copies).
Add the text to the first copy. Note that its Out Port has a plus sign (+) indicating that there is overflow text.
Select all the copies of the path, including the first one with the text.
Execute the Type > Threaded Text > Create command. Ai will thread the Text among the paths.
Position the text as described above.
Thread Text from Paths to Shapes
To thread text among paths and shapes in Adobe Illustrator:
Draw the paths and shapes that you want to contain the text.
Add the text to the first path. Note that its Out Port has a plus sign (+) indicating that there is overflow text.
Select the path and all the shapes.
Execute the Type > Threaded Text > Create command. Ai will thread the Text among the paths.
Position the text as described above.
Undo Threading
Ai provides two commands to undo threading: Release Selection and Remove Threading.
The Releasing Selection command makes the text roll back up into the object at the beginning of the thread. That is, the first object will again show a plus sign, indicating that it has overflow text, and the objects that were formerly part of the thread will be present, but empty.
The Remove Threading command leaves the text in the objects to which it was threaded, but removes the threading links, so that if you add or remove text from one of the objects, the updates will not cause the text in other objects to re flow.
To Release or Remove Threading in Adobe Illustrator:
Select the Path Type object.
Execute either the Type > Threaded Text > Release Selection command or the Type > Threaded Text > Remove Threading command.
 ).
).