Adobe Illustrator Smart Notes


 How It Works Sections    How-To Articles     Definitions    Menu Options  

Live Paint

Overview

Illustration of Coloring Paths versus Coloring regions (called Faces)
Coloring Paths versus Coloring the regions (called Faces) that are created by the intersection of the paths

You use the Live Paint Bucket Tool when you have overlapping closed (or nearly closed) paths and you want to color, not the paths themselves, but the regions (called Faces) that are created by the intersection of the paths.

To use the tool effectively, before you begin, you will probably want to go to the Swatches panel and create a Swatch Group. A Swatch Group is useful because the Live Paint Bucket tool has a Cursor Swatch Preview widget that shows you the current color with which the tool will paint and makes it easy to switch colors without leaving the tool. However the widget is useful only if you have defined a Swatch Group of a manageable size to function as a palette for the coloring.

Screen shot of the Live Paint Group's Bounding Box
Live Paint Group Bounding Box

Before you can color with the tool, you must first create a Live Paint Group, which is a Group-like container with the special property that the Live Paint Bucket tool works only with objects that are inside the Group. You can tell that there is a Live Paint Group and which objects are in it by (A) observing that in the Layers panel the container has the default name "Live Paint," or (B) by noticing that when you Select any path that is inside of a Live Paint Group, Ai will place a bounding box around all the items in the group and the Bounding Box will have controls with Xs inside them. You can create a Live Paint Group in two ways:

  • Select the overlapping paths that you want to color, and then either execute the Object > Live Paint > Make command, or.
  • Screen shot of Live Paint Tool button
    Live Paint Bucket Tool Under the Shape Builder Tool
    Select the overlapping paths that you want to color, then get the Live Paint Bucket tool and click once on one of the Selected items.

When you create a Live Paint Group, Ai will:

  1. Illustration of Faces and Edges exposed by the Live Paint tool.
    Faces and Edges
    Analyze the Groups path's with their overlapping areas into distinct non-overlapping regions that together include everything that is inside of the Live Paint Group. Technically, Ai looks for edges and faces. An edge is a path that does not intersect any other path. A face is a closed area bounded by edges, but is undivided internally by an edge.
  2. Break the objects overlapping regions into disjoint Face Objects and Edge Objects. You cannot see these objects in the Layers panel, but on the Artboard you can target their Fills and Strokes for coloring as illustrated in the Live Paint Bucket Options article:
    1. When you hover over a face object, Ai will switch to a Paint Bucket shaped cursor and will highlight the face boundaries with a thick line.
    2. When you hover over an edge object, Ai will switch to a paint brush shaped cursor and highlight the edges with a thin line.
Screen shot of the Live Paint Bucket Cursor
Live Paint Bucket Cursor
Now you can color the Object's fills or strokes by changing the current color, and then, on the artboard, clicking on the faces or edges to which you want to apply the color with the Live Paint Bucket tool.

However, keep in mind that, while you can apply fills and strokes to Face Objects, they are not real paths, and you cannot do many of the things that you might expect to be able to do. For example, you cannot change their opacity, apply effects, transform them, or combine them. See the Illustrator documentation for a list of the Live Paint limitations.

Live Paint Commands

The Object > Live Paint menu provides the commands that allow you to do the following:

  • Make. Create a Live Paint Group, as described above.
  • Merge. Add paths to a Live Paint Group, or merge several Live Paint Groups into one.
  • Release. Undo the process of creating (making) a Live Paint Group.
  • Gap Options. Launch a dialog box that allows you to set the options that control how Ai will deal with paths that contain gaps and so are nearly, but not completely closed. Ai can detect gaps and with the dialog, you can tell Ai to ignore or close gaps.
  • Expand. Convert the contents of a Live Paint Group into simple paths.

Live Paint Bucket Options

Illustration of Targeting Fills and Strokes for Coloring with the Live Paint Bucket tool.
Targeting Fills and Strokes of Face and Edge Objects for Coloring with the Live Paint Bucket tool.

Before you begin using the Live Paint Bucket tool, you may want to set its options. To do that, double-click the Live Paint Bucket tool. Ai will launch the Live Paint Bucket Options dialog. In the dialog, update any of the following Options:

  • The Paint Fills checkbox enables you to target and color a Face's Fill. When you mouse-over a the interior of a Face Object, Ai will:
    • Highlight the interior of the Face with a border that is defined by the Highlight area's Color and Width fields. This is illustrated in the Fill Targeted image in the accompanying figure.
    • Switch to the Fill coloring cursor .
  • The Paint Strokes checkbox enables you to target and color a Face's Stroke. When you mouse-over an Edge Object, Ai will:
    • Highlight the Edge's Stroke with the color that is defined in the Highlight area's Color field. This is illustrated in the Stroke Targeted image in the accompanying figure.
    • Switch to the Stroke coloring cursor .
  • The Cursor Swatch Preview checkbox enables the on-art widget that allows you to switch color Swatches without leaving the Live Paint tool.
  • The Highlight checkbox enables highlighting of targeted Face and Edge Objects Fills and Strokes.
  • The Color dropdown enables you to specify the Highlighting color.
  • The Width field allows you to specify the Width of the border that the tool displays when you mouse-over the interior of a Face Object to target its fill for coloring.

Using Live Paint

Paint with the Live Paint Tool

Example of a figure before and after coloring with the Live Paint tool

To use the Live Paint Bucket tool in Adobe Illustrator:

  1. Go to the Swatches Panel and define a Swatch Group. The Live Paint Bucket tool has a widget that makes it easy to switch colors without leaving the tool, but it is only useful if you define a Swatch Group to function as a palette for the coloring.
  2. In the Swatches Panel, go to the Swatch Group, and select a color. Ai will use this as the initial color setting of the Live Paint Bucket tool.
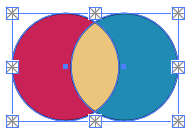
  3. Select all the overlapping shapes that you want to color.
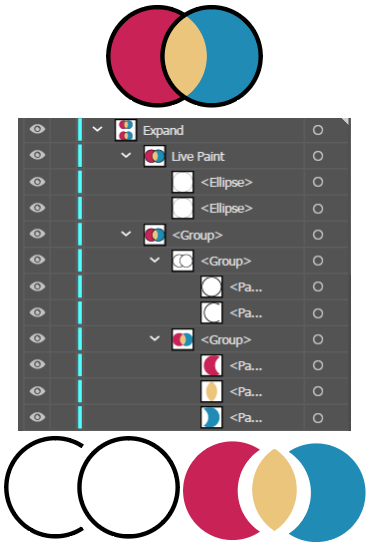
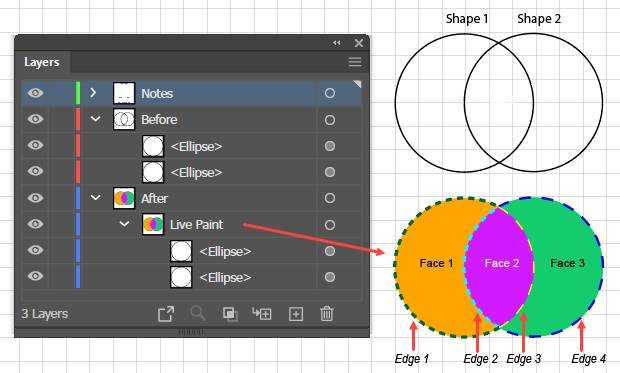
  4. Create the Live Paint Group by doing one of the following:
    1. Execute the Object > Live Paint > Make command.
    2. Get the Live Paint Bucket tool (k), and click once on an area of the selected overlapping shapes.
    Ai will create a Live Paint Group that contains the Selected paths, and in the Layers panel will give it the default name "Live Paint." On the Art Board, you will see that the newly created Group contains the items and that it has a distinctive Bounding Box that has controls with Xs inside them.
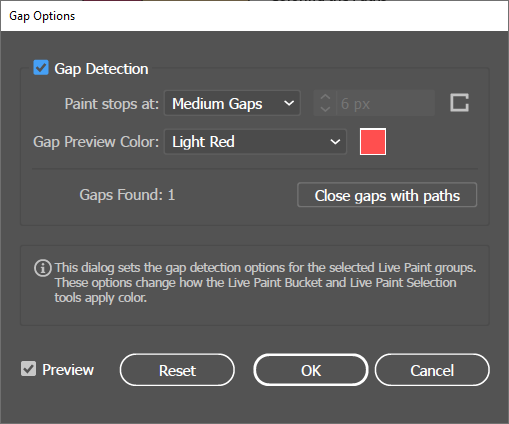
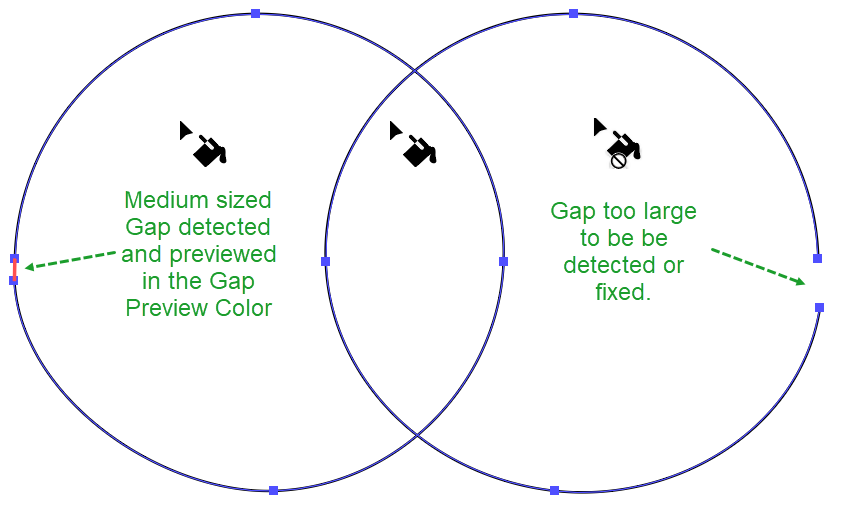
  5. Unless you are sure that the paths in your just created Live Paint Group check for gaps and manage them with the Gap Options dialog, as described below.
  6. Get the Live Paint Bucket tool (k) and begin to drag it over the Canvas. Provided that you have checked the Cursor Swatch Preview checkbox, Ai will display a Cursor Swatch Preview widget (Cursor Swatch Preview widget of the Live Paint tool) with 3 compartments that contain colors. The larger, center compartment is the active color, the one that the tool will use to color a face or edge that you click with the tool. This is the color that you selected in step 3b above. The compartment on the left is the previous color in the Color Group, and the right compartment is the next color in the Color Group. You can move forward or backward in the Color Group by clicking the left and right arrow keys respectively. Obviously, the widget is useful only to the extent that the Color Group is small and represents a meaningful color palette. If you have just entered the Canvas, but not yet moved the cursor over a Live Paint Group, you will see the Cursor Swatch Preview widget with the coloring prohibited cursor (Coloring Prohibited cursor of the Live Paint tool). As soon as you hover over a Live Paint Group, you will see the Cursor Swatch Preview widget with the coloring cursor (Coloring Cursor with the Cursor Swatch Preview of the Live Paint Bucket tool).
  7. You can now 
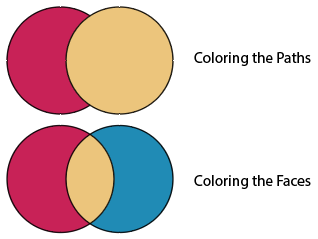
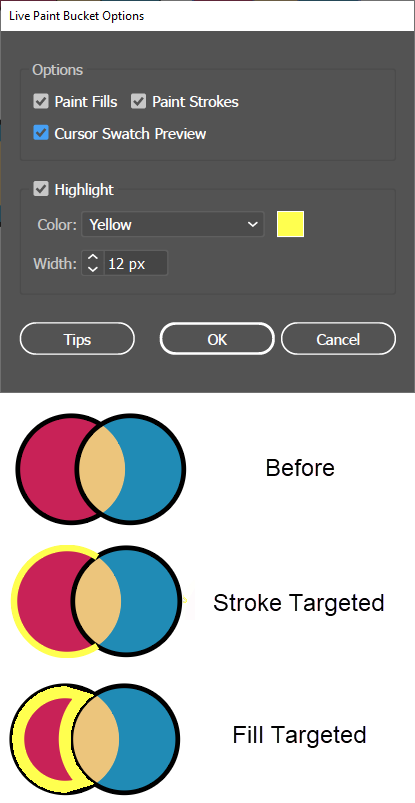
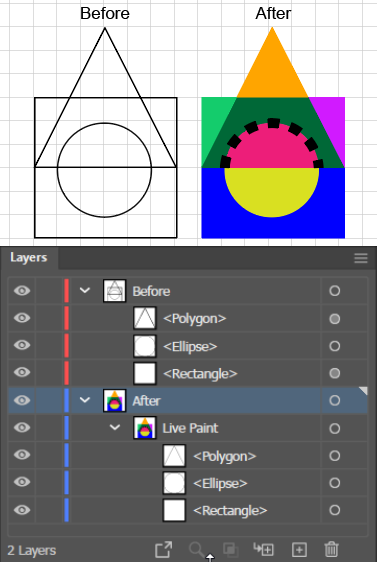
Color the faces and edges that you want to color by repeatedly doing the following:
    1. Go to the Appearance Panel and select a fill and a stroke color.
    2. With the tool, hover over a face or an edge. When you see the thick face highlight, or the thin edge highlight, click the tool. Ai will apply the fill or stroke color that you set in the Appearance panel.

Hint

You can also switch the current color to any other color on the Artboard. With a Live Paint group selected, press the Alt-key (Ai will switch to the Eyedropper cursor) and click on the color that you want to paint with.

Deal with Gaps in Live Paint Group Paths

Example of Gap Options Dialog with Preview and Gap Detection Checkboxes Checked.
Gap Options Dialog with Preview and Gap Detection Checkboxes Checked. The Dialog has detected 1 gap that is less than the Medium Gap setting (6 px).
To deal with gaps in Live Paint Group paths in Adobe Illustrator:
  1. With the Live Paint Group selected, execute the Object > Live Paint > Gap Options command. Ai will launch the Gap Options dialog.
  2. Check the Gap Detection checkbox.
  3. Go to the "Paint stops at" dropdown, click the down-pointing arrow, and choose a gap preset, or define a custom gap value. The Gap value specifies the largest gap in a path that Live Paint will ignore and still consider the path to be closed. When you paint a face that has a gap that is smaller than the Gap setting, the color will stop at the Gap (as if the end points were connected by a straight line.
  4. Illustration the 'Paint stops at' Option of Live Paint Group paths.
    Live Paint Group Selected but with Bounding Box turned off. The Gap Options dialog is set to Medium (6 px) So, the dialog detects one of the two Gaps. Click to see a larger version of this image.
    When you have checked the Gap Detection checkbox and have set the "Paint stops at" value, the Gap Options dialog will:
    1. Detect and display the number of gaps that are less than or equal to the specified Gap value in the Gaps Detected field.
    2. Show a preview of a line that connects the two ends of the detected Gaps. You can set the color of the preview line via the Gap Preview Color dropdown.
    If a Gap is too large to be detected, you cannot color it with the Live Paint Bucket tool. If you mouse over a Face with a too-large gap, Ai will display a version of the Live Paint cursor with a prohibition sign modifier, indicating that it cannot be colored.
  5. Screen shot of Live Paint Bucket Cursor with Prohibition Symbol
    Live Paint Bucket Cursor with Prohibition Symbol
    You can deal with detected gaps in two ways:
    1. Click the Close Gaps with Paths button. Ai will replace the preview line with a straight path segment that closes the path.
    2. With the Live Paint Bucket tool, simply color the Fill of the Face Object that contains the Gap. Ai will stop painting the Fill at the gap preview line.

Add Paths to a Live Paint Group

To add paths to a Live Paint group in Adobe Illustrator:

  1. Select the Live Paint group and the paths that you want to add to it.
  2. Execute the Object > Live Paint > Merge command. Ai will add the new paths to the group and if they form Faces, you can color them with the Live Paint tool.

Merge Live Paint Groups

To merge two or more Live Paint groups in Adobe Illustrator:

  1. Select the Live Paint groups that you want to merge.
  2. Execute the Object > Live Paint > Merge command. Ai will combine the Live Paint Groups into a single Live Paint Group.

Release a Live Paint Group

To undo a Live Paint group in Adobe Illustrator:

  1. Select the Live Paint group.
  2. Execute the Object > Live Paint > Release command.

Expand a Live Paint Group

Illustration of how to Expand a Live Paint Group.
Layers panel showing the result of Expanding a Live Paint Group. On top is the Live Paint Group. On the bottom is its Expanded version, which contains sub-groups for the strokes and fills. The bottom image shows the faces and edges, moved apart to illustrate that they are simple paths.

Expanding an object is a process of converting it into a collection of simple paths each of which can be edited with path editing tools.

To Expand a Live Paint group in Adobe Illustrator:

  1. Select the Live Paint group.
  2. Execute the Object > Live Paint > Expand command. Ai will convert the Live Paint group into a normal Group (usually with several sub-groups) that contain only simple paths.

Color Several Faces at Once

To Use the Live Paint Selection Tool to color several Faces at the same time in Adobe Illustrator:

  1. Go to the Live Paint Selection Tool (under the Shape Builder).
  2. Go to the Live Paint Group within which you want to paint and Shift + click with the Live Paint Selection Tool. Ai will display cross hatching in the selected Faces.
  3. Go to the Swatches Panel and click a Swatch. Ai will color all the selected Faces with the Swatch color.

Resources