Illustrator allows you to place raster (bit-oriented) images on a document's Artboard, manipulate them, and use its Live Trace facility to convert them into vector drawings.
Placing Images
How Placing an Image Works
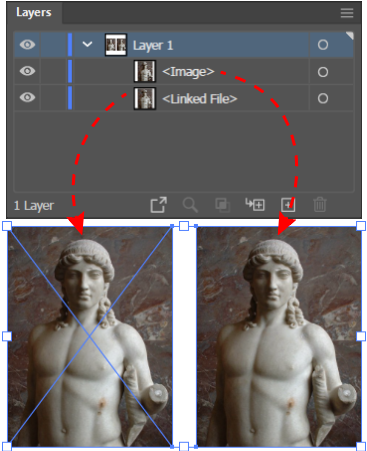
A Linked image (left) versus an Embedded image (right).
You can place images from many different types of raster files (including, not only PNGs and JPEGs, but also PSDs) onto an Illustrator document's Artboard, via the File > Place command. Illustrator presents the placed image on the Artboard inside a display object. The display object makes the image data into an Illustrator object and allows you to crop or transform it on the Artboard in the same way that you would any illustrator object. You can place image data in its display object in one of two ways, as a:
Linked Image, or an
Embedded Image.
When you place an image on the Artboard as a linked image, which is the default, Ai shows the image by means of a link) (i.e., a reference) to the external image file. The file remains separate from the document. In the Layers panel, a linked image appears as an object that Ai gives the default name Linked File.
The Links Panel
When you place an image file in Illustrator as an embedded image, Ai actually makes the image file part of the Illustrator document. In the Layers panel, an embedded image appears as an object that Ai gives the default name Image.
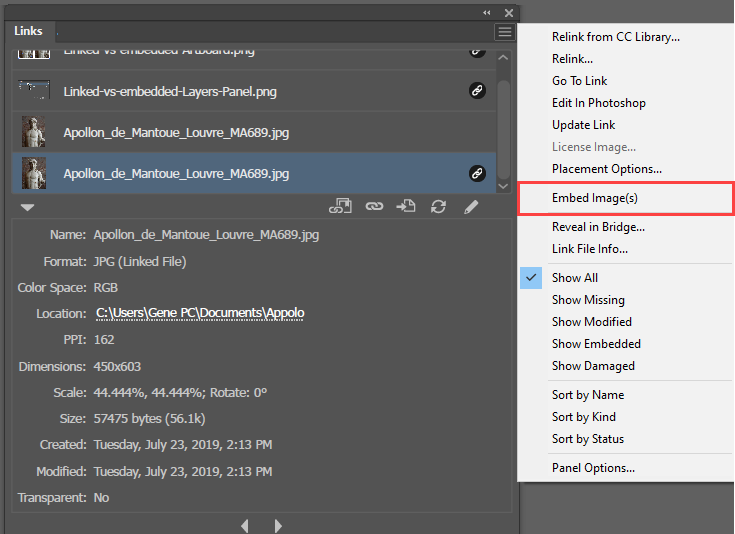
In either case, Illustrator's Links panel tracks the document's images. You can use the panel to select an individual image and manipulate it. Using the Embed command in the Window > Links panel flyout menu or the Embed buttons in the Control panel or in the Properties panel, you can convert a linked image into an embedded image.
Placing a Raster Image
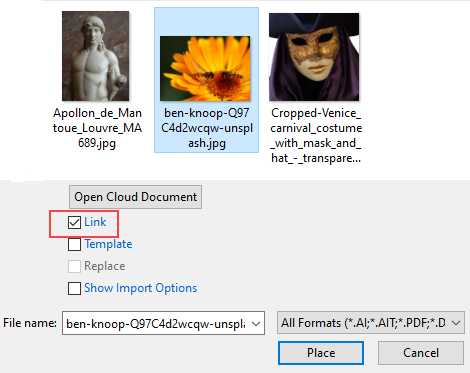
File Explorer Window for Placing an Image File
To place a raster image on the current Artboard. in Adobe Illustrator:
Execute the File > Place command (Ctrl + Shift + P). Ai will launch a File Explorer window, at the bottom of which is a bank of checkboxes. The Link checkbox is checked by default. Leave it checked to place the file as linked or uncheck to import the file as embedded.
In the window, select an image file and click Place.
In the Artboard, Ai will display a cursor with a thumbnail of the image.
With the cursor, drag out a rectangle until it is the size at which you want the image to display. When you release the cursor, Ai will place the image display object on the Artboard inside the space defined by the rectangle, and the object will then display the raster image data. The Layers panel will represent a linked image with the default name <Linked File> and an embedded image with the default name <Image>.
Manipulating Placed Images
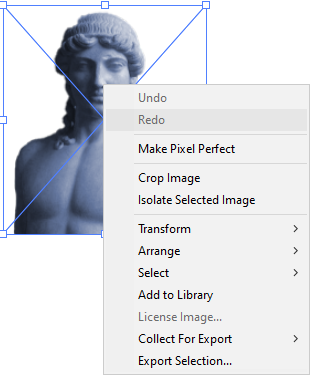
Flyout menu listing things that you can do with an Image Display object
Ai allows you to alter a linked or embedded image display object in some of the same ways as you would a vector object. Notably, you can crop, transform, and arrange an image display.
To manipulate an image display object in Adobe Illustrator:
Select the image display object on the Artboard or in the Layers panel.
Right-click the image. Ai will pop up a menu of commands for manipulating how the image is displayed.
Managing Images via the Links Panel
The four areas of the Links panel
The Links panel lists all the linked or embedded images that are displayed in the current document, monitors the status of the image objects that have linked files, and allows you to perform a number of image management tasks.
The panel includes:
A hamburger button that will display a fly-out menu from which you can executes commands on the target image.
A list of images showing the status of each image and from which you can target an image for inspection or management. Targeting images in the Links panel is not the same as selecting the image display object in the Layers panel, but the two are coordinated in the following way. When you Select an image on the screen or in the Layers panel, Ai automatically targets the image in the Links panel. However, targeting an image file in the Links panel does not Select the corresponding image display object in the Layers panel.
A row of icons, which represent a few of the most frequently used commands in the fly-out menu. These commands allow you to:
Relink from CC Library, i.e., relink to a member of the CC Library,
Relink a linked image to an external image file,
Go to Link i.e., select the object in the Layers panel and position the image in the center of the Artboard.
Update Link, i.e. refresh the link between the display object and the linked external file when the source image file has been changed).
Edit in Photoshop. Ai will invoke the editing software that the operating system has associated with the file extension of the external source file.
A File Info area that displays information that was imported to create the linked or embedded image display. You can show or hide this area using the arrow on the left side of the row of icons.
Updating a Link to a Modified File
If an image's source file has been modified so that the view on the Artboard is no longer accurate, the file's entry in the Links panel will display a Modified artwork icon.
To update the image that displays on the Artboard in Adobe Illustrator:
Target the image in the Links panel.
Click the hamburger menu to open the flyout menu and click the Update Link command. Ai will refresh the link and display the current version of the image on the Artboard.
Note: Ai will also display an informational message which you can click to refresh the image.
Fix a Broken Link
If the file to which an image has been linked is moved or deleted, Ai will display a Missing Link Icon .
To fix a broken link in Adobe Illustrator:
Target the image in the Links panel.
In the panel's row of icons, click the Relink button . Ai will open the same File Explorer window that you use to select a file to place on the Artboard.
In the window, select the file and click the Place button.
Edit a Linked Image's Source File
To edit the external source file to which an image is linked in Adobe Illustrator:
Target the image in the Links panel.
In the panel's row of icons, click the Edit Original button . Ai will invoke the editing software that the operating system has associated with the file extension of the external file. If the original linked image is editable in Photoshop, the tool tip for the button will say Edit in Photoshop.
Do the editing and save the file.
Note, to associate an editing program with a file:
Go to the Explorer window, and right-click the file, and Properties command. Ai will open the Properties dialog box.
In the dialog, click the "Change …" button. Ai will pop up a list of programs.
In the list, select a program, and then click OK. When you next double-click on the file in Windows Explorer, or edit the file via the Edit Original button in the Links panel, Windows will launch the editor program that you selected.
Tracing an Image with Live Trace
Live Trace Workflow
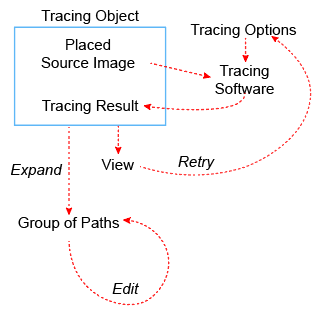
Image Tracing, converting a raster image into a vector drawing, is an iterative process of successive refinements. The architecture of Live Trace is designed to make iteration easy. For the first iteration, Ai uses a Source Image that you have Placed on the Artboard, plus Tracing Options (i.e., parameter values) that you provide in the Image Trace panel to generate a simulation of a vector drawing. Ai then stores the simulation, which is called a Tracing Result. along with the Source Image in a Tracing Object. Storing the simulated and the original image together makes it easy to retry subsequent iterations.
Ai also makes it easy for you to evaluate, the simulation relative to the original with its, View facility.
Finally, because the original is not destroyed or discarded, you can easily change the Tracing Options and generate a refined iteration of the simulation, i.e., the Tracing Result. Then when the Result has the look that you want, you can convert it into a vector drawing by executing the Object > Image Trace > Expand command. If Ai simply converted the Source Image and replaced it with vector drawing paths, you would have to start from scratch to create another iteration.
The flexibility of being able to easily try out several settings and Tracing Results before you commit to expanding the final version into a vector drawing is the advantage that warrants the name Live Trace.
While Ai is generating the Tracing Result, it will display Progress messages telling you that it is doing tasks such as the following:
Pixel Clustering, i.e., grouping the pixels of an image into similar areas based on color and luminosity. The more colors and gradations of luminosity you call for in the options settings the more areas Ai will generate and the larger the result will become.
Path Smoothing, i.e., grouping the clusters into smooth paths.
Curve Fitting, i.e., converting the smooth paths of clusters into anchor points and control handles.
Boundary Refinement, which enhances the area boundaries when using options that call for the Result to have appreciably fewer colors than the Source Image.
The View feature not only allows you to see the Result (i.e., to preview the appearance of the vector drawing), but also to see a preview of the path Outlines, and to view the Outlines superimposed on the Result or on the Source Image.
When you judge that the Tracing Result has the look that you want, invoke the Object > Image Trace > Expand command to convert it into vector paths which you can edit in the usual way. Alternatively, you can modify the paths with special features. For example, you can simplify the paths using the Object > Path > Simplify command, or you can recolor the paths using Live paint groups (Object> Live Paint > Make command).
Tracing an Image
Functional Layout of the Image Trace Panel
To trace an image in Adobe Illustrator:
Place the image that is to be traced on an AI art board (File > Place) as a Linked Image.
With the image still selected, open the Image Trace panel (Window > Image Trace).
Check the panel's Preview checkbox. As you adjust the settings, Ai will update the view of the result.
Set the options manually by selecting a Mode option and the other options that become available after you select the tracing Mode.
Optionally, set some of the Advanced Options.
Evaluate the adequacy of the Tracing Result using the View options and if necessary, revise the tracing options settings.
Hints:
To try out various settings for fields with numerical values in a panel, click inside the field, and tap the UP or DOWNarrow keys.
To Undo a traced image, execute the Object > Image Trace > Release command. Ai will scrap the Trace Object and leave just the placed image.
Setting Tracing Options via Presets
The result of using each of the 6 Preset buttons.
An Image Trace panel Preset is a named collection of Tracing Option settings that you can apply, as a group, with a single click. In the Tracing Panel you can apply presets via:
Preset Image Trace Icons: With one exception, the 6 icons at the top of the panel are simply the most frequently used presets in the Preset dropdown list. The exception is the first icon (Auto Color), which produces a Result that looks like poster art.
The Preset Image Trace dropdown list: This control displays the names of 12 groups of settings for the parameters that control the tracing process. When you select a preset name in the list, Ai automatically makes the settings and generates the Tracing Result Object, and shows the Tracing Result.
Note the Manage Presets button, at the right of the Preset dropdown. Clicking it, displays a flyout menu that allows you to save custom settings as a new preset.
Setting Tracing Options Manually
In the Image Trace panel, the Mode dropdown controls the process of setting the tracing options manually. In the dropdown, you first select one of the 3 ways (Color, Grayscale, or Black and White) that the tracing process can use to deal with color and luminosity. Ai responds by displaying one or two additional dropdowns the content of which depend on the Mode:
Color Mode: Tells Ai to preserve colors in the Result (i.e., the simulation of the final expanded tracing) and to use color information in defining its regions and paths. If you choose this option, Ai will display the Pallet dropdown list, in which you can tell Ai how you want it to derive the colors that it will use to colorize the tracing.
Palette: Tells Ai which of 4 methods you want it to use to derive the colors that it will use in the Result and to define its regions and paths. Ai will respond by displaying a Color field, the content of which depends on your selection of the Pallet:
Automatic: Let Ai determine what color information it needs to consider when deciding when it is necessary to create a new path in order to preserve good color fidelity in the Tracing Result. If you choose this option, Ai will present a Colors field (and slider) with which you can specify the color fidelity on a scale from 0 to 100. A value of 100 (the default) means that Ai will create a path for any region where the color changes in a significant way.
Limited: Tells Ai to consider at most 30 colors to determine when it is necessary to create a new path outline. When you choose this option, Ai will display a Colors field and slider that allow you to enter a value between 2 and 30. Choosing a smaller number will reduce the number of paths that Ai must create.
Full Tone: Tell Ai to consider some or all the available color information in the Source Image when deciding when it is necessary to define a path outline to preserve a patch of color. If you choose this option, Ai will display a Colors field (and slider) with which you can specify the color fidelity on a scale from 0 to 100, where 100 means consider all the color information in the Source Image.
Document Library: If you choose this option, Ai will display a Colors dropdown that allows you to select one of the document's Color Groups. When you select one Ai will consider only those colors in constructing paths.
Grayscale Mode: Convert all colors to shades of gray. When you choose this option, Ai will display a Grays field in which you can specify how many gradations of luminosity to use when deciding when it is necessary to create a path to preserve a region that represents a significantly different shade of gray.
Black and White Mode: Tells Ai to convert the entire Result into regions of either black or white pixels. If you select this option, Ai will display a Threshold field (and slider) on which you can select a value from, 1 (black) and 255 (white). The threshold value means that any pixel that is darker than the threshold value will get converted to black in the Result. Setting the threshold to 1 (black) means that only pixels with a value darker than black will get converted to black. Since there are no such pixels, the entire Result will be white. Setting the threshold to white (255) means that any pixels that are darker than white will get converted to black. Since all the pixels are darker than white, the entire Result will get converted to black.
Advanced Tracing Options
Whether you have set basic tracing options with presets or manually, you can use the following options to tell Ai how you want it to build specific features of the Result.
Paths: Specify if you want Ai to fit paths loosely or closely to the area contours.
Curves go to Corners: Specify the degree to which you prefer Ai to represent changes in the direction of contours with a smooth point or with a corner point.
Noise: Specify the size of a region, in pixels, within which you want Ai to ignore variation, i.e., consider it noise rather than information.
Method: Specify that when curve fitting, Ai should create only abutting paths (which may have gaps) or should create paths that may be stacked on top of one another (which minimizes gaps).
Create: Tell Ai to represent the areas that it detects only as Fills, only as Strokes, or both.
Stroke: Specify the maximum width of an area that Ai should convert into a stroked path.
Snap Curves to Lines: Tell Ai that when it is constructing paths and there is a choice of representing a contour as a straight line or a curve, you prefer that it use a straight line.
Ignore White: Tell Ai not to make a white background into a closed path with white fill.
Evaluate a Tracing Result
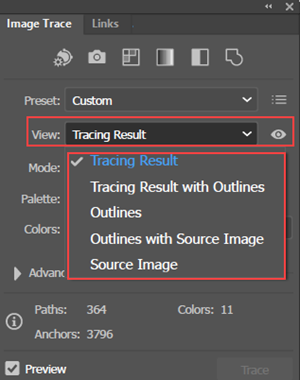
The 5 views of the result of a Trace that you can choose from in the Image Trace panel.
The View feature of the Image Trace panel helps you judge the adequacy of a particular iteration's tracing option settings by providing several comparative views of the Tracing Result (i.e., the simulation of the final expanded tracing).
To evaluate the Tracing Result in Adobe Illustrator:
Select the Tracing Object.
In the Tracing panel, go to the View dropdown list and select one (or usually a sequence of several) of the following:
The Tracing Result view and the Source Image view provide a before and after picture of the tracing. Alternatively, you can click the eye icon at the right of the dropdown to temporarily switch to viewing the Source Image.
The Tracing Result with Outlines view shows how well the path outlines will fit the contours of the Tracing Result.
The Outlines view shows a simulation of the path outlines that the tracing will generate when expanded.
The Outlines with Source view shows how well the path outlines will fit the contours of the Source Image.
Convert the Tracing Result into a Vector Drawing
To convert the tracing result into vector paths that you can edit in Adobe Illustrator:
Select the Tracing Object
Click the Expand button on the Control panel, the Properties panel, or the Object > Expand command. Ai will replace the Tracing Object with a Group of vector paths.
Optionally, with the object still selected simplify the paths by executing the Object > Path > Simplify command.
Optionally, ungroup the result (Object > Ungroup), so that you can more easily edit it.
Edit the Path Segments and Anchor points in the usual way.