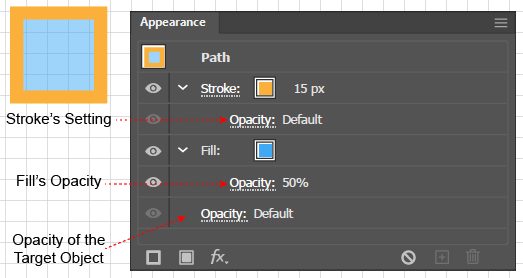
Appearance Panel for a Path with a Basic Appearance
In Illustrator, a path's structure (anchor points and control handles) is independent of its appearance. You control a path's appearance by giving it Appearance Attributes, i.e., Fills or Strokes, each of which may be modified by an Opacity setting and Effects. Without at least one fill or one stroke, a path is invisible when not selected.
You work with an object's Appearance Attributes via the Appearance panel. Each row in the panel represents one of the current path's Attributes or a modification of that Attribute, such as its Opacity (degree of transparency) or its Effects, which are additional features that can change the Attribute's basic Appearance.
The Appearance panel also provides controls that allow you to:
Add, change, or delete Attributes.
Change each Attributes' Opacity.
Give each Attribute one or more Effects.
Control the order in which attributes are rendered and how they interact with one another.
Layers and Appearance Panel Interaction
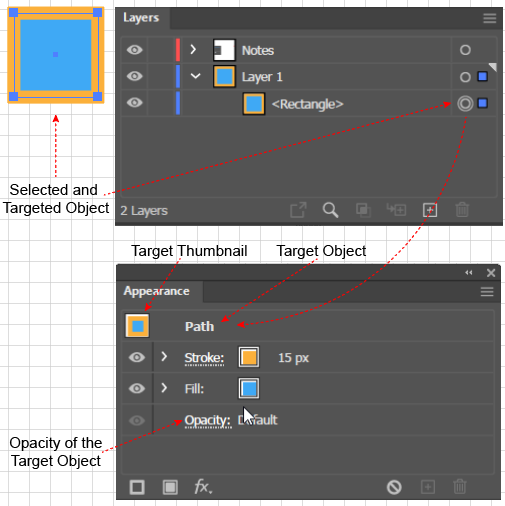
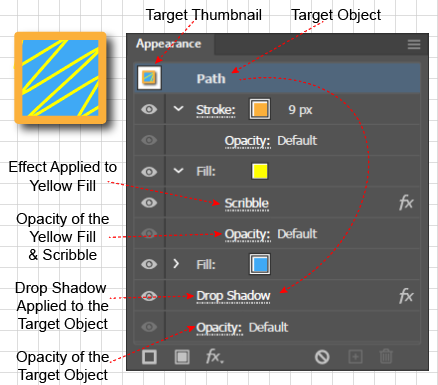
The Layers panel and the Appearance panel work together. When you select an object, in the Layers panel, Illustrator automatically Targets its Appearance, which makes the Appearance panel display its Attributes. The top row in the Appearance panel (the Target row) shows the type of object that is targeted, and the Target Thumbnail represents the entire Style, i.e., the entire set of Attributes that are displayed in the subsequent rows of the Appearance panel. You can actually drag the Target Thumbnail into the Graphic Styles panel to save the Target object's Style, so that you can reuse it to give other objects the same look.
Stacking of Appearance Attributes
A Single Line with Two Strokes and an Arrowhead
The ordering of the rows in the Appearance panel represents the Stacking Order of the appearances, i.e., the order in which Ai renders the Target Object's Appearance features (Attributes, Opacity Settings and Effects). In applying Appearance features, Illustrator works from the bottom of the Appearance Panel Stack to the top. So, if the row for feature B is on top of the row for feature A in the Stacking Order, Ai will render A before B, on the Artboard, B will appear to be on top of A, and if A and B overlap, B will obscure A.
The Stacking Order is particularly important because an object can have multiple fills and strokes.
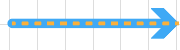
Open paths can have, not just one, but several strokes, and each stroke can have settings that for example, allow them to have different widths, to be solid versus dashed, to have different types of ends (caps), or to have arrowheads. The accompanying figure shows a line with a narrow orange dashed fill, a wide blue stroke, and an arrowhead. In the panel, the row representing the orange stroke is above the row representing the blue stroke. If the order were reversed, the blue stroke would obscure the dashed orange stroke.
Stroke Alignment and Stacking Order
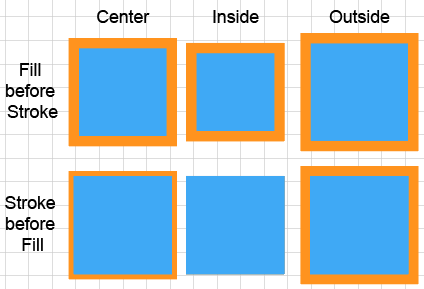
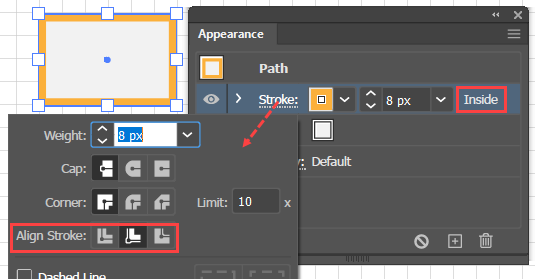
Closed paths can have both multiple strokes and multiple fills, and as illustrated in the first row of the "Stroke Alignment and Stacking Order" figure, closed path strokes can be aligned on the inside, on the center, or on the outside of a path.
By default, Ai places the row for a path's fill below its stroke, so that it renders the fill before the stroke. If Ai rendered the fill after the stroke (as illustrated in the second row of the "Stroke Alignment and Stacking Order" figure), the fill would cover up a stroke that was aligned inside the path and would hide half of a stroke that was aligned on the center of the path.
Path with Two Fills, a Solid fill and a Pattern fill
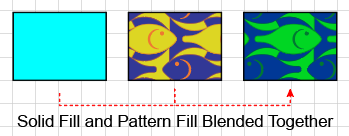
As the figure "Path with Two Fills..." illustrates the inside of a path may have one or more fills and each fill may be of a different type (solid, gradient, or pattern) or of a different color.
Furthermore, different fills may blend into one another in various ways. The figure "Multiple Fills with Blending" shows the left rectangle with a solid fill, the middle rectangle with a pattern fill, and the right rectangle with both fills. Note that the orange of the pattern fill is blending into the blue of the solid fill.
Multiple Fills with Blending
Appearance Attribute Opacity Settings
Appearance Attribute Opacity Settings
The entire currently targeted object (as represented by the Target Thumbnail) in the first row of the Appearance panel and each of the individual Appearance Attributes has an Opacity setting, which can make it appear fully transparent (0%), fully opaque (100%), or any degree of translucency between the two extremes.
When Illustrator paints an object's Appearance Attributes, it starts at the bottom of the Appearance panel and applies each attribute in turn. Therefore, the panel represents each individual Attribute's Opacity setting by a slightly indented row that is directly below the Attribute's row, signifying that Ai first sets the opacity and then paints the Attribute (e.g., a Fill or a Stroke). However, since most Attributes will typically be 100% opaque, by default, Ai hides the Opacity setting so that you must click the row's disclosure triangle to show the Opacity.
There is one apparent exception, the bottom row of the appearance panel is always visible and represents the Opacity setting of the entire Target Object. However, this placement is consistent with the way in which the panel represents the order in which Ai renders the Appearances and their settings. That is, the first thing that Ai must do is to set the Opacity of the entire Target Object, after which it then sets the Opacity of the individual attributes as it works its way up the stack of appearances in the panel.
How the Appearance Panel Represented an Effect
Effects
Effects (also called Live Effects) are super-appearance-features that allow you to modify the appearance of an entire object or just one of its appearance attributes via programs that can, do things as simple as adding a drop shadow or as complex as making a path appear three dimensional. You can apply Effects via either the Effect menu, or via the popup menu that displays when you click the fx icon at the bottom of the Appearance panel.
You can apply Effects to:
An entire object, including groups and layers, or
A single appearance (fill or stroke) attribute of an object.
To apply an Effect:
In the Appearance panel, target the entire object by clicking the top (Target) row or clicking an appearance attribute (e.g., the fill or stroke that you want to modify by clicking its row in the Appearance panel.
Click the fx icon at the bottom of the Appearance panel. Ai will pop up a long menu listing the various types of effects.
Select the effect. Ai will display a menu that allows you to set the parameters for the effect.
Set the parameters and click OK. Ai will add an fx row below the appearance to which the effect was applied to signal that it has been modified.
An applied effect remains "live" in the sense that:
The effect remains intact when you edit the path.
You can double-click the Effect's row in the Appearance panel to modify the effect's setting.
It is reversible.
You can Expand the effect to convert it into Basic paths.
Targeting vs Selecting in the Layers Panel
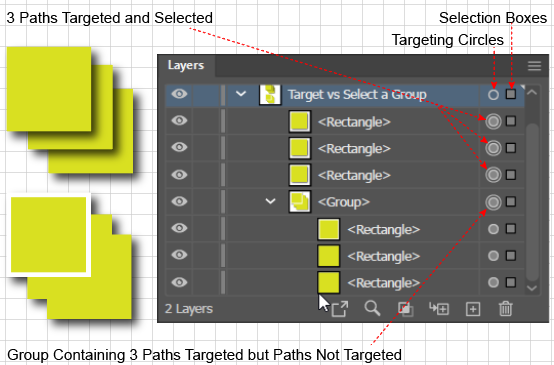
Targeting vs. Selection in the Layers panel
Selecting an object is different from targeting its appearance. In the Layers panel, you can either select an object or target its appearance or both. Each object's row in the Layers panel has both a Selection Box for selecting it (so that you can change its structure) and a Targeting Circle for targeting it (so that you can change Attributes in the Appearance panel). This distinction is not important in most cases because of an Illustrator feature called Smart Targeting, which guesses what you intend to do and in most cases saves you the trouble of having to click both the Target Circle and the Selection box each time you want to make an update. For example, when you Select a path, Ai's Smart Targeting will also target it automatically.
However, when working with a container, the distinction between Selecting and Targeting in the Layers panel is not trivial. When you want to apply an Appearance attribute to a container such as a Group, you must be aware of the difference, in order to understand how the attribute is going to look.
The "Targeting vs. Selection" figure shows an example, of a Layer that contains 3 paths and also a Group that contains 3 identical paths. If you Select the 3 paths on the Artboard, Ai will both Select and Target each of them. However, if you select the Group on the Artboard, Ai Selects the 3 paths but does not Target them. If you apply a drop shadow when the 3 paths are Targeted (top of the figure), each path gets a drop shadow. If you apply a drop shadow when only the Group is Targeted (bottom of the figure), the group gets the drop shadow.
Basic vs Complex Appearance
A path with only one fill or one stroke is said to have a Basic Appearance. However, Illustrator provides other features that go well beyond a Basic Appearance. Any of the following actions will create a path with a Complex Appearance:
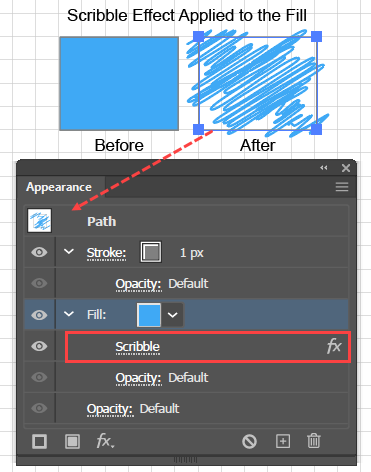
Effects are Applied to Appearance Attributes
Add extra fills or strokes so that there are two or more, by using the Add New Fill or Add New Stroke buttons at the bottom left of the Appearance panel.
Apply a Live Effect. An Illustrator Effect is a feature that allows you to further modify the appearance of an Appearance Attribute while it remains editable. You can apply Effects by clicking the fx icon at the bottom of the Appearance panel and selecting an Appearance from a pop-up menu. Thereafter, the Attribute's row in the panel will have an fx icon to signal that it has an Effect applied to it and to allow you to modify the Appearance by clicking the fx icon.
Add an arrowhead to an open path.
Apply a Width (or Width Profile) to a Stroke.
Apply a Brush to a Path.
Note that the Appearance panel is the only place in Illustrator that you can see at a glance when a path has multiple fills or strokes, or when an Attribute has an Effect applied to it.
There can be minor complications related to Basic versus Complex appearances when sending files to a printing firm or sharing files with other applications.
Objects with a Basic Appearance are compatible with the Encapsulated PostScript format and can be freely exchanged with other graphic packages.
Objects with a Complex Appearance are compatible only with Adobe's PDF format.
If you want to share a document containing an object that has a Complex Appearance with a program that does not support PDF, you must Expand its appearance by executing the Object > Expand Appearance command. Ai will then replace the Complex Appearance object with an object that looks the same but is made up of paths that have a Basic Appearance and are compatible with Encapsulated PostScript.
Expand vs Expand Appearance
The distinction between simple and complex paths also comes into play when you want to reduce paths to a simpler form, a process called Expanding a path, which you might want to do when, sending art to a printer, sharing art with other programs, or to enable you to edit some path features that you added by applying Effects.
There are two related, but mutually exclusive, commands for Expanding a path's appearance:
Object > Expand Appearance command, which applies to any object with a Complex Appearance, and reduces a path with a Complex Appearance to an equivalent looking object made up of several paths each of which has only a Basic Appearance.
Object > Expand command, which applies only to paths with a Basic Appearance. and allows you to further disassemble a path with a Basic Appearance into an object that is made up only of simple paths that have only one Stroke, or one Fill. However, paths with a Gradient Fill or a Pattern Fill count as paths with a Basic Appearance and in that case, Ai may generate a larger number of simple paths.
Illustrator signals when an object has a complex appearance by showing the Object > Expand Appearance command and by graying-out the Object > Expand command. Similarly, it signals that a path has a Basic Appearance by showing the Object > Expand command and graying out the Object > Expand Appearance command. In addition, in the Layers panel Ai, uses the Targeting Circles to flag objects as having a Basic or Complex appearance. An object with a solid center has a Complex appearance. An object with an empty center has a Basic appearance.
Advantages of the Appearance Panel
Appearance Panel for a Path with a Basic Appearance
There are good reasons to use the Appearance panel as the primary way that you work with appearance attributes and their settings. For any selected object, the panel allows you to:
See at a glance when an object has multiple fills or strokes, or when an Attribute has an Effect applied to it.
Change any Attribute's stacking order.
Target Attributes so that you can apply Effects to them individually.
Initiate nearly all actions related to Appearance Attribute settings, which are described later on this page.
You can save an Appearance (even a Complex Appearance) independently of the structure of the object on which you created it (for details see the Facilities > Graphic Styles article).
Fills and Strokes
This section describes how to use the Fill, and Stroke Appearance Attributes, . Dedicated pages describe the features that modify attributes, Opacity Settings and Effects. In addition, Opacity Settings work together with another setting called the Blending Mode, which determines how the colors of Fills and Strokes set in one row of the Appearance panel will interact with the colors set in lower layers. The Blending Modes section of the Transparency and Masks page describes how Blending Modes work.
Multiple Fills and Strokes
You can add more than one fill or stroke, to an object, which can both achieve striking effects and provide a more efficient workflow. Here are two examples:
With multiple strokes, you can create decorative borders or complex (symbolically significant) lines of the sort that you see on maps.
With multiple fills, you can use opacity settings in conjunction with pattern fills or gradient fills to create overlays or backgrounds that add interest and make drawings that are more familiar to the eye than large, stark blocks of solid color.
Using multiple fills and strokes can often achieve the same visual result as adding several overlaid images, but using multiple fills and strokes is more efficient, because when you edit the path, all the fills and strokes change automatically to conform to the path's new structure. When creating and editing multiple fills and strokes, it is best to use the Appearance panel, because other panels display only the top-most fill and stroke in the Appearance panel stack.
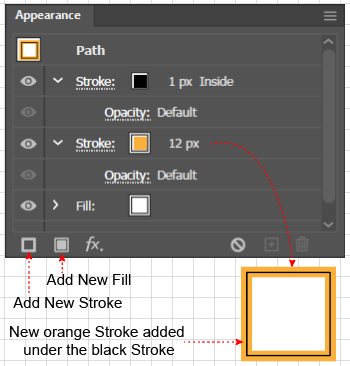
Adding a second, orange Stroke that is positioned under the default, black Stroke so that Ai will render it before the black Stroke, which will then appear on top of it.
Adding Additional Fills or Strokes
When you create a path, Illustrator automatically creates, by default, one Fill and one Stroke. The first path that you create in a document will have the default colors: black Stroke and white Fill. Thereafter, the number of fills and strokes and their color settings will be the same as those of the last path that you created. You can return to the default colors by pressing the d-key.
To add an additional Stroke or Fill in Adobe Illustrator:
Click the New Stroke or New Fill icon at the bottom of the Appearance panel. Ai will create a new row in the Appearance panel.
Drag the new row to the appropriate position in the stacking order.
Fills
There are four types of fills:
Solid Fills,
Traditional Gradient Fills (Linear and Radial),
Freeform Gradient Fills, and
Pattern Fills
Solid Fills
Solid Fill
Create or Edit a Solid Fill
To add or change a solid fill in Adobe Illustrator:
In the Layers panel or in the document window, select the object. Ai's Smart Targeting feature will automatically target the object, and as always, when an object is targeted in the Layers panel, Ai displays its attributes in the Appearance panel.
Go to the Appearance panel and select the Attribute that you want to work with, in this case the Fill.
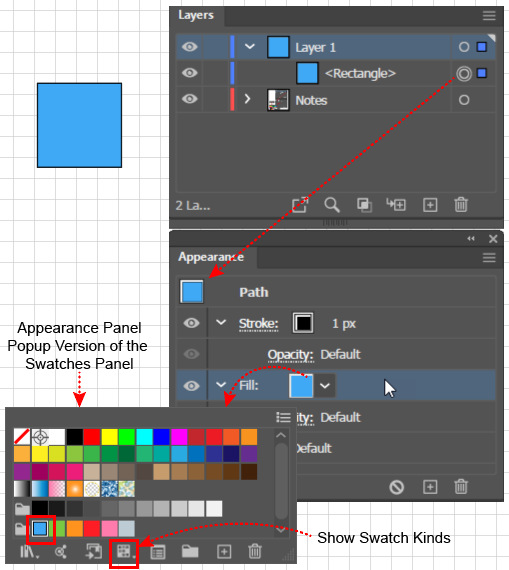
In the Appearance panel row for the Fill attribute, click the color thumbnail to display a version of the swatches panel).
Select the color. Ai will create the fill using the selected color.
Hints
Swatches Panel
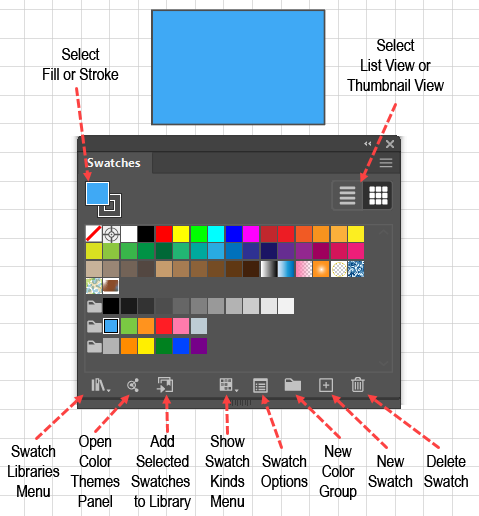
To make step 3 easier, you can make the version of the Swatches panel that displays when you click the Fill color icon in the Appearance look like the default Swatches panel, or you can filter it by the type of Swatch by clicking on the Show Swatch Kinds menu button at the bottom of the appearance panel.
The dropdown display that you get when you click the Fill or Stroke thumbnail icon in the Appearance panel is essentially the same as the Swatches panel. The only differences are that at the top of the Swatches panel it has two options that are not in the dropdown. The first is the Select Fill or Stroke icons, for which the dropdown provides the means of selecting among multiple fills and strokes. The second difference is that the Swatches panel allows you to select a list view option, whereas the dropdown only displays the thumbnail view.
Traditional Gradient Fills
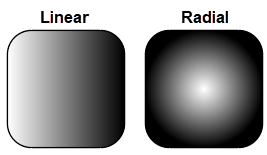
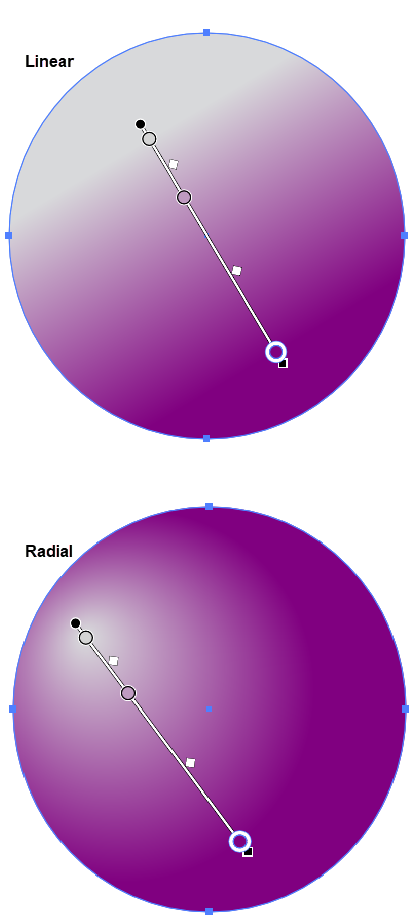
Traditional (Linear and Radial) Gradients with a Simple White to Black Transition
Traditional Gradient Fills:
Are defined by a spectrum line (Gradient Slider) and color stops,
Come in two traditional types: (A) linear and (B) radial.
Can be applied to either open or closed paths. In fact, Gradients can also be applied to strokes, but this article describes only their use as Fills.
Can, like other types of Fills, be saved in the Swatches panel.
Contrast with Freeform Gradients, which are a new feature that allows you to place gradient color stops, not in a linear or radial patterns, but at arbitrary points or along arbitrary curves, inside a closed path.
Create a Custom Gradient from Scratch
To fill an object with a custom Gradient in Adobe Illustrator:
Select the object that you want to fill.
In the Appearance Panel select the Fill (or Stroke) that you want to make into a Gradient.
Open the Swatches panel (Window >Swatches) and the Gradient panel (Window >Gradient).
Click and drag a Swatch from the Swatches panel onto one end of the Gradient Slider in the Gradient panel. Release the mouse button when you see a plus sign (+) modifier below the Cursor. Ai will create a Color Stop where you dropped the slider on the Selected object. Repeat this step to add additional Stops.
Optionally, click an existing Color Stop to select it and then Alt + Drag to copy it to another location on the Slider. Copying is useful when you have a repeating pattern of Stops e.g., several pairs of alternating light and dark Stops.
Optionally, to delete a Color Stop just drag it off the slider.
Optionally, to space the Color Stops precisely, select each Stop and in the Gradient panel's Location field, type a percentage value that represents the point on the Slider where Ai should place the Stop.
Rather than creating a Gradient from scratch, you can use the more common method of applying a stock gradient and then modifying it. The steps are:
Apply a Gradient that resembles to gradient that you want to create; either:
Apply a generic Gradient (e.g., a simple white to black transition) that is already in the Swatches panel, or
Apply one from one of the Gradient Libraries.
Modify the gradient either:
Quantitatively via the Gradient panel, or
Graphically via the Gradient tool.
It is common practice to use the Panel to set up the gradient and then use the Tool to visually refine its stop placement, its angle, or its aspect ratio.
Apply a Gradient from the Swatches Panel
To apply a gradient via the Swatches panel in Adobe Illustrator:
In the Layers panel or on the Artboard, select the object that you want to fill with a gradient.
In the Appearance panel, click the Thumbnail Fill (or Stroke) that you want to become a gradient. Ai will open a version of the Swatches panel.
In the Swatches panel select a Gradient Swatch. Ai will replace the Fill (or Stroke) with the selected Gradient Swatch.
Hint
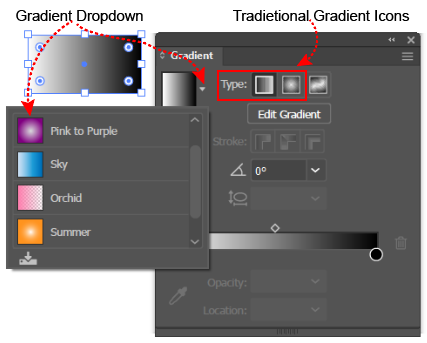
A common method of creating a custom gradient is to first apply a simple white-to-black linear or radial Gradient and then modify it. If that is your intent, you can simply open the Gradient panel and, at the top, click one of the Gradient Type icons or select a recently used gradient from the gradient dropdown at the top left corner of the panel.
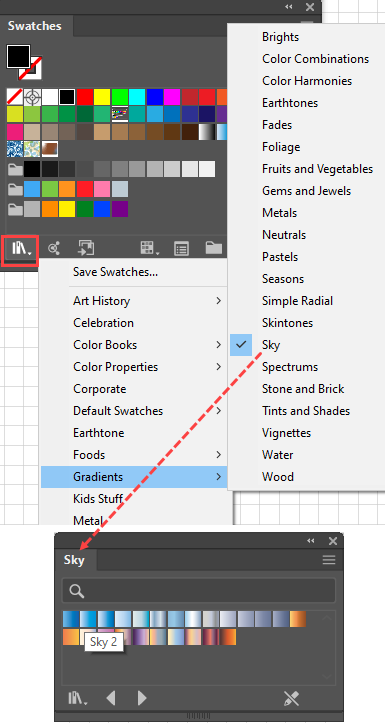
Apply a Gradient from the Swatches Library
Gradient Libraries Opened from the Swatches Panel
If none of the Gradients Swatches in the Swatches panel provide a good starting point for the type of gradient that you want to create, you can select one from any of the 21 sub-libraries of the Gradient Swatches Library structure.
To apply a gradient from a Library in Adobe Illustrator:
In the Layers panel, select the object that you want to fill with a gradient.
In the Appearance panel, click the row for the Fill or Stroke that you want to become a Gradient.
Either go to the Swatches panel (Window > Swatches) or click a Thumbnail to open the popup version of the Swatches panel.
At the bottom of either version of the Swatches panel, click the Swatch Libraries icon. Ai will display a popup list of libraries. In the list of libraries, choose Gradients. Ai will display a secondary list of 21 Gradient libraries. Select a library and within that Library, double-click a Gradient Swatch that resembles the gradient that you want to create. Ai will:
Apply the Gradient to the Swatch that you targeted in Step 2.
Add the Swatch to the Swatches panel.
Apply a Gradient from the Gradient Panel
Gradient Dropdown and Gradient Icons
You can also quickly create and apply a Gradient via the Gradient panel i n Adobe Illustrator:
To create and apply a gradient using the Gradient panel:
In the Layers panel, select the object that you want to fill with a gradient.
Go to the Gradient panel and in the Type area, select the icon for either the Linear or Radial gradient. As soon as you select the gradient type, Ai will create a default, white-to-black gradient, with one black and one white color stop.
Optionally, select a recently used gradient from the gradient dropdown at the top left corner of the panel.
Optionally, you can continue to use the Gradient panel to modify the black-to-white gradient to create a custom gradient.
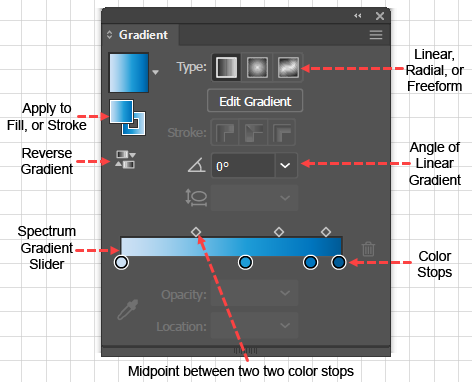
Modify a Gradient via the Gradient Panel
Gradient Panel
To edit a Gradient using the Gradient Panel:
Select the object that has the Gradient that you want to modify.
In the Appearance Panel, select the Fill (or Stroke) that you want to make into a Gradient.
In the Gradient panel, update the properties:
To switch the Gradient Type, click one of the 3 buttons in the Type area of the panel.
To switch to a recently used Gradient, click the down arrow next to the Gradient Icon in the upper left of the panel and pick a Gradient from the dropdown list.
To add a Color Stop:
Drag a color from the Swatches panel to the Color Slider.
Hover over a position just below the gradient line and when you see a plus sign (+) modifier below the cursor click the location where you want to add the Stop. Ai will add a Color Stop of the Current Color to the Color Slider.
Copy another Color Stop using the Alt + Click + Drag procedure.
To change the color of a Color Stop, do one of the following:
Double-click on a Color Stop. Ai will display the Modify Color dialog which has 3 main icon controls that switch the dialog into 3 modes of changing the color:
Color mode, which is equivalent to selecting the Color Stop and using the Color panel to change color. This mode has a hamburger button that allows you to pick Color Mode options. To specify a Color Stop in Hex, use the RGB option.
Swatches, which is equivalent to selecting the Color Stop and then using the Swatches panel to change color.
Eyedropper, which is equivalent to selecting the Color Stop and using the Eyedropper tool to pick a new color from an object on the Artboard.
Alternatively, to change the color of a Gradient Color Stop to a Swatch Color:
Click the Color Stop to select it.
Alt + Click on a Color Swatch.
To reverse the gradient (e.g., to make the default white-to-black gradient into a black-to-white gradient), click the Reverse Gradient Icon.
To adjust the gradient's angle, simply update the Angle field. This is easier to do with the Gradient Tool.
To adjust a Radial Gradient's Aspect Ratio, update the field with the ellipse icon. This is easier to do with the Gradient Tool.
To change a color stop's opacity, select the color stop and update the Opacity field (only available in the Gradient panel).
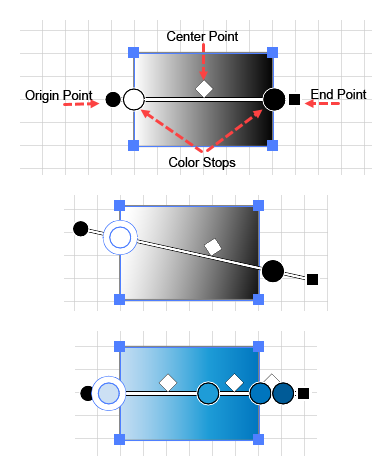
Modify a Gradient via the Gradient Tool
Gradient Annotator Linear Gradient
To edit a gradient using the Gradient tool:
Select the object that has the gradient that you want to modify.
In the Tools panel, click the Gradient tool. Ai will display the Gradient Annotator over the object that has the Gradient. The Annotator is analogous to the slider in the Gradient panel, but works differently:
It has a spectrum line with a round end (the starting or origin point) and a square end (the ending point).
It has Color Stops, which you can move along the Annotator, and which you can double-click to open the same Modify Color dialog that is used in the Gradient panel.
It also has a diamond shaped icon above each pair of Stops that indicates the mid-point, where the mix of colors between two Color Stops is 50% of each.
For Linear Gradients, the Annotator must pass through the object's center. For Radial Gradients, you can place the Annotator off-center to create a highlight.
However, the Annotator works differently for Linear versus Radial Gradients:
Radial Gradients have a dashed ellipse that you can use to adjust their aspect ratio.
On Linear Gradients, the line from the Annotator's start point to its end point must go through the center of the object. If you try to drag the Annotator off-center. Ai will show you a dashed line parallel to the Annotator that shows you where it will put the Annotator when you stop dragging and release the mouse.
On Radial Gradients, the line from the Annotator's start point to its end point need not go through the center of the object. You can place the start point and end point of the Annotator anywhere you want.
Move parts of the Annotator to update the gradient:
To move the origin point, simply click and drag the point.
To move the end point, click and drag the point.
To add a color stop, click below the annotator's spectrum line. Ai will give the new Stop the Current Color.
To change colors in a color stop, double click the stop. Ai will display the Modify Color dialog.
To adjust the gradient's angle, move the cursor beyond the end point until you see the cursor change to a circular arrow. Then drag the spectrum line to a different angle.
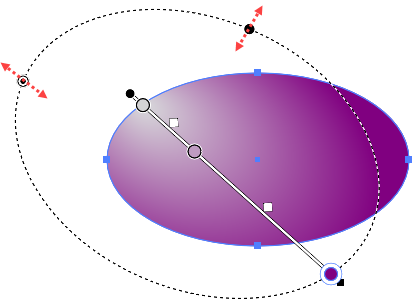
Modifying the Aspect Ratio with the Gradient Annotator
To change the aspect ratio of a Radial gradient, hover over the annotator until you see an ellipse with a dotted line, which controls the extent of the Gradient in the direction of its major and minor axes. The dotted ellipse has two small circles, one with a solid black fill and one with a black dot inside a circular border. The major axis of the dotted ellipse extends along the Annotator (even though the Annotator may not go through the center of the object):
To change the size of the dotted ellipse, drag the control with the center dot.
To change the extent of the dotted ellipse's minor axis, drag the control with the solid fill.
Apply the Same Gradient to Several Objects
To apply the same gradient to several objects in Adobe Illustrator:
Create the gradient on one of the objects.
With the objects still selected, go to the Swatches panel, and click the New Swatch (+) button to add the new swatch to the panel.
Shift + Select the other objects to which you want to apply the same Gradient.
Click the Gradient tool. Ai will display a copy of the Gradient Annotator to each of the objects. You can then use each annotator to modify its Gradient's angle, its Color Stop positions, or their colors.
Freeform Gradients
Freeform vs Linear Gradient
The Freeform Gradient tool allows you to place gradient color stops on a surface, not just along a single line but at arbitrary points or arrayed along arbitrarily drawn curves or both. Each color stop will blend with neighboring color stops that are within the radius of its influence (called its spread). This allows you to realistically simulate the depth cues associated with form shadows, including those that arise from multiple light sources, reflected light and complex contours.
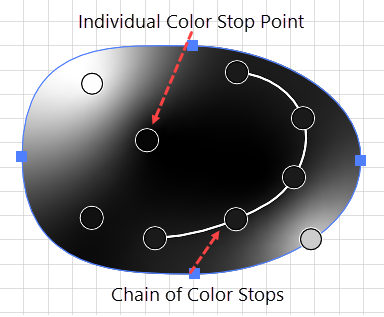
Freeform Gradient Color Stop Point and Chain
The tool has two modes:
Point mode is for placing or modifying individual (unconnected) color stop points.
Line mode is for placing a chain of color stops that are connected by a curve.
Create a Freeform Gradient
To create a Freeform gradient in Adobe Illustrator:
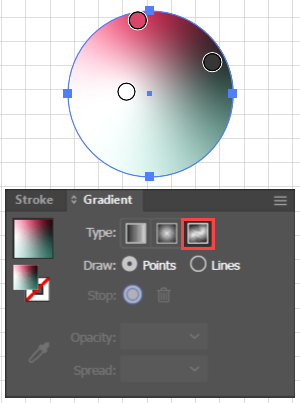
A Freeform Gradient and its representation in the Gradient Panel
In the Layers panel, select the object, and in the Appearance panel, select the fill to which you want to apply the gradient.
Go to the Gradient panel, click the Freeform Gradient icon (the third icon in the Type section. The Gradient panel will display two radio buttons labeled Points and Lines. By default, the Points button is selected, signifying that the tool will create individual color stops that blend into one another. It will also place one or more color stops on the object in locations where it thinks they are most likely to be useful and will also guess at the appropriate colors, based on the context.
To switch to create a chain of color stops that are arranged along a curve, simply click the Lines radio button. Now when you click on arbitrary locations, the tool will connect the color stops with a curve in the same way that curves are drawn using the Curvature tool.
With the Lines button selected, click to place the first point.
Before creating the second point, change the color of the first point. Now, as you click to create the other points, the tool will make the subsequent colors stops the same color. The color will follow the curve. Note that it may be helpful to create a Global Color swatch so that you can change the color of all the color stops with one click.
When you are done creating the last color stop in the chain, press the Escape-key to terminate the curve, just as you would with the Curvature tool or in the Pen tool.
Note that because the tool starts out in Point mode and places default color stops, you cannot create just a single chain without creating any points. The first time you switch to Line mode, the tool does not delete the default individual color stops (it assumes that you will want both a few individual color stops and perhaps some chains. To create just a single chain without any points, you will have to delete the default, Line mode points.
Modify Freeform Gradient Color Stop Points
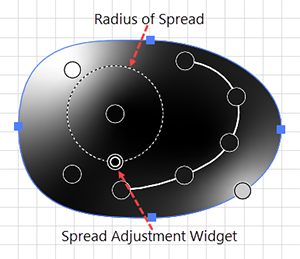
Spread of a Freeform Gradient Point
To modify Freeform gradient color stops in Adobe Illustrator:
With the object Selected and the Fill targeted in the Appearance panel, go to the Gradient panel, and click the Edit Gradient button. The tool will display the color stops, on the object.
Select the Points button, then you can:
Click to select a color stop point.
Shift + click to select several color stops (this only works in Points mode).
Mouse over a color stop point to display its spread, i.e., the radius within which it will blend with other color stops. Ai will show the outer limits of the Spread as a circle with a dotted border.
Drag the small circular Spread Adjustment Widget to expand or contract the Spread.
Double click to change the color. The tool will display a color panel that allows you to select a color by using a color pallet, swatch, or the Eye-dropper tool. Note that if you use the Eyedropper tool, it will persist, to get rid of it, press the Escape-key
Modify a Chain of Freeform Gradient Color Stops
To modify a line mode freeform gradient in Adobe Illustrator:
Select the object, appearance attribute, and in the Gradient panel. click the Edit Gradient. The tool will display the color stops, on the object.
Select the Lines button, then you can:
Reactivate and extend a chain of color stops by clicking on either end point.
Close a chain by reactivating the chain from one end and moving the cursor to the other end of the chain. As you hover over the other end of the chain, the tool will display the Close Path (o) cursor, just as it would in the Pen tool or the Curvature tool.
Select several color stops in a chain. First enter Point mode (i.e., clicking the Points button) and then Shift + click on the individual color stops. With multiple color stops selected, you can, for example, change the color of all the selected points simultaneously.
Save a Freeform Gradient from the Gradient Panel
To save a Gradient that was created with the Gradient panel:
Drag the gradient from the canvas or from the Gradient panel to the Swatches panel.
In the Swatches panel, double click to display the Swatch Options panel and give it a Name.
Pattern Fills
Pattern fills act like wallpaper, which you can rotate and scale independently of their object.
Apply a Pattern-Fill from the Swatches Panel
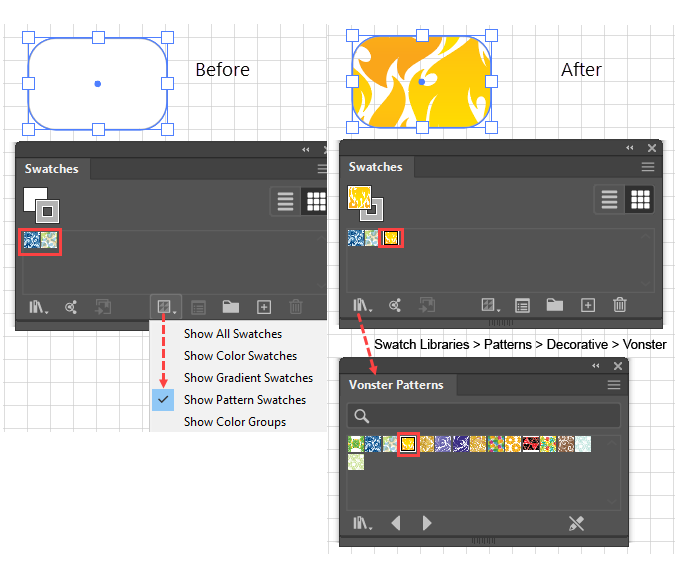
Apply a Pattern Fill
To fill a closed path with a Pattern-fill Swatch in Adobe Illustrator:
In the Layers panel, select the object.
In the Appearance panel, target the Fill or Stroke to which you want to apply the pattern.
In the Swatches panel, select a pattern swatch. Ai will apply the Pattern Swatch to the target.
Optionally, if you do not see a pattern that you want, you can select one from a Library:
Click the Swatch Library icon (the first icon at the bottom). Ai will display a list of Library Collections.
Select the Patterns collection, and select a Library. Ai will open a panel that displays Thumbnails for the Pattern Swatches in the library.
Double-click a Pattern Swatch Thumbnail. Ai will apply the Pattern Swatch to the target and add it to the Swatches panel.
Transform a Pattern Fill
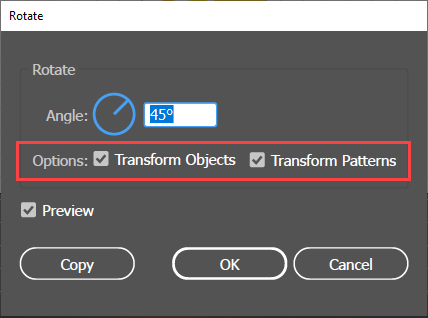
Rotate Tool Pattern Settings
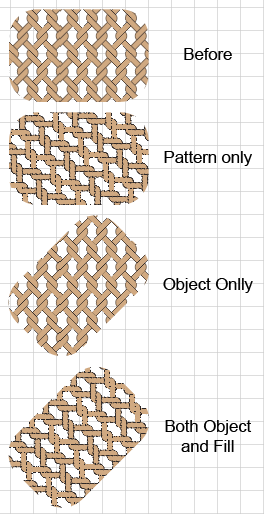
The dialog boxes for the Scale and Rotate tools have check boxes that allow you to apply the transformation to: (A) just the object leaving the pattern unchanged, (B) just the pattern leaving the object unchanged, or (C) both.
To scale or rotate just the object, just the pattern, or bothin Adobe Illustrator:
Select the object.
In the Appearance panel, target the Fill or Stroke that you want to transform.
Scale or Rotate (A) just the object, (B) Just the pattern, or (C) both
Double click the Rotate or Scale tool.
Check either or both of the Transform Objects or the Transform Patterns checkboxes.
Set the tool's parameters.
Click Copy to make a transformed copy, or click OK to implement the transformation on the selected object.
Strokes
Strokes may be of uniform or variable-width.
Uniform Width Strokes
For paths that have a uniform stroke width, Ai bases many of its alignment and formatting decisions on one-half the line weight (the thickness of the line's stroke). For example, when Ai adds round caps to the ends of a line, the radius of the cap is one-half the line weight.
Stroke Alignment Options in the Strokes Dialog of the Appearance Panel
Stroke Alignment
For closed paths (but not for open paths), Ai allows you to change how the Stroke aligns relative to the center of the path. By default, Ai will align a uniform Stroke, whatever its width, so that it evenly straddles the center line and is evenly distributed on both sides of the path.
The alignment options are:
Center (default)
Outside
Inside
Set the stroke alignment
Setting Stroke Alignment in the Appearance Panel
To set the stroke alignment:
Select a closed path.
In the Appearance panel, target the row for the stroke that you want to modify and click the "Stroke" link to open the Stroke panel.
Go to the Align Strokes section and click the icon for one of the three alignment options.
Weight
Line weight is a general term that referrers to how prominent, heavy, or dark a line is relative to its background, and may include such features is whether or not the line is made up of dots or dashes. Illustrator documentation uses the term stroke width to denote just the thickness of the line exclusive of other features, for which it has created specific options (discussed below).
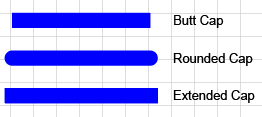
Caps
Caps are treatment options that modify the appearance of the endpoints of open paths. The round cap and projecting extend one-half the line weight from the end of the line, which by default is terminated with a butt cap.
Change Stroke Caps
Three types of Stroke Caps
To assign a Cap option:
Select the path.
Go to the Stroke panel (e.g. double click the Stroke link in the Appearance panel.
Select the Cap option.
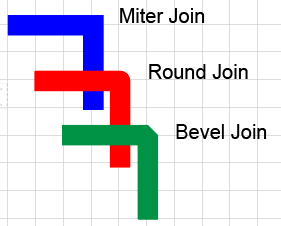
Corner Joins
Corner Joins
Joins are different treatments of corner points. Comparison of the three Corner Join options include:
Miter Join. Note that the Limit field value represents a multiple of one-half the line weight, and determines how far the tip of the miter join can extend before Ai converts it to a bevel join.
Round Join. The radius of the rounded portion of the join is one-half the line weight.
Bevel Join. The bevel is a line that connects the outer corners of the two imaginary lines that would have been there if no join had been applied.
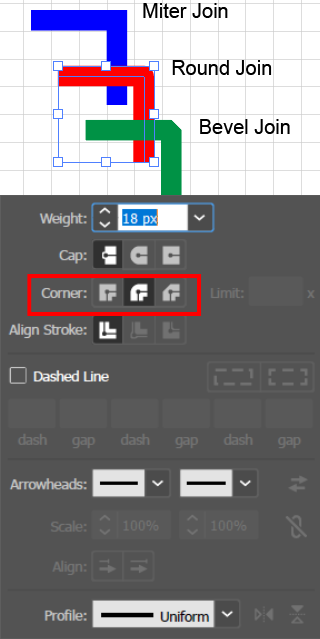
Change a Join Options
Corner Joins Settings in Stroke Panel
To assign a join option to a corner point:
Select the path in the Layers panel and target the fill in the Appearance panel.
With the stroke selected in the Appearance panel, click the Stroke link to open the Stroke panel.
In the Stroke panel, select a Corner option.
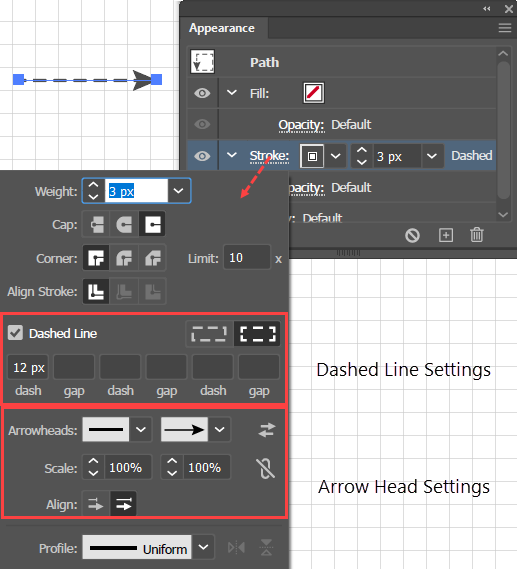
Dashes and Arrows
Dashes and Arrows
In Ai, dashed lines and arrows are merely stroke attribute options.
Create a Dashed Line or an Arrow
To assign dashes or arrow heads to a line:
Select the path.
Target a Stroke.
Open the Stroke panel by clicking the Stroke link in the Appearance panel, the Properties panel, or in the Control panel.
In the Stroke panel update the Dashed Line and Arrowheads fields.
Hint:
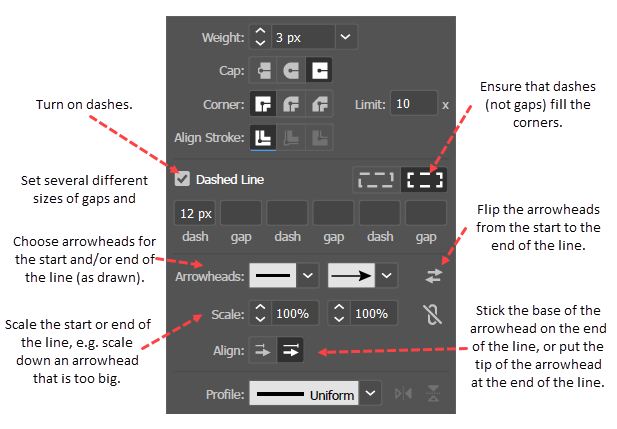
Stroke panel Dash and Arrow Options
To create a dotted line:
Set the dash to 0 but the gap to a non-zero value.
Set the caps to Round
Variable-Width Strokes
You can create a path with a stroke of varying width by assigning one or more Width Points to the path via the Width tool. Note that the Width tool can work on paths that are not selected.
Variable Width Stroke
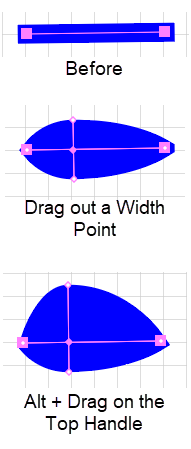
Assign a Variable Width Point Visually
To create a width point with the Width tool:
Create a path with a fixed width.
Get the Width tool ( Shift + w) and hover over a point on the path until you see the cursor change from one that has a cursor with a tilde (~) to one that has a plus sign (+), which indicates that you can add a width point. Ai will display a white width-point.
Drag the width-point across the path to change the width. Ai will expand the single width-point into a transverse line with two control handles. By default, Ai smoothly and symmetrically expands or contracts the path at the width-point. To reposition a width point, drag it along the length of the line.
To change the distribution of the stroke width about the path and create an asymmetrical path, Alt + click + drag on one of the width-point control handles.
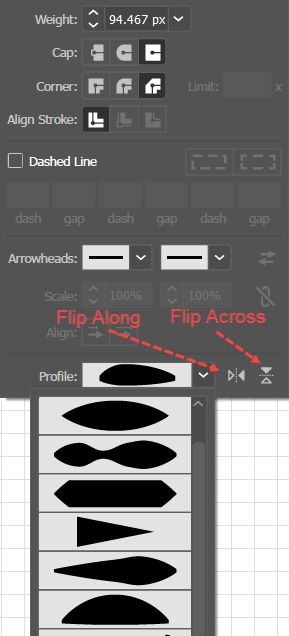
Assign a Preset Variable Width Stroke
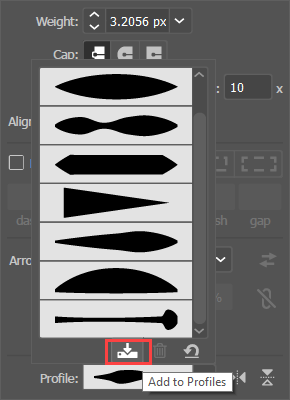
Stroke Width Preset Profiles
Ai provides several variable width path presets, which it refers to as profiles. To assign a variable width profile to a path:
Select the path.
Go to the Profile dropdown menu at the bottom of the Strokes panel and select a preset.
Undo a Variable-Width Stroke
To undo a variable width path assignment:
Select the path. In the Appearance panel, click the "Stroke" link. Ai will display a thumbnail image of the path in the Profile dropdown at the bottom of the Strokes panel.
Scroll to the top of the dropdown and select "Uniform."
Hints:
When you have selected a path with a variable stroke and have opened the Stroke panel, you can use the Flip Along or Flip Across buttons to flip the variable-width stroke from end to end or laterally across the axis of the path.
Add Variable Width Stroke Profiles
Save a Stroke Profile
When you have assigned a custom variable stroke width with the Width tool, Ai will display it as though it were the currently selected profile in the Profile dropdown menu, at the bottom of the Stroke panel. To reuse a newly created variable width profile as a preset, you can save it as a custom stroke profile.
To create a custom stroke profile:
Select a the path that has been edited with the Stroke Width tool and from the Appearance panel open the Stroke panel..
In the Strokes panel, click the Profiles dropdown . Ai will display a list of the variable width presets and the Add to Profile button.
Click the Add to Profiles button. Ai will display the Variable Width Profile form.
In the form's Profile Name field, give the custom profile a name and click OK. Ai will add it to the Profile presets menu.
Convert a Stroke into a Filled Path
To make a stroke into a compound path (which is a filled shape that in this case will look like a thick line) so that you can edit it like a shape:
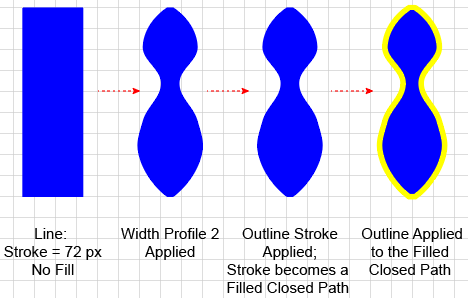
Line with a Variable Width Stroke Converted into a Closed Path with a Fill and Stroke
Select the path.
Object > Path > Outline Stroke. Ai will change the layer panel to show a compound path.
The accompanying figure shows an example of an application of the Object > Path > Outline Stroke command. It proceeds in the following 4 steps:
Draw a straight line with no Fill but with a 72 px Stroke.
With the line selected, go to the Appearance panel target the Stroke, click the Stroke link to open the Stroke panel, and apply Width Profile 2.
With the Stroke still targeted in the Appearance panel, go to the menu, and execute the Object > Path > Outline Stroke command. Ai will convert the line that has the variable width Stroke into a closed path with a Fill of the same color as the line's Stroke.
Add a Stroke to dramatize that the straight line has really become a closed path with a curved outline.
Resources
Illustrator Insider Training: Rethinking the Essentials by
Mordy Golding at LinkedIn