To edit any object, you must first select it. Since selection is so frequently used, the effective use of selection techniques is essential to using Illustrator efficiently. The Appearances page describes the role of the selection in connection with path editing. This page focuses on the different methods of selecting objects, how they work, and how to use them. Illustrator provides three generic ways to select objects:
Arrow tools, i.e., the Selection tool and the Direct Selection tool. Super author and trainer, Deke McClelland refers to these as the Black Arrow tool and the White Arrow tool, respectively.
Isolation Mode, an alternative method that isolates a selected object, (A) locking it and (B) dimming all other objects that are not selected. It is particularly useful for selecting complex art that is constructed using nested groups.
Special purpose selection tools, which include: The Magic Wand tool, the Lasso tool, and two Selection Commands. They allow you to make mass selections based on proximity, or similarity.
Save a Selection
Regardless of how you have made a selection, you can save it for reuse later.
To save a selection in Adobe Illustrator:
Save a Selection
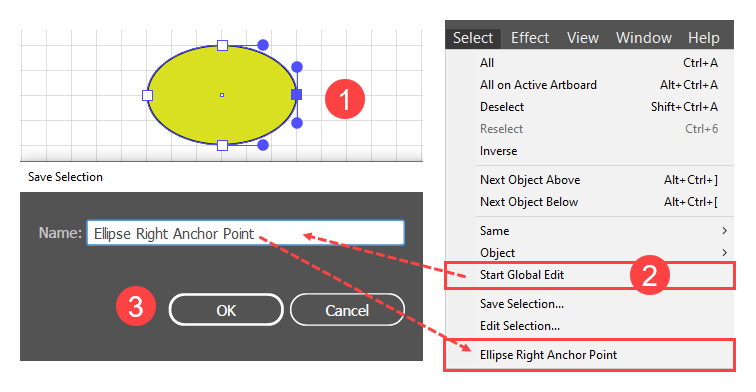
Select the objects.
Execute the Select > Save Selection command. Ai will display the Save Selection dialog box.
Name the selection and click OK. Ai will add the name of the saved selection to the bottom of the Selection menu. To reuse the selection, simply open the Select menu and click the row with the assigned name.
Selection Tools
Selection Tool
The Selection tool (or Black Arrow tool, with shortcut: v-key) is for selecting entire objects (e.g., paths or groups). You use this tool when you want to do something to the entire path, e.g. move it, rotate, or scale it).
The result of clicking an object with the Selection tool depends upon whether or not you have Bounding boxes turned on (View > Show (Hide) > Bounding Box). Deke McClelland recommends working with the Bounding boxes turned off. The advantage of having Bounding boxes turned on is that you can do basic scaling and rotating by dragging the box's handles. The disadvantages are that it creates clutter and can make selecting small objects frustratingly difficult. In any case, it is easy enough to control. To quickly toggle Bounding Boxes on and off use the Ctrl + Shift + b shortcut. When you release the keys, Ai will show or hide the Bounding box.
Using the Selection Tool
To use the Selection tool to mark an object for moving, scaling, or rotating in Adobe Illustrator:
Get the Selection tool,
Click only once on the object. If you click twice, you will enter isolation mode. If an object has no fill, you cannot select the object by clicking in its interior, but must click on the stroke or path outline.
Alternatively:
Ctr+ a to select all the objects on the artboard.
Shift + click on several objects to select them.
Drag the tool across several objects to select them.
To deselect an object: click anywhere off the object.
Direct Selection Tool
The Direct Selection tool (or White Arrow tool with shortcut: a-key), is for selecting path components (anchor points or segments). You use this tool when you want to edit the structure of the path, e.g. move a segment, anchor point, or control point.
Use Direct Selection Tool
Direct Selection Tool Operations
To use the Direct Selection tool in Adobe Illustrator:
Get the Direct Selection tool.
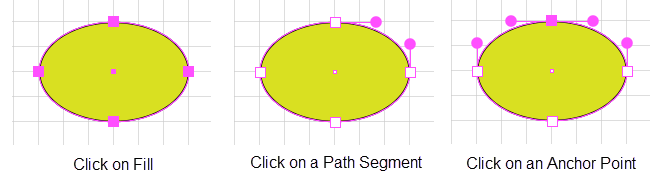
If you hover over one of the object's anchor points, Ai will highlight the point. If, in addition, you have View > Smart Guides turned on, when you hover over a segment or an anchor point, Ai will show you a tool tip telling you when you are on target. If you first click on the fill (provided that there is one) or at the center of a shape, Ai shows all the anchor points as filled squares, so that you can see where they all are. You may, now select a path segment or an anchor point.
To select a path segment, click the segment. Ai will flag the anchor points as unselected by showing them as empty (rather than filled) squares and will show the control handles, if there are any, on the anchor points that bound the segment.
To select an anchor point, click the point. Ai will flag the point as selected by showing it with a filled square, while showing the objects other anchor points with empty squares. Ai will also show (A) both control handles at the selected point and (B) the single control handle on each of the anchor points adjacent to the one selected.
To deselect an object: chick anywhere off the object.
Work-flow Tips
Probably the commonest use of the Selection and Direct Selection tools is to move (drag) and copy (Alt + drag) objects, anchor points, or path segments. In Ai, the operations of moving and copying go together. This is true, not only of the basic selection tools but also of the Scale and Rotate tools. Whether you are working with an entire object, an anchor point, or a path segment, keep these principles in mind.
Get Last Selection Tool Principle: When using a drawing tool or the Type tool, you can temporarily access the last selection tool that you used by, simply pressing the Ctrl-key. The last selection tool that you used will remain active while the Ctrl-key is depressed.
Alt + drag Copy Principle: When moving an object, anchor point, or a path segment, the Alt-key converts the move operation into a copy operation. Ai signals the change in state by modifying the cursor.
Nudge Principle: Once you have an entire object, an anchor point, or a path segment, not only can you drag to move it, but you can move it by precise increments with the arrow keys. You can set the size of the increment by executing the Edit > Preferences > General command and updating the Keyboard Increment field.
Repeat Operation Principle: To repeat a move, copy, scale, or rotate operation execute the Object > Transform > Transform Again command (Ctrl + d for duplicate).
Shift/45 Principle: The Shift + drag operation constrains operations to linear movements that are a multiple of 45 degrees. This principal applies to both moving objects and to drawing actions.
Isolation Mode
Concepts
Isolation Mode vs Normal Selection
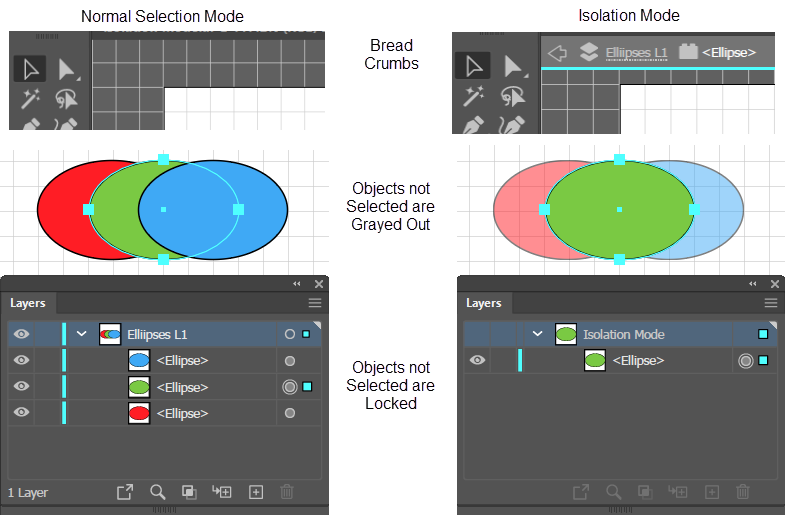
Container objects are essential for managing complexity, not only for organizing art objects into Layers, but for working with (e.g., moving or rotating) sets of objects efficiently as Groups rather than as many individual objects. However, Layers, especially those with contents that overlap, and Groups, especially when they are nested (Groups within Groups), complicate the business of selecting objects. Illustrator developed Isolation Mode to make it easier to select objects that are nested in Layers and Groups. Isolation mode is an alternative way of selecting objects that isolates a selected object by (A) temporarily locking it and (B) dimming all other objects that are not selected. To select an object for isolation, you simply double click it with the Selection tool. So, if instead of clicking once with the Selection tool on an object, you double click on it, you will enter Isolation mode.
Isolation mode is especially useful for editing complex artwork where, without it, to select the correct object, you would have to do one or both of the following: (A) lock nearby objects so that you can isolate and select just the objects that you want, or (B) ungroup one or more nested groups so that you can edit their contents.
The Isolation mode facility:
Allows you to navigate down and up the levels of a hierarchy of nested containers and isolate the contents for easy editing. For example, you could isolate a path that is contained in a group that is contained in another group, that is contained in a layer.
Not only works on both Layers and Groups, but also works in an analogous way on other container-like objects including sublayers, symbols, clipping masks, compound paths, and gradient meshes.
Presents a breadcrumb navigation menu at the upper left of the window to display the hierarchy of containers.
Automatically isolates (i.e., locks) objects that are not selected.
Preserves the context of your edits, by graying-out rather than simply turning off the invisibility of the objects that are not at the same level. This allows you to visually navigate up and down the hierarchy by using the same double-clicking gesture.
When you are at a particular level of isolation mode, the facility allows you to add, change, or delete objects in that level.
Allows you to edit the contents of a group, without first ungrouping, then editing contents, and regrouping the results.
Use Isolation Mode
Before Isolation
It is a merit of the facility's design that instructions for its use are short.
To use isolation mode in Adobe Illustrator:
Double click the object until it is isolated (i.e., until it appears by itself in the Layers panel and it is the only element on the artboard that appears in full color and in its full extent, not obscured by any overlapping object). Each time you double-click Ai will descend one level in the hierarchy of containers and display breadcrumbs that show the current level.
Edit the isolated object.
To ascend the hierarchy, either click on one of the breadcrumbs, or click repeatedly on the arrow at the beginning of the breadcrumbs, or simply click on a blank area of the Artboard to completely exit Isolation Mode.
After Isolation
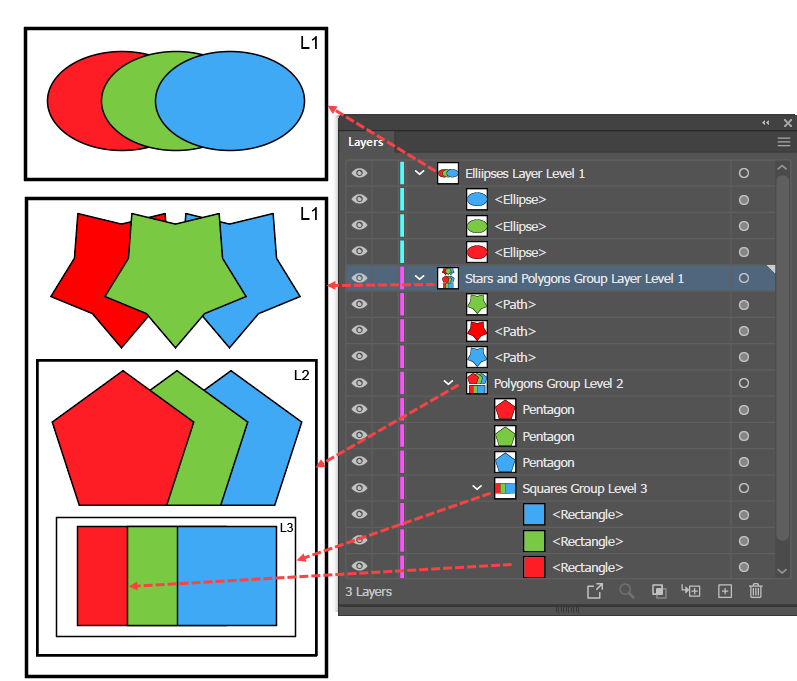
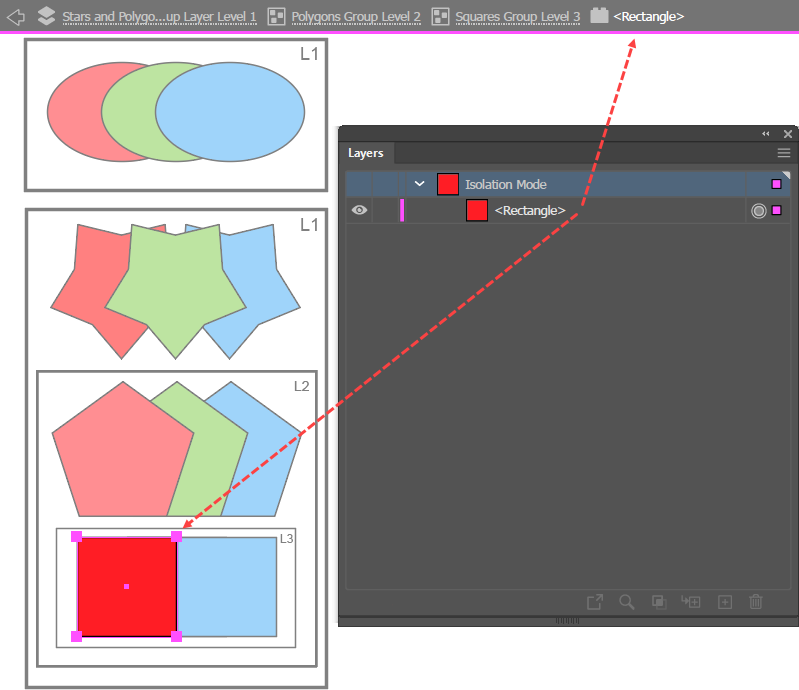
The two screen shots of the Layers panel show a three-level hierarchy (of a group within a group within a layer) before and after a path in the bottom group is selected. In the after picture, note how Isolation Mode, does not just select the object in its original stacking order relative to other objects, but temporarily brings it to the top of the Layers panel's stacking order so that it can be edited in its entirety.
Special Selection Tools
The special selection tools allow you to make bulk selections.
Magic Wand Tool
The magic wand tool allows you to select objects that have appearance attributes (fill color, stroke color, stroke weight, opacity, or blending mode) that are similar to a prototype object that functions as an example of what you want to select. Double-clicking the tool, pops up its Properties menu, which allows you to select one or more attributes and a tolerance (degree of similarity) for each. Selecting more than one attribute tells the tool that in order for an object to be considered similar to the prototype, it must have all the specified attributes, and must be within the specified tolerance.
Use the Magic Wand Tool
Magic Wand Tool Example
To use the Magic Wand tool in Adobe Illustrator:
Double-click on the tool. Ai will display the Magic Wand tool dialog box.
In the dialog box, select the attributes and a corresponding tolerance value for each.
With the tool still selected, click on the object that you want to use as a prototype. Ai will select all the objects that are similar to the prototype with respect to the attributes and tolerances that you specified in the Magic Wand tool dialog box.
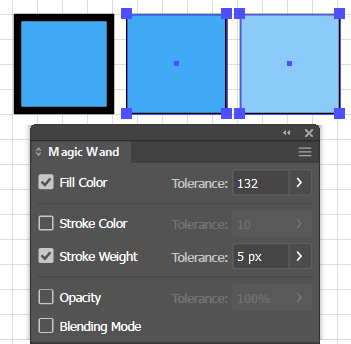
The Magic Wand Tool Example figure shows a selection where the middle object is the prototype. The object on the right is also selected because the fill color has a wide tolerance. However, the object on the left is not selected, because its stroke weight is beyond the specified tolerance.
Lasso Tool
The Lasso tool, like the Selection tool, allows you to select everything that is inside of a perimeter. However, the advantage of the Lasso tool over doing a marquee selection with the Selection tool is that it allows you to specify an irregularly shaped perimeter.
Use the Lasso Tool
To use the Lasso tool in Adobe Illustrator:
Get the Lasso tool.
Drag an area through or around the objects, anchor points, or path segments that you want to select. When you release the mouse button, Ai will select the indicated items.
Selection Commands
The select menu provides the following commands:
Select Menu Commands
Commands
Shortcut
Action
All
Ctrl + A
Select all objects on all artboards that are not locked.
All on ActiveArtboard
Alt + Ctrl + A
Select all objects on the current artboard that are not locked.
Deselect
Shift + Ctrl + A
Deselect all selected objects on all artboards.
Reselect
Ctrl + 6
Reselect the last object that was selected.
Inverse
Deselect all currently selected objects and select those that were not selected.
Next Object Above
Alt + Ctrl + ]
Select the object that is just above the currently selected object in the stacking order.
Next Object Below
Alt + Ctrl + [
Select the object that is just below the currently selected object in the stacking order.
Same
Select all the objects that match the currently selected prototype object with respect to an appearance attribute that you specify in a submenu.
Object
Select all the objects that are of the same object-type (e.g., all stray points, all brush strokes, all text objects, etc.) as specified on a submenu.
Start Global Edit
Start a simultaneous edit of multiple objects by selecting all the objects that hav e a structure (outline) that is geometrically similar to the currently selected object. Once they are selected you can transform all the selected objects using standard tools.
Save Selection...
Name the current selection, save it, and add it to the bottom of the Select menu so that you can reuse it.
Edit Selection...
Edit a saved selection.
Two of the Select Menu commands (Select Same and Select Object) deserve further comment.
Select Same
Like the Magic Wand tool, the Select Same command selects objects by matching them to a prototype object. Unlike the Magic Wand tool, the Select Same command does not allow you to specify multiple criteria or to specify tolerances for approximate matching. However, as shown in the table below, the Select Same command can select matching objects based on several criteria that the Magic Wand tool cannot.
Select Same Matching Criteria
Same As
Magic Wand
Select Same
Fill Color
Yes
Yes
Stroke Color
Yes
Yes
Stroke Weight
Yes
Yes
Opacity
Yes
Yes
Fill & Stroke
Yes
Yes
Blending Mode
Yes
Yes
Shape
No
Yes
Graphic Style
No
Yes
Symbol Instance
No
Yes
Appearance
No
Yes
Appearance Attribute
No
Yes
Link Block Series
No
Yes
To select an object that is the same, in some respect, as a selected object in Adobe Illustrator:
Select an object to serve as a prototype.
Select > Same. Ai will display a dropdown of the matching criteria as listed in the above table.
Select a matching criterion. Ai will find all the objects that match the criterion.
Select Object
With the Select > Object command you can do any of the following:
Select all objects on the Same Layers
Select all objects with the same Direction Handles
Select all Clipping Masks
Select all Stray Points
Select all Text Objects
Select all Point Type Objects
Select all Area Type Objects
To select all the objects of a certain type in Adobe Illustrator:
Execute the Select > Object command. Ai will display a dropdown of the matching criteria as listed above.
Select a matching criterion. Ai will find all the objects that match the criterion.
Resources
Illustrator CS5 Essential Training "Using the basic selection tools" by Mordy Golding at LinkedIn