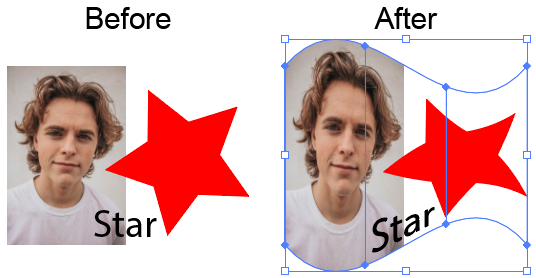
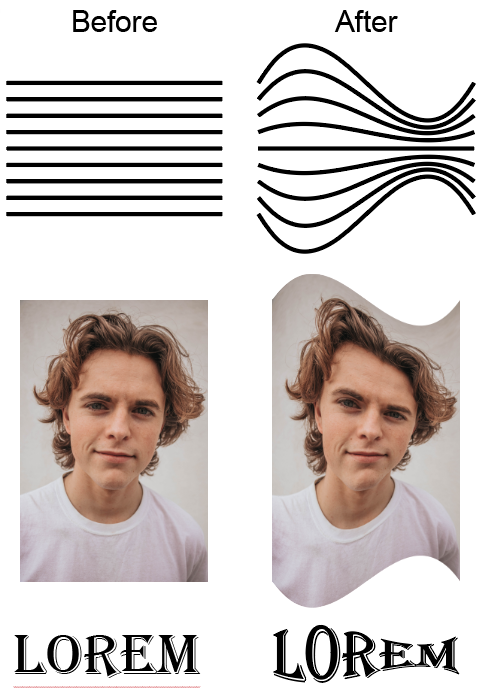
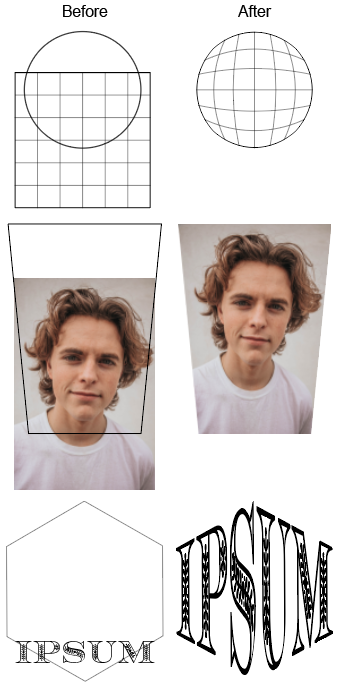
A target with an image, point text, and a vector (Before) made into an Envelope Distortion with a fish-shaped Mesh (After). The After View is Selected to show the role of the Mesh in shaping the Distortion.
An Envelope Distortion is a process that allows you to use various types of Mesh objects to distort a Target object.. The target object can be or can contain vector objects, text objects, embedded images, or a combination of all three, but cannot contain a linked image. The result of an Envelope Distort operation is a Envelope object, with is a special type of container that is represented in the Layers panel with the default name <Envelope>.
The Mesh used in an Envelope Distort object is the same type of object that you would create with the Object > Create Gradient Mesh command or with the Mesh tool. In fact, you can edit an Envelope object with the Mesh tool. Furthermore, when you select an Envelope for editing, and target its contents in the Appearance panel you will see that the contents is a Mesh. However, when used in an Envelope, a Mesh functions differently than it does in a Gradient or a . The Mesh is used not just as a framework for shading or coloring its Points and Patches. Instead, when used with Envelope Distort, the topology of the Mesh controls how the Mesh will distort the Contents. The distortion always (A) fills the entire Envelope and (B) follows the paths of the Mesh. That is, a rectangular Mesh, is neutral; it does not distort the Contents, but moving any point in a rectangular Mesh will cause a corresponding distortion in the Contents.
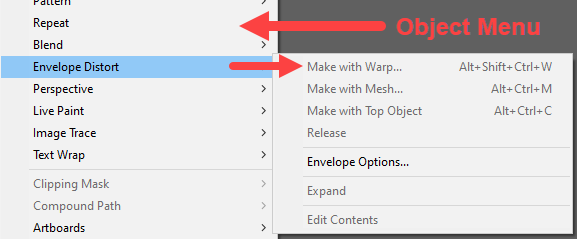
You can create an Envelope Distortion object in 3 ways, each of which has a corresponding command in the Object > Envelope Distort menu, and its own characteristic type of Mesh.
Menu Options for Object > Envelope Distort
The Make with Warp (Alt + Shift + Ctrl + W) command allows you to select the Mesh from a number of presets. Each preset creates a corresponding distortion in the target. The presets present the same options as are available from the Effect > Warp command (Arc, Arc Lower, Arc Upper, Arch, Bulge, Shell Lower, Shell Upper, Flag, Wave, Fish, Rise, FishEye, Inflate, Squeeze, and Twist). These presets are just Meshes that have Mesh points on the periphery of the preset shape.
The Make with Mesh (Alt + Ctrl + M) command allows you to create an Envelope with a neutral, rectangular Mesh. To distort the Contents, you must edit this Envelope so as to change the trajectory of its Mesh lines.
The Make with Top Object (Alt + Ctrl + C) command allows you to use an arbitrary shape as the Mesh. You place the Mesh above the target in the Layers panel stacking order, select them both, and then execute the Make with Top Object command. By default, Ai places Mesh points only on the border of the shape, but you can add more Mesh points with the Mesh tool.
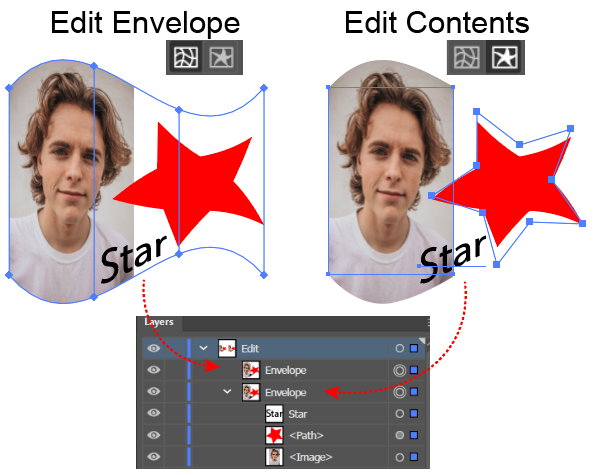
With the Edit Envelope button pressed (left) you are editing the Envelope's Mesh. With the Edit Content button pressed (right) you the Layers panel shows the Envelope's Contents, which you can edit in the usual way.
The Envelope is a Live technology object that is nondestructive and functions as both a container (for its target objects), and also implements a special kind of Mesh that has properties that normal containers and Meshes do not have. However, while you can edit either the Envelope's Mesh or its Contents, you cannot edit both at the same time as you would with a normal container. Instead, you must first signal whether you want to edit the Envelope's Mesh or its contents. Therefore, before you can start editing, you must first Select the Envelope object and then click either the Edit Envelope button (which is on by default), or the Edit Contents button. When (and only when) you click the Edit Envelope button, will you get access to the Mesh (i.e., its Anchor Points and Control Handles). Similarly, when (and only when) you click the Edit Contents button, will you see the Envelope's row in the Layers panel display a disclosure triangle, signaling that it will now act like a container, and give you access to the contents.
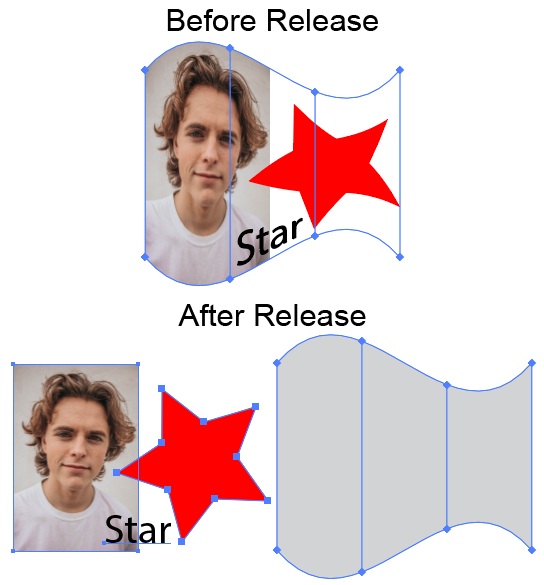
When you Release an Envelope Distortion, Ai gives you back not only the original target objects, but also the Mesh that it used to create the Envelope object.
With the Object > Envelope Distort > Release command you can undo the Envelope Distortion, and in the process verify that the Envelope is non-destructive (i.e., that it preserves both the target objects and the Mesh that was used to construct the Envelope. When you execute the Release command, Ai will:
Replace the Envelope sublayer in the Layers panel with a Group that contains the Mesh and a Group that contains the original target objects.
Show both the original target objects and the Mesh on the Artboard.
Using an Envelope that has a Warped Mesh
Envelope Distortion made with a Fish-shaped Mesh, one of 13 Warp presets
Create an Envelope Distortion using Make with Warp
To make an Envelope Distortion that uses a preset type of warped Mesh in Adobe Illustrator:
Select all the objects that you want to make up the target.
Execute the Object > Envelope Distort > Make with Warp (Alt + Shift + Ctrl + W) command. Ai will (A) apply the default style (Arc) to the target and (B) open the Warp Options dialog, which has the same appearance and options as the dialog that is invoked by the Effect > Warp command.
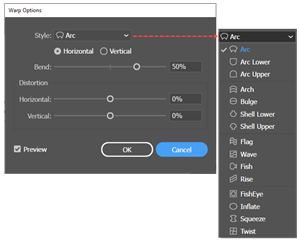
In the dialog, select the Style: Arc, Arc Lower, Arc Upper, Arch, Bulge, Shell Lower, Shell Upper, Flag, Wave, Fish, Rise, FishEye, Inflate, Squeeze, or Twist. Figure 5 Warp Options (not to be confused with the Envelope Options) tells Ai how to construct the Mesh when you use the Make with Warp command.
Warp Options (not to be confused with the Envelope Options) tell Ai how to construct the Mesh when you use the Make with Warp command.
In the dialogue you may also set options for the:
Horizontal or Vertical orientation.
Bend: the amount that the warp will bend, expressed as a positive or negative percentage of the maximum. Options id = "Warp".
Distortion in the Horizontal direction expressed as a positive or negative percentage of the maximum.
Distortion in the Vertical direction expressed as a positive or negative percentage of the maximum.
Click OK. Ai will:
Create a hidden, internal Mesh object of the type you specified Apply the distortion to the target objects.
Use the internal Mesh to create an Envelope object, which, in the Layers panel, will have the default name <Envelope>.
Show the word "Envelope" in the Appearance panel and below it the link to Contents. Clicking on the Contents link will reveal that it contains a Mesh, which contains Mesh Points.
Show the following in the Control panel:
An Edit Envelope button, which looks like the Mesh tool.
An Edit Contents button, which looks like a warped star.
Controls for all the options that were displayed in the Warp Options dialog.
Show the Mesh's Anchor Points, and Segments on the Artboard. Ai does this because the Edit Envelope button is enabled by default. If the Edit Contents had been the default, you would see a Selection box for the Contents.
Edit an Envelope
To edit the Mesh of a Warp Envelope Distortion in Adobe Illustrator:
Select the Envelope.
To change the Warp Options, in the Control panel, ensure that the Edit Envelope button is active; then use any of the controls for the Warp Options.
To edit the Mesh Control Points directly, do any of the following:
To add an Anchor Point, click on the Mesh.
To delete an Anchor Point, Direct Select it and press the Delete-key.
To move an Anchor Point or a Control Handle, Direct Select it and drag.
Reset with Warp
To reset the Warp Options dialog settings in Adobe Illustrator:
Select the Envelope object on the Artboard or in the Layers panel.
Ensure that the Edit Envelope button is active.
Execute the Object > Envelope Distort > Make with Warp (Alt + Shift + Ctrl + W) command. Ai will display the Warp Options dialog with its current settings.
Reset the settings.
Click OK
Note:
You can also apply the Object > Envelope Distort > Reset with Warp (Alt + Shift + Ctrl + W) command to an Envelope that you created with the Make with Mesh or the Make with Top Object command. If you do, Ai will display the Warp Options dialog, and you can essentially convert the other object into a Warp-type Envelope Distortion.
Release
To undo an Envelope Distortion in Adobe Illustrator:
Select the Envelope object either on the Artboard or in the Layers panel.
Execute the Object > Envelope Distort > Release command. Ai will:
Undo the Envelope Distortion.
In the Layers panel, replace the Envelope object, with two objects: (A) a Mesh object and (B) a sublayer for each of the original target objects.
Display on the Artboard:
The original target objects as they were when the Envelope Distort command was first applied (without any of the edits that you applied when they were within the Envelope object).
The Mesh object as it was just before you Released the Envelope Distortion.
Edit Contents
To edit the Contents of a Warp Envelope Distortion in Adobe Illustrator:
Select the Envelope object on the Artboard or in the Layers panel.
In the Control panel, click the Edit Contents button. In the Layers panel, the Envelope layer will then behave, not like a single Mesh object, but like a container, similar to a Group. Ai will display a disclosure triangle that allows you to see all the sublayers that represent the Envelope's contents, with all content sublayers selected by default. You can now:
Select the entire container object and change its Attributes in the Appearance panel or give it an Effect.
Click the disclosure triangle to display the Sublayers and target individual sublayers for editing.
Go to the Artboard and double-click the Envelope to enter Isolation Mode and use it to select and edit the Contents.
Using an Envelope Distortion that has a Rectangular Mesh
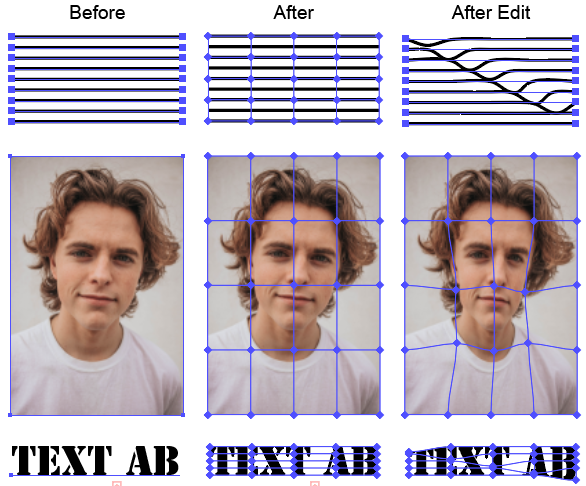
Envelope Distortion made with non-distorting rectangular Mesh, which was then edited to create a custom distortion. Before the Envelope Distortion, the vector drawing target (top left) was made up of 9 lines. All the Meshes have 4 rows and 4 columns.
Create an Envelope Distortion Using Make with Mesh
To make an Envelope Distortion that, by default, uses a generic non-distorting rectangular Mesh in Adobe Illustrator:
Select all the objects that you want to make up the target.
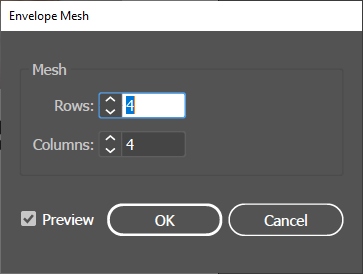
Execute the Object > Envelope Distort > Make with Mesh (Alt + Ctrl + M) command. Ai will display the Envelope Mesh dialog.
In the Dialog, set the number of rows and columns that you want the Mesh to have.
Click OK. Ai will:
The Envelope Mesh dialog tells Ai how many rows and columns you want the Mesh to have when you use the Make with Warp command. This dialog corresponds to the Warp Options dialog (not to the Envelope Options dialog).
Create an internal non-distorting rectangular Mesh object that has the number of rows and columns that you specified in the Mesh dialog.
Use the internal Mesh to create an Envelope object, which, in the Layers panel, will have the default name <Envelope>.
Show the word "Envelope" in the Appearance panel and below it the link to Contents. Clicking on the Contents link will reveal that it contains a Mesh, which contains Mesh Points.
Show the following in the Control panel:
An Edit Envelope button, which looks like the Mesh tool.
An Edit Contents button, which looks like a warped star.
Controls for the number of Rows and Columns, and a Reset Envelop Shape control that will immediately reset any Mesh Points and Control Handles that you have edited so that they define a simple, non-distorting rectangular grid.
Show the Mesh's Anchor Points, and Segments on the Artboard. Ai does this because the Edit Envelope button is enabled by default. If instead the Edit Contents had been the default, you would see Selection indicators around the Content objects.
Edit an Envelope
To edit the Envelope in Adobe Illustrator:
Select the Envelope object on the Artboard or in the Layers panel.
To change the number of rows and columns in the grid, go to the Control panel, and update the Rows and or Columns controls.
To edit the Mesh Control Points directly, do any of the following:
To add an Anchor Point, click on the Mesh.
To delete an Anchor Point, Direct Select it and press the Delete-key.
To move an Anchor Point or a Control Handle, Direct Select it and drag.
Reset with Mesh
To reset the Mesh Distortion's settings for the number of rows and columns in Adobe Illustrator:
Select the Envelope object on the Artboard or in the Layers panel.
Ensure that the Edit Envelope button is active.
Execute the Object > Envelope Distort > Reset with Mesh (Alt + Ctrl + M) command. Ai will display the Mesh Options dialog with the Rows and Columns fields set to their current values.
Reset the Rows and Columns values.
Click OK.
Note:
You can apply the Object > Envelope Distort > Reset with Mesh (Alt + Ctrl + M) command to an Envelope that was created with one of the other two Envelope Distortion commands, Ai will still display the Mesh Options dialog with the Rows and Columns fields set to their default values (4 x 4). This will convert the other object to a Mesh-type Envelope Distortion.
Release
To undo a Mesh Envelope Distortion in Adobe Illustrator:
Select the Envelope object either on the Artboard or in the Layers panel.
Execute the Object > Envelope Distort > Release command. Ai will:
Undo the Envelope Distortion.
In the Layers panel, replace the Envelope object, with two objects: (A) a Mesh object and (B) a sublayer for each of the original target objects.
Display on the Artboard:
The original target objects as they were when the Envelope Distort command was first applied (without any of the edits that you applied when they were within the Envelope object.
The Mesh object as it was just before you Released the Envelope Distortion.
Edit Contents of a Mesh Envelope Distortion
To edit the Contents of a Mesh Envelope Distortion in Adobe Illustrator:
Select the Envelope object on the Artboard or in the Layers panel.
In the Control panel, click the Edit Contents button. In the Layers panel, the Envelope layer will then behave, not like a single Mesh object, but like a container, similar to a Group. Ai will display a disclosure triangle that allows you to see all the sublayers that represent the Envelope's contents, with all content sublayers selected by default. You can now:
Select the entire container object and change its Attributes in the Appearance panel or give it an Effect.
Click the disclosure triangle to display the Sublayers and target individual sublayers for editing.
Go to the Artboard and double-click the Envelope to enter Isolation Mode and use it to select and edit the Contents.
Using an Envelope that uses a Closed Path as the Mesh
Three closed paths used to create the Meshes for Envelope Distortions with the Make with Top Object command. Note that on the Artboard: (A) the closed path (i.e., the Top Object) need not overlap the target, (B) the Envelope will replace the Top Object, and (C) the target will expand or contract to fill the Top Object.
Create an Envelope Distortion with Make with Top Object
To make an Envelope Distortion that allows you to create an arbitrary shape and use it as the Mesh in Adobe Illustrator:
Select all the objects that you want to make up the Target.
Draw a closed Path that you want Ai to use as the Mesh.
Make sure that the Path is on top of the Target in the Layers panel stacking order.
Execute the Object > Envelope Distort > Make with Top Object (Alt + Ctrl + C) command.
Ai will immediately:
Use the Path as the Mesh and the Target as the contents to create an Envelope object, which, in the Layers panel, will have the default name <Envelope>.
Show the word "Envelope" in the Appearance panel and below it the link to Contents. Clicking on the Contents link will reveal that it contains a Mesh, which contains Mesh Points. When making an Envelope Distortion with the Make with Top Object command, by default, Ai will place the Mesh points only on the outer boundary of the Distorting Path. You can, however, add more Mesh points with the Mesh tool.
Show the following in the Control panel:
An Edit Envelope button, which looks like the Mesh tool.
An Edit Contents button, which looks like a warped star.
Show the Mesh's Anchor Points, and Segments on the Artboard. Ai does this because the Edit Envelope button is enabled by default. If instead the Edit Contents had been the default, you would see Selection indicators around the Content objects.
Edit Envelope
To edit the Envelope that was made from a "Top Object" in Adobe Illustrator:
Select the Envelope.
To update the Envelope options for this type of Envelope Distortion object, go to the Control panel and click the Envelope Options button, which is just to the right of the Edit Contents button. Ai will pop up the Envelope Options dialog.
To edit the Mesh Control Points directly, do any of the following:
To add a Mesh Point, Get the Mesh tool and click on the Mesh. Ai will add a Mesh Point, which when it intersects with the boundary will add four more anchor points to the border.
To delete an Anchor Point, Direct Select it and press the Delete-key.
To move an Anchor Point or a Control Handle, Direct Select it and drag.
Release
To undo an Envelope Distortionin Adobe Illustrator:
Select the Envelope object either on the Artboard or in the Layers panel.
Execute the Object > Envelope Distort > Release command. Ai will:
Undo the Envelope Distortion.
In the Layers panel, replace the Envelope object, with two objects: (A) a Mesh object and (B) a sublayer for each of the original target objects.
Display on the Artboard:
The original target objects as they were when the Envelope Distort command was first applied (without any of the edits that you applied when they were within the Envelope object.
The Mesh object as it was just before you Released the Envelope Distortion.
Edit Contents
To Edit the Contents of a "Top Object" Envelope Distortion Adobe Illustrator:
Select the Envelope object on the Artboard or in the Layers panel.
In the Control panel, click the Edit Contents button. In the Layers panel, the Envelope Layer will then behave, not like a single Mesh object, but like a container, similar to a Group. Ai will display a disclosure triangle that allows you to see all the sublayers that represent the Envelope's contents, with all content sublayers selected by default. You can now:
Select the entire container object and change its Attributes in the Appearance panel or give it an Effect.
Click the disclosure triangle to display the Sublayers and target individual sublayers for editing.
Go to the Artboard and double-click the Envelope to enter Isolation Mode and use it to select and edit the Contents.
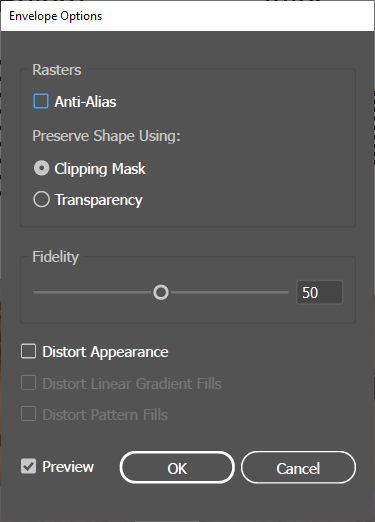
Envelope Options
Envelope Options Dialog
The Envelope Options control how the Mesh will distort the target when you execute one of the Make commands.
Update Envelope Options
To apply options to an Envelope object in Adobe Illustrator:
Select the object.
Execute the Object > Envelope Distort > Envelop Options command or click the Envelope Options button () in the Control panel. Ai will display the Envelope Options dialog.
In the dialog, update any of the following settings.
Envelope Option Settings
The envelope option settings are:
Anti Alias
Enabling this option can smooth jagged edges (aliasing) in raster images, which may appear when distortion exposes square pixels. It works by blending colors around edges to make the pixels less visible. Therefore, enabling Anti-Aliasing may reduce performance, and disabling it can decrease the time it takes to distort an image.
Preserve Shape Using
This area of the dialog contains a radio button group that allows you to specify that Ai should use either a Clipping Mask or Transparency (an Alpha Channel) to preserve the shape of a Mesh that is not rectangular.
Fidelity
This option tells Ai how closely it should align the target objects to the boundary of the Mesh when it constructs the Envelope.
Distort Appearance
Tells Ai that when creating the Envelope Distortion it should also distort any effects that were used in the target. This option also enables the following two options.
Distort Linear Gradients
Tells Ai that when creating the Envelope Distortion it should also distort any Linear Gradients that are used in the target.
Distort Pattern Fills
Tells Ai that when creating the Envelope Distortion it should also distort any Pattern Fills that are used in the target.

 ) in the Control panel. Ai will display the Envelope Options dialog.