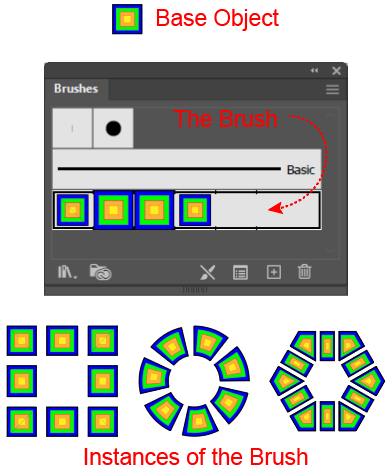
Shows the Object on which the Brush is based, the Brush itself (i.e., the template) based on that Object as it is represented in the Brushes panel, and 3 instances of the brush, i.e., 3 paths to which the Brush has been applied.
A Brush is a custom template that you can create, give a name, and then use to give the Stroke of any number of paths a special appearance. Illustrator allows you to create 5 types of Brushes: Bristle Brushes, Calligraphic Brushes, Scatter Brushes, Art Brushes, and Pattern Brushes. You can define as many Brushes of each type as you like, and you can use each Brush to give its appearance to as many different paths as you like.
You use Illustrator's Brushes panel to start the process of creating a Brush. When you click the New Brush button in the panel, Ai will take you to a New Brush dialog in which you can select one of the 5 different types of Brushes. When you have selected a Brush type, Ai will guide you to a dialog in which you can specify parameters for the selected type of Brush. Illustrator calls the parameters Options and names dialogs accordingly. For example, if you choose to create a Pattern Brush, Ai will give the parameters dialog the title Pattern Brush Options. When you specify the parameters (one of which is always the Brush's name), by filling in the fields of the Options dialog, Ai will store these values in a software object, which it will represent by an entry in the Brushes dialog.
Once you have created a Brush template, you can use it to give any number of paths the appearance that you have defined. Giving a path's stroke the appearance of a Brush is called applying a Brush to the path, and when multiple paths have the same Brush applied to them, they are called different instances of the Brush.
While Illustrator metaphorically calls these special Stroke templates Brushes, only 2 of the 5 types of Brushes (the Bristle Brush and the Calligraphic Brush) behave much like a real brush. For the other 3 types of Brushes, (the Scatter Brush, Art Brush, and Pattern Brush) the metaphor is stretched beyond any resemblance to the capabilities of any real brush. Nonetheless, each named Brush that you create is a special appearance, analogous to an Effect, and like an effect, when you have applied a Brush to a path, you can convert it to a path with a Basic appearance via the Object > Expand Appearance command.
Once you have created a Brush and have its representation in the Brushes panel, you can:
By selecting a path and then selecting the Brush, apply it to any path that you have already drawn, or
First select the Brush in the Brushes panel and then use a drawing tool to both draw a new path and apply the Brush at the same time.
This article will cover both, but will focus on applying Brushes to existing paths.
Brushes have features and settings that are specifically designed for use with a Graphics Tablet. On the premise that these features are best covered separately and as part of a dedicated article on using Graphic Tablets, they will not be discussed here.
Once you have applied a Brush to a path, you can edit the paths in two ways:
Redefine the Brush, i.e., change the options that you defined when you created the Brush. This will change the appearance of all the Strokes on all the paths to which the Brush was applied.
Modify some of the Brush's Options on an instance of the Brush, i.e., the Stroke of an individual Selected path. This will only change the Brush's appearance on that path and leave the other paths to which the Brush has been applied unchanged.
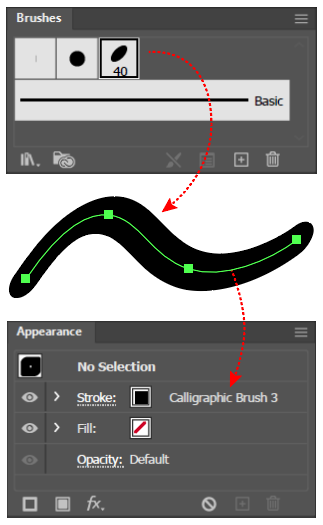
Calligraphic Brush applied to a path that when Selected shows the Brush type in the Appearance panel.
When you apply a Brush to a path's Stroke and then Select the path, the Appearance panel will show a dropdown that notes the type of Brush. Clicking the dropdown's disclosure arrow, will open a version of the Brushes panel that highlights the applied Brush.
You can still modify the Stroke Width of an individual path that is an instance of the Brush in the usual way even though it has had a Brush applied to its Stroke. That is, you can simply, click the Stroke link in the Appearance panel and in the dropdown dialog, change the Stroke Weight field value. Alternatively, you can update the Stroke Weight field in the Control panel or the Properties panel.
For Bristle Brushes and Calligraphic Brushes you can also change the color of an instance of the Brush in the usual way. However, for Scatter Brushes, Art Brushes, or Pattern Brushes, you cannot change the Stroke color of an instance of the Brush in the usual way (by simply changing the Stroke color), but must use a more complex procedure that uses a Colorization Method.
Types of Brushes
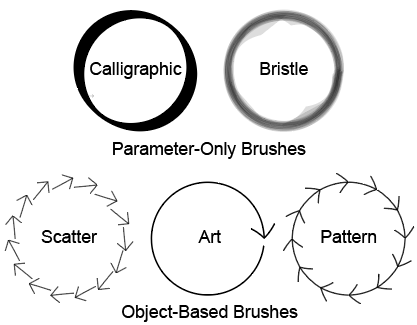
One instance of each of the 5 Types of Brushes, each applied to a circular path.
The 5 types of Brushes, fall into two groups:
Parameter-Only-Brushes (which include the Bristle Brush and Calligraphic Brush) are defined solely by the parameters that you specify when you create the Brush.
Object-based Brushes (which include the Scatter Brush, Art Brush, and Pattern Brushes) are also defined by parameters, but in addition, are based on one or more objects that you must specify when you define the Brush. Therefore, before you start to create one of these Brushes, you must first create the Base Object and select it.
In the Brushes panel, you will see that some types of Brushes are represented as square thumbnails, and others are represented as horizontal rectangular rows. This has nothing to do with whether the Brush is a Parameter Only Brush or an Object-Based Brush. For no obvious reason, only Calligraphic Brushes and Scatter Brushes are represented as square thumbnails.
Bristle Brush
A Bristle Brush is a Parameter-Only Brush that makes a path's Stroke look like it was made with a paint brush. The Brushes panel displays a Bristle Brush in a horizontal thumbnail with a small icon that shows the brush tip that the Brush Stroke is intended to simulate.
For any path to which this Brush has been applied, changing the Stroke color of the underlying path will automatically change the Brush's color. That is, you can change the color of an instance of a Brush by simply changing the path's Stroke Color
Calligraphic Brush
A Calligraphic Brush is a Parameter-Only Brush that makes a path's Stroke look like it was made with a calligraphic pen, which has an oblique nib. The Brushes panel displays a Calligraphic Brush in a square thumbnail.
For any path to which this Brush has been applied, changing the Stroke color of the underlying path will automatically change the Brush's color. That is, you can change the color of an instance of a Brush by simply changing the path's Stroke Color
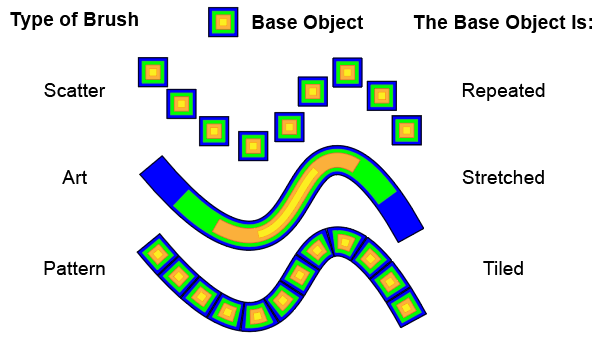
Example illustrating what the 3 types of Object-Based Brushes (i.e., the Scatter, Art, and Pattern Brushes) do with the same Base Object.
Scatter Brush
A Scatter Brush is an Object-Based Brush that makes a path's Stroke look like the object has been scattered (i.e., repeated) along the path. The Brushes panel displays the object that it distributes along the path in a square thumbnail.
For any path to which this Brush has been applied, changing the Stroke color of the underlying path will not automatically change the Brush's color. To be able to change the color of an instance of this Brush by simply changing the path's Stroke Color, you must use a Colorization Method.
Art Brush
An Art Brush is an Object-Based Brush that makes a path's Stroke look like an object was stretched (rather than repeated) along the length of the path. The Brushes panel displays the object that the Art Brush stretches along the path as a horizontal rectangular thumbnail.
For any path to which this Brush has been applied, changing the Stroke color of the underlying path will not automatically change the Brush's color. To be able to change the color of an instance of this Brush by simply changing the path's Stroke Color, you must use a Colorization Method.
Pattern Brush
A Pattern Brush is based on a main object, but unlike other Object-Based Brushes, it can also have 4 auxiliary objects, and it uses these 5 objects as tile-patterns with which it covers the Stroke of the path to which you apply the Brush. Put another way, a Pattern Brush can have up to 5 types of Tiles. When you create a Pattern Brush, you define the Tiles, i.e., you tell Ai what patterns to use for each type of Tile. The 5 types correspond to different parts of the path, including its: sides, inner corners, outer corners; and its beginning, and end. The main tile is the Side Tile, the one that Ai will repeat along the sides of the path. You must define a Side Tile; the other tiles are optional.
Although the tool seems to be designed for paths made up of straight segments, you can apply a Pattern Brush to a curved path. The Brushes panel displays a Pattern Brush as a horizontal rectangle that displays the thumbnails of the tiles that make up the path.
For any path to which this Brush has been applied, changing the Stroke color of the underlying path will not automatically change the Brush's color. To be able to change the color of an instance of this Brush by simply changing the path's Stroke Color, you must use a Colorization Method.
Brushes Panel Operations
Preliminaries
When you first open the Brushes panel, it displays some default Brushes. It is a common practice for designers to remove the default Brushes before they start defining their own custom Brushes.
To clear out the Brushes panelin Adobe Illustrator:
Click the hamburger button at the top right of the Brushes panel. Ai will display a dropdown list of Brush Panel Options.
Click the "Select All Unused" option. In the Brushes panel, Ai will select all the thumbnails that have not been applied to any path in the document.
Click the Delete Brush () button. Ai will delete all the unused Brushes, clearing out the panel and making it easy for you to save it in a Library.
Also, note that in the Brushes Panel the Basic Brush is not a real Brush that you can apply to a path Stroke. Instead, it functions as a reset button. Applying the Basic brush to a Selected path is equivalent.
to clicking the Remove Brush Stroke ( )button. In the Control panel, when you see that a Selected path has a Brush Definition of Basic, it means that the path has no Brush applied. You cannot delete the Basic Brush.
Apply a Brush to a Path's Stroke
To apply a Brush to a path in Adobe Illustrator:
Select a path that was created with nearly any drawing tool (including the Paint Brush tool, Pencil tool, Pen tool, Curvature tool, Line tool, Spiral tool, Arc tool, Live Shape tool, Rectangular Grid tool, or Polar Grid tool.
Go to the Brushes panel and choose a default or custom Brush from the panel, from the Brushes Library, or from the CC Libraries Panel.
Draw with a Brush
To draw with a Brush, i.e., draw a path and apply a Brush simultaneously in Adobe Illustrator:
Go to the Brushes panel and choose a Brush, or pick a Brush from a Library.
Get a drawing tool (including the Paint Brush tool, the Blob Brush tool, Pencil tool, Pen tool, Curvature tool, Line tool, Spiral tool, Arc tool, or a Live Shape tool – but not the Rectangular Grid tool, or the Polar Grid tool)
Draw out a path.
Note that drawing a free form path with the Paint Brush tool's default setting is much the same as drawing with the Pencil tool. By default, both tools give the path the same default Brush, and both tools have Fidelity and Width settings.
Remove an Applied Brush
This illustration contrasts removing an instance of a Brush versus Removing the Brush. This example uses the Text Divider 1 element in Brush Library's Decorative sub-library.
To undo the application of a Brush from a path, i.e., to delete an instance of a Brush in Adobe Illustrator:
Select the path.
Go to the Brushes panel and click the Remove Brush Stroke () button. Ai will remove the Stroke from the selected path only, and leave the Brush's definition in the Brushes panel.
Delete a Brush
To delete a Brush, i.e., to delete the Brush template from the Brushes panel, and remove the instances of the Brush from all the paths to which it was applied in Adobe Illustrator:
Go to the Brushes panel and click the Thumbnail that represents the Brush.
Click the Delete Brush () button. Ai will pop up a message that says: "One or more of the brushes are in use and cannot be deleted until their strokes are expanded or removed." The message box also has three buttons: Expand Strokes, Remove Strokes, and Cancel.
Click the Remove Strokes button. Ai will remove the Strokes from all instances of the Brush and remove the Brush's definition from the Brushes panel.
Optionally, if you choose the Expand Strokes button, Ai will:
Remove the Brush from the Brushes panel.
In the Appearance panel, convert all the paths to which the Brush was applied with a Group that looks the same, but that ultimately contains only paths that have just basic fills and strokes.
Create a Custom Brush
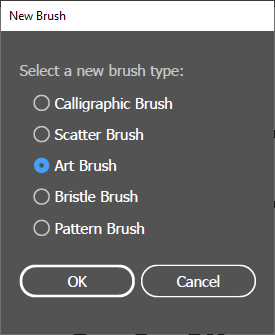
New Brush Dialog with Art Brush Radio Button Selected
To create a Brush in Adobe Illustrator:
If you intend to create a Parameter-Only Brush (i.e., a Bristle Brush or Scatter Brush), go directly to Step 3.
If you intend to create an Object-Based-Brush (i.e., a Scatter Brush, Art Brush, or Pattern Brush), you must first create the object on which the Brush is based:
If you intend to create a Scatter Brush, go to the Artboard and Select the object that you want Ai to repeat along the path to which the Brush will be applied. Continue with Step 3.
If you intend to create an Art Brush, Select an object on the Artboard that you want Ai to stretch along the path to which the Brush will be applied. Continue with Step 3.
If you intend to create a Pattern Brush, you must first create the object that you want Ai to use as the Side Tile (the Tile that Ai will repeat along the sides of the path) and then Select it before you go on to the next step. When you create a Pattern Brush, you can use Pattern Swatches to specify the tiles that you want Ai to use for the path's sides, inner corners, outer corners, start, and end. Continue with Step 3.
Go to the Brushes panel and click the New Brush button (). Alternatively, you can drag the Artboard object into the Brushes panel. Ai will display the New Brush dialog that will present a radio button for each type of Brush.
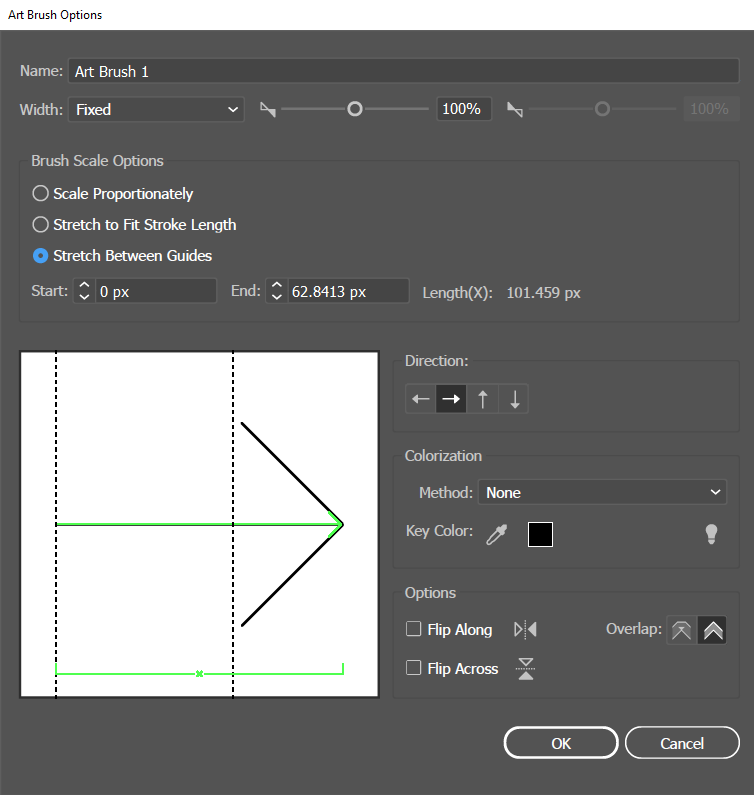
Art Brush Options dialog with the 'Stretch Between Guides' option selected and the Preview Box showing the Guides, between which Ai will stretch the Object.
In the dialog, choose a radio button for one of the five types of Brushes, and click OK. Ai will launch an Options dialog for the type of Brush that you selected. For example if you chose the Art Brush radio button, Ai would launch the Art Brush Options dialog.
In the Options dialog, give the Brush a name, adjust the controls and click OK. Ai will create the Brush and add it to the Brushes panel.
Recall that when you have created a custom Brush, you can apply it to any number of paths. Those paths are referred to as Instances of the Brush. When you have applied a Brush to several paths, creating several instances of the Brush, you can change the paths in two ways:
Modify the properties of a single instance of the Brush. When you modify just one instance of a Brush, you can only change some, but not all of the options that you set when you created the Brush.
Redefine the Brush itself, i.e., change the options that you set when you created the Brush. Redefining the Brush will also change all the instances of the Brush.
Modify an Instance of a Brush
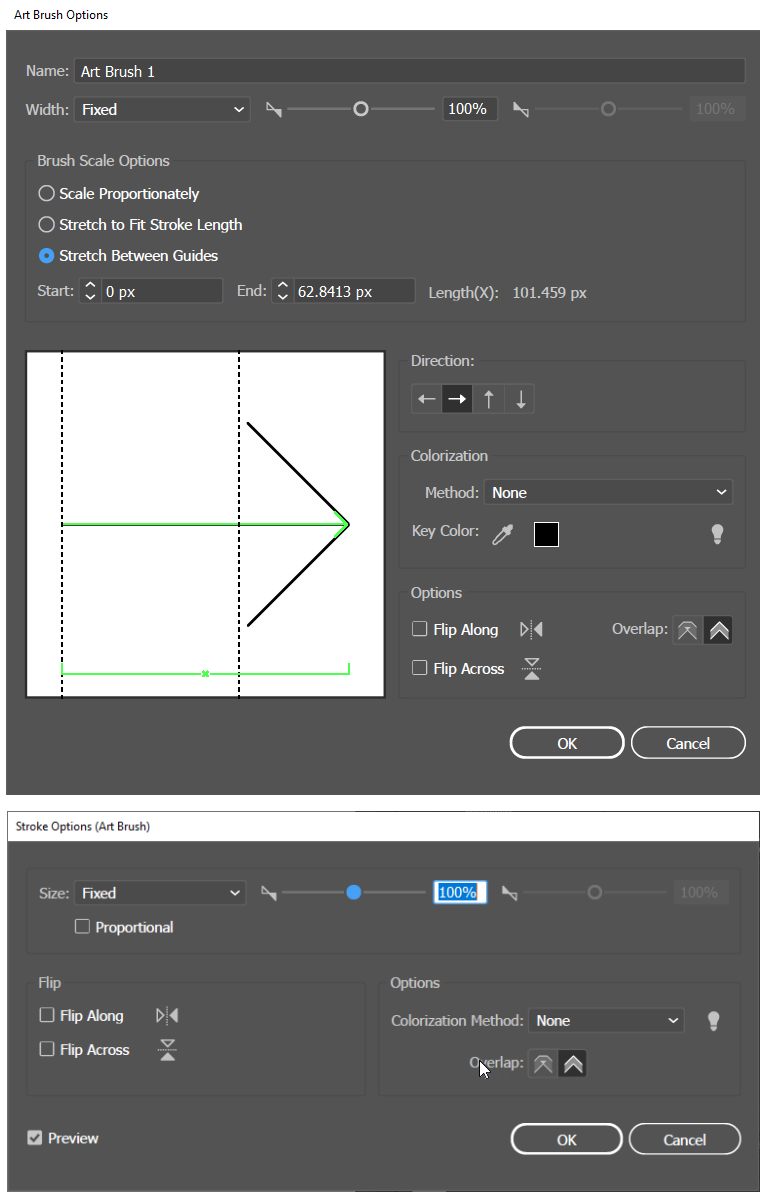
Comparison of the dialog for Creating an Art Brush with the dialog for Modifying an Instance of an Art Brush.
You can change a single instance of a Brush, i.e., you can change some of the Brush's properties on an individual path, without changing the appearance of all the other paths to which you have applied the same Brush.
To modify the appearance of a Brush on just one specific path in Adobe Illustrator:
Select the path to which a Brush has been applied.
Go to the Brushes Panel and click the Options of Selected Objects () button. Ai will launch a Brush instance modification dialog, which will have a title that looks like this: Stroke Options (x). For example, if the Stroke on the selected path was an Art Brush, then Ai would launch the Stroke Options (Art Brush) dialog. Note that the Brush instance modification dialogs do not have all the same fields as the X Brush Options dialog.
Update the fields that you want to change. Ai will change the appearance of the selected path only, and will leave the other paths to which the Brush has been applied unchanged.
Redefine a Brush
You can change, not only the properties of an individual instance of a Brush, but the properties of a Brush i.e., the options that you set when you defined a Brush. This will change all the instances of that Brush.
To change the definition of a Brush in Adobe Illustrator:
Go to the Brushes panel. When you hover over a Brush's thumbnail, Ai will pop-up a tool-tip that shows the name of the Brush.
Double-click the thumbnail of the Brush (X) that you want to redefine. Ai will launch the X Brush Options dialog, the same dialog that you used to create the Brush.
In the dialog, update the fields that you want to change and Click OK. Ai will pop up a message saying: "That brush is in use and some strokes may have overridden its options. Do you want to apply the changes to existing brush strokes?".
Click the Apply Strokes Button. Ai will change all the paths to which the brush is applied to comply with the new definition.
Obviously, the bulk of the work in creating a Brush is in adjusting the Options for each type of Brush, which is covered in the following sections.
Bristle Brush Options
Bristle Brush Options Dialog
The Bristle Brush Options dialog fields define properties (parameters) of a particular Bristle Brush. The properties correspond to and are named metaphorically after the properties of real brushes that they are designed to simulate. Put another way, we can think of a Bristle Brush as having simulated or virtual properties of real brushes. As you change the values of the Brush Option fields, the Preview window will show the result. The Bristle Brush Options dialog provides the following fields:
Name
The Name field allows you to give the new brush a 31-character name. This name appears as a tool-tip when you mouse-over the Brush's thumbnail in the Brushes panel. You can only update the Name field when you create or redefine the Brush.
Shape
The Shape field is a dropdown that allows you to choose from 10 settings of the Shape parameter. Each setting represents a combination of 2 options for how the virtual brush's bristles are bundled (Round or Flat) and 5 options for how they are trimmed (Point, Blunt, Curve, Angle, or Fan).
Size
The Brush Size is measured in millimeters and is intended to be a virtual analog of the diameter of the brush at the ferrule, i.e., the area where the bristles are bound to the handle.
Bristle Length
The Bristle Length increases or decreases the virtual thickness of the Brush stroke. This makes the Stroke wider, as though you were painting not just with the tip but also with some of the side of the brush.
Bristle Density
The Bristle Density increases or decreases the number of virtual bristles. Increasing the Density makes the gradations of Stroke finer and less distinguishable.
Bristle Thickness
The Bristle Thickness increases or decreases the size of individual virtual bristles. Increasing the thickness makes the Bristle lines more prominent.
Paint Opacity
The Paint Opacity increases or decreases the opacity of the entire Stroke. At 100% Opacity the stroke is Black.
Stiffness
The Brush Stiffness increases or decreases the stiffness of individual virtual Bristles. This makes the Stroke narrower, as though you were painting only with the tip of the Brush.
Calligraphic Brush Options
Calligraphic Brush Options Dialog
Besides the Name field, the Calligraphic Brush Options panel has three fields (Roundness, Angle, and Size) that define the Brush's basic numerical properties (or dimensions). However, each basic numerical property field also has a dropdown that can modify its appearance. You can set the dropdown to either Fixed or Random. There are other settings, but they apply only when you are using a Graphics Tablet. If you choose Random, Ai will enable a Variation modifier field in which you can specify the amount of variation in degrees of Angle, percent of Roundness, or Size in points.
The Calligraphic Brush Options dialog provides the following fields:
Name
The Name field allows you to give the new brush a 31-character name. This name appears as a tool-tip when you mouse-over the Brush's thumbnail in the Brushes panel. You can only update the Name field when you create or redefine the Brush.
Roundness
The Roundness field allows you to specify how elliptical the virtual Brush's cross section will be (expressed as a percentage of totally round).
Angle
The Angle field allows you to set the angle of the major axis of the cross section of the virtual Brush.
Size
The Size field allows you to specify the height of the virtual brush's Stroke (measured in points).
Scatter Brush Options
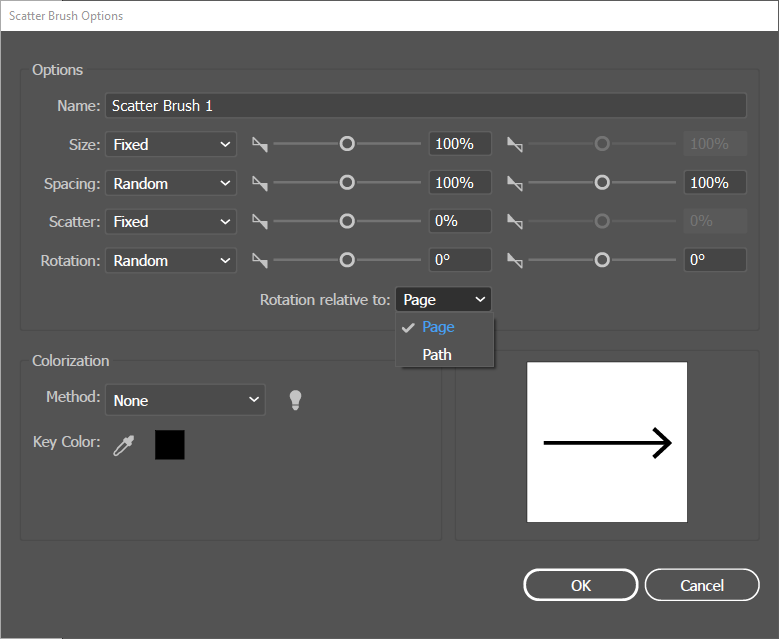
Scatter Brush Options Dialog
A Scatter Brush is based on an object which you must select before you click the Brush panel's New Brush button to start creating the Brush. When you apply the Brush to a path, Ai will scatter virtual copies of the object along the path's Stroke. The Scatter Brush Options panel provides 4 fundamental numerical fields (Size, Spacing, Scatter, and Rotation) that define how the scattered copies will look relative to the original object on which the Brush is based.
Each of the 4 fundamental fields also has a dropdown that can modify its appearance. You can set the dropdown to either Fixed or Random (There are other settings, but they apply only when you are using a Graphics Tablet).
If you choose Fixed, the numerical fields apply uniformly to all the virtual copies.
If you choose Random, Ai will enable a second set of numerical fields for each basic property that defines how you want the copies to vary in Size, Spacing, Scatter, and Rotation. Note that if you define a Brush with one or more fields set to Random, then each time you reapply the same Brush to the same path, you will get a new look.
The Scatter Brush Options dialog provides the following fields:
Name
The Name field allows you to give the new brush a 31-character name. This name appears as a tool-tip when you mouse-over the Brush's thumbnail in the Brushes panel. You can only update the Name field when you create or redefine the Brush.
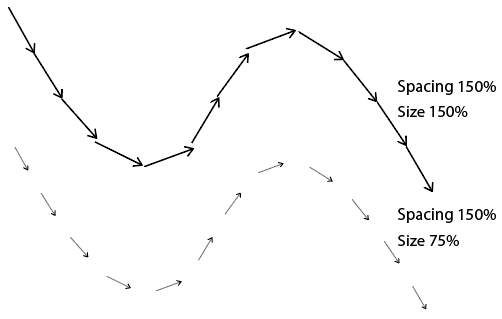
Size
The Effect Size Option
The Size field allows you to enter a scaling factor from 10% to 1000% relative to the size of the object on which the Brush is based. The default value is 100%.
If the Size dropdown is set to Fixed, only the first scaling factor value is available and its value is applied uniformly to all virtual copies.
If the Size Option dropdown is set to Random, the first value represents a minimum and the second a maximum
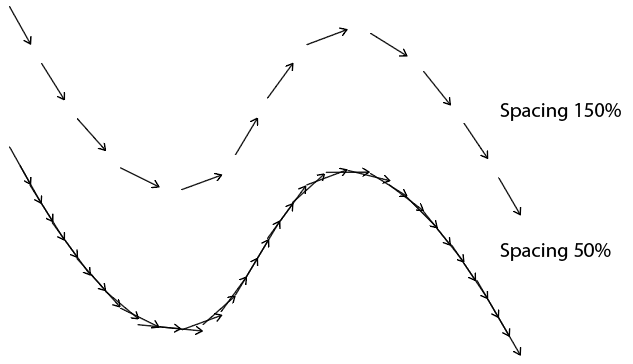
Spacing
The Effect of the Spacing Option
The Spacing field allows you to enter a value that determines the amount of space between virtual copies of the object on which the Brush is based. The value must be a percentage (from 10% to 1000%) relative to the size of the object on which the Brush is based. The default value is 100%.
If the Spacing dropdown is set to Fixed, only the first value is available and its value is applied uniformly to all virtual copies.
If the Spacing Option dropdown is set to Random, the first value represents a minimum and the second a maximum value, and Ai will randomly assign a value between the minimum and maximum to each virtual copy on the path.
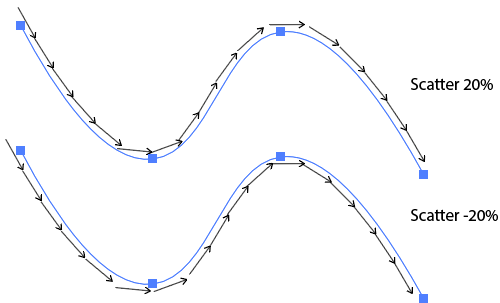
Scatter
The Effect of the Scatter Option
The Scatter field allows you to enter a percentage value that specifies how far Ai should offset the copies from the path. The Scatter field may be a positive or negative value. A positive valued tells Ai to scatter the copies above the path. Negative values tell Ai to scatter the copies below the path.
If the Scatter dropdown is set to Fixed, only the first scaling factor value is available and its value is applied uniformly to all virtual copies.
If the Scatter Option dropdown is set to Random, the first value represents a minimum and the second a maximum value. Ai randomly assigns a value between the minimum and maximum to each virtual copy on the path.
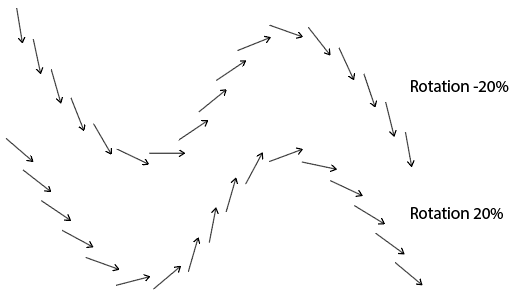
Rotation
The Effect of the Rotation Option
The "Rotation relative to" specifies whether the rotation of the virtual copies should be relative to the Page or relative to the path to which the Scatter Brush is applied.
If the Rotation dropdown is set to Fixed, only the first scaling factor value is available and its value is applied uniformly to all virtual copies.
If the Rotation Option dropdown is set to Random, the first value represents a minimum and the second a maximum value, and Ai will randomly assign a value between the minimum and maximum to each virtual copy on the path.
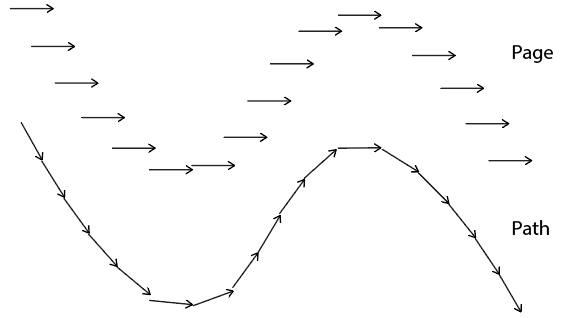
Rotation Relative To
Example of Rotation relative to the Page vs. Rotation Relative to the Path.
The "Rotation relative to" specifies whether the rotation of the virtual copies should be relative to the Page or relative to the path to which the Scatter Brush is applied.
Colorization
With this Brush, as with any object-based Brush, when you have an instance of the Brush simply changing the Stroke color of the underlying path will not automatically change the Brush's color. To be able to change the color of an instance of a Brush by simply changing the path's Stroke Color, you must use a Colorization Method.
Multicolor Brushes
If you want to create a multicolored Brush:
You must incorporate the colors into the object on which the Brush is based. You cannot, however, create a Brush that is based on an object with a gradient (multicolored or otherwise). The best you can do is to use a Blend.
It is probably best to set the Colorization Method field to None, because if you set the Colorization Method to Tints or to Tints and Shades and then you change the color of the underlying path, the colors will disappear. If you set the Colorization Method to Hue Shift, and then change the color of the underlying path, the colors will change unpredictably. With the Colorization Method, you can only change the colors of an instance of the Brush by changing its key color.
To recolor an instance of a multicolored Brush, you must redefine the Brush. Fortunately, if you have a Scatter Brush that is based on a multi-colored object, you can recolor it with the Edit > Edit Colors > Recolor Artwork command (). If you use the Recolor Artwork command on any path to which you have applied a Scatter Brush, Ai will automatically create a new Brush with the recolored object, and will place it in the Brushes panel.
Recolor a Scatter Brush
To Recolor a Scatter Brush in Adobe Illustrator:
Select an instance of the Scatter Brush.
Execute the Edit > Edit Colors > Recolor Artwork command (). Ai will launch the Recolor Artwork dialog.
Use the dialog's Edit or Assign tabs to specify a recolored version of the instance of the Scatter Brush and click the OK button. As soon as you click OK, Ai will automatically:
Create a new, Recolored version of the Scatter Brush.
Apply it to the instance of the old version on which you used the Recolor Artwork command.
Optionally, apply the new Brush to other paths just as you would any other Brush.
Art Brush Options
The Art Brush Options dialog (for creating a Brush) compared with the Brush Options (Art Brush) dialog (for modifying an instance of a Brush). Note that the Preview box (which you use for restricting the area of the object that Ai should stretch) is available only on the Art Brush Options dialog, when you create the Brush.
There are three types of Art Brushes which are defined by the Brush Scale Options radio buttons, and are differentiated by how the object on which the Brush is based is to be extended along the length of the path: Scale Proportionally, Scale to Fit Stroke Length, or Stretch Between Guides.
Once you define one of these scaling options, it becomes a permanent part of the brush's definition. That is, you cannot modify the scaling option of an instance of a Brush by clicking the Options of Selected Object button and then adjusting the scaling options on the Stroke Options (Art Brush) dialog, and for that reason, the dialog box (shown at the bottom of the accompanying figure, has no Brush Scale Options fields.
The Art Brush Options dialog provides the following fields:
Name
The Name field allows you to give the new Brush a 31-character name. This name appears as a tool-tip when you mouse-over the Brush's thumbnail in the Brushes panel. You can only update the Name field when you create or redefine the Brush.
Width
The Width field increases or decreases the width of the Brush stroke by a percentage of the object on which the Brush is based. The default value is 100%. You can modify the Width of any path to which you have applied an Art Brush by clicking the Options of Selected Object button at the bottom of the Brushes panel and adjusting the Width field in the Stroke Options (Art Brush) dialog.
Brush Scale Options
Effect of choosing each of the 3 options for how Ai should stretch the Base-Object along the Stroke of a path.
The 3 Brush Scale Options radio buttons tell Ai how it should stretch the object on which the brush is based along the length of the Brush. The 3 options are:
Scale Proportionally tells Ai to keep the object's width proportional to its length.
Stretch to Fit Stroke Length tells Ai to simply stretch the object along the path.
Stretch Between Guides tells Ai to add movable guidelines to the preview box. You can then drag the guidelines to define an area within which Ai will stretch the object on which the Brush is based and outside of which Ai will not stretch the object.
You can only set the Brush Scale Options when you define the Brush. You cannot modify the scaling options via the Options of Selected Object button ( ) and the Stroke Options (Art Brush) dialog.
Direction
The 4 Direction radio buttons tell Ai in what the object on which the Brush is based should be stretched along or across the path: Right to left, left to right (the default), bottom to top, or top to bottom. You cannot modify this option on individual paths using the Stroke Options (Art Brush) dialog.
Flip Along and Flip Across
The Flip Along and Flip Across checkboxes tell Ai that when it applies the Brush to a path, it should flip the object on which the Brush is based along the path from left to right or across the path from bottom to top, or both. You can modify this option on individual paths by clicking the Options of Selected Object button at the bottom of the Brushes panel and adjusting the Width field in the Stroke Options (Art Brush) dialog.
Colorization
The same Colorization method values apply to the Scatter Brush, Art Brush, and Pattern Brush.
Multicolor Art Brushes
If you want to create a multicolored Brush:
You must incorporate the colors into the object on which the Brush is based. You cannot, however, create a Brush that is based on an object with a gradient (multicolored or otherwise). The best you can do is to use a Blend.
It is probably best to set the Colorization Method field to None, because if you set the Colorization Method to Tints or to Tints and Shades and then you change the color of the underlying path, the colors will disappear. If you set the Colorization Method to Hue Shift, and then change the color of the underlying path, the colors will change unpredictably. With the Colorization Method, you can only change the colors of an instance of the Brush by changing its key color.
To recolor an instance of a multicolored Brush, you must redefine the Brush. Fortunately, if you have an Art Brush that is based on a multi-colored object, you can recolor it with the Edit > Edit Colors > Recolor Artwork command (). If you use the Recolor Artwork command on any path to which you have applied an Art Brush, Ai will automatically create a new Brush with the recolored object, and will place it in the Brushes panel.
Recolor an Art Brush
To Recolor an Art Brush in Adobe Illustrator:
Select any instance of the Art Brush.
Execute the Edit > Edit Colors > Recolor Artwork command (). Ai will launch the Recolor Artwork dialog.
Use the dialog's Edit or Assign tabs to specify a recolored version of the instance of the Art Brush and click the OK button. As soon as you click OK, Ai will automatically:
Create a new, Recolored version of the Art Brush.
Apply it to the instance of the old version on which you used the Recolor Artwork command.
Optionally, apply the new Brush to other paths just as you would any other Brush.
Pattern Brushes
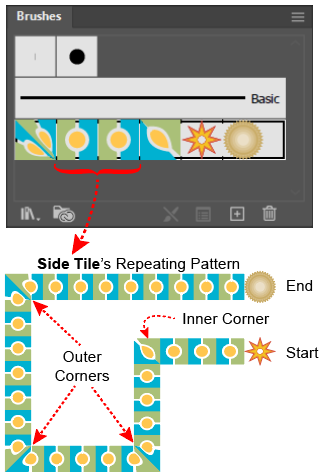
Types of Tiles and how they are represented in the Brushes panel. Note that the Brushes panel represents the Side tile with 2 thumbnails side-by-side.
Pattern Brushes are more complex (and require more explanation) than other Object-Based Brushes because:
Pattern Brushes are designed to be applied to paths that have straight sides and corners, and to cover these paths with Tiles. The Brush may have up to 5 distinct types of tiles which it may use for the sides, corners, start, and end of the path.
Corresponding to the 5 types of Tiles, Pattern Brushes, unlike Object-Based Brushes, may be based on, not just one, but up to 5 objects that can be associated with the 5 types of Tiles.
When you create a Pattern Brush, you must define its Tiles, which you do by specifying an object that you want Ai to use as the pattern for the Tile. You must define one main object (that must be a horizontally repeating pattern) for Ai to use as what it calls its Side Tile, which it will repeat along the sides of the path to which you apply the Brush. The other objects and types of Tiles are optional
You can define a Tile three ways:
Define the main, Side Tile, in the same process that you use to create the Brush. You can simply Select an object on the Artboard and then click the New Brush button in the Brushes panel. Ai will automatically use the Artboard object to define the Side Tile.
Use a Pattern Swatch that you have previously created to define the Tiles. In fact you can create a new Pattern Brush using just Pattern Swatches. To do that you would create an "empty" Pattern Brush by clicking the New Brush button in the Brushes panel. Ai will create a new Pattern Brush with no Tiles defined. Then you can use the Brushes panel to define any of the 5 types of Brushes as being associated with any of the Pattern Swatches that you have created in the document. When you define a Pattern Brush the Brushes panel provides a dropdown for each type of Tile from which you can select a Pattern Swatch to associate with that type of Tile.
Define the Side Tile from an Artboard object when you create the Brush and then use Swatches to define the other, optional types of Brushes. In addition, Ai will automatically create some patterns that are common variations of the Side Tile pattern and will make these patterns available as choices in the same dropdown that you use to select Swatches.
The 5 types of tiles that may make up a Pattern Brush are:
Outer Corner Tile, which defines the pattern that will be used at any corners that point out into the exterior the path to which you apply the brush.
Side Tile, which defines the rectangular figure that the Brush will place side-by-side to form a pattern that will repeat to make up most of the path to which you apply the brush. For example, if you apply the brush to a closed path, the Side tile pattern will repeat to form the sides (i.e., most of the border) of the path.
Inner Corner Tile, which defines the pattern that will be used at any corners that point into the interior the path to which you apply the brush.
Start Tile, which defines the first tile of the path to which you apply the brush.
End Tile, which defines the last tile of the path to which you apply the brush.
Create a Patten Brush from an Artboard Object
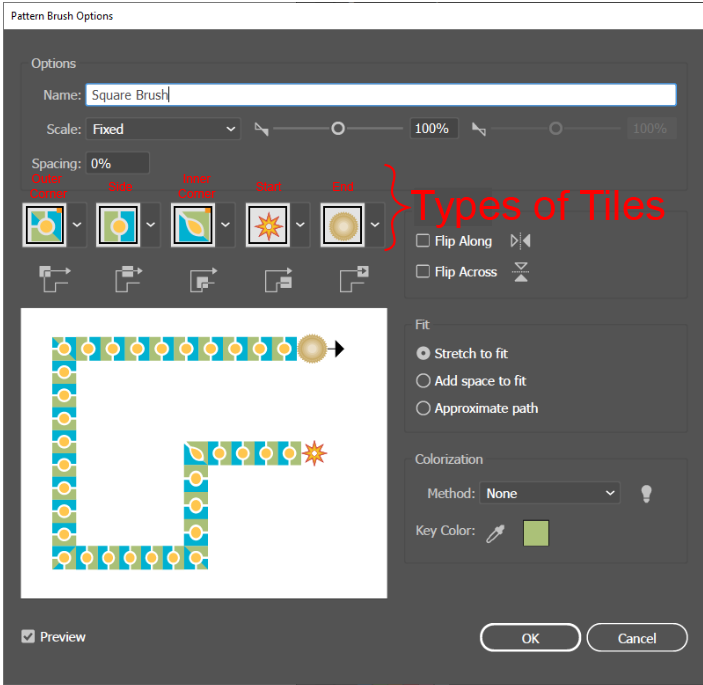
Pattern Brush Options Dialog
To create a Pattern Brush from an Artboard object that is a horizontally repeating pattern in Adobe Illustrator:
Create an object that has a horizontally repeating pattern that you want the Brush to use as its Side Tile.
Select the repeating tile object.
Go to the Brushes panel and Click the New Brush button. Alternatively, drag the Side tile pattern into the Brushes panel (Window > Brushes). Ai will pop up the New Brush dialog.
In the dialog, select the Pattern Brush radio button and Click OK. Ai will pop up the Pattern Brush Options dialog in which it will:
Assign the Brush a default name.
Automatically assign the repeating pattern that you dragged into the Brush dialog to be the Side Tile.
Automatically generate 4 common variations of the Side Tile that you can associate with the non-repeating Tiles.
Assign one of the 4 auto-generated patterns to be the Outer Corner Tile.
In the Options dialog, set the common options. Typically, you will want to, at least:
Assign a meaningful Name.
Choose one or more of the swatches that you have previously added to the Swatches panel and assign them to non-repeating tiles. To assign a Swatch to a Tile, simply:
Click the down-pointing arrow next to the Tile's icons (buttons). Ai will display a list of its automatically generated patterns and the document's Pattern Swatches.
In the dropdown, select one of the auto-generated patterns or Swatches.
Choose the Tint options from the Colorization Method dropdown. This allows you to change the color of the Brush. More on this below.
Click OK. Ai will add the Pattern Brush to the Brushes Panel.
If you don't like any of the automatically generated choices for the tiles, you can create custom art for the Outer Corner, Inner Corner, Start, or End tiles, and then use these patterns to define or redefine any of the Brush's 5 types of Tiles.
Create a Patten Brush from Pattern Swatches
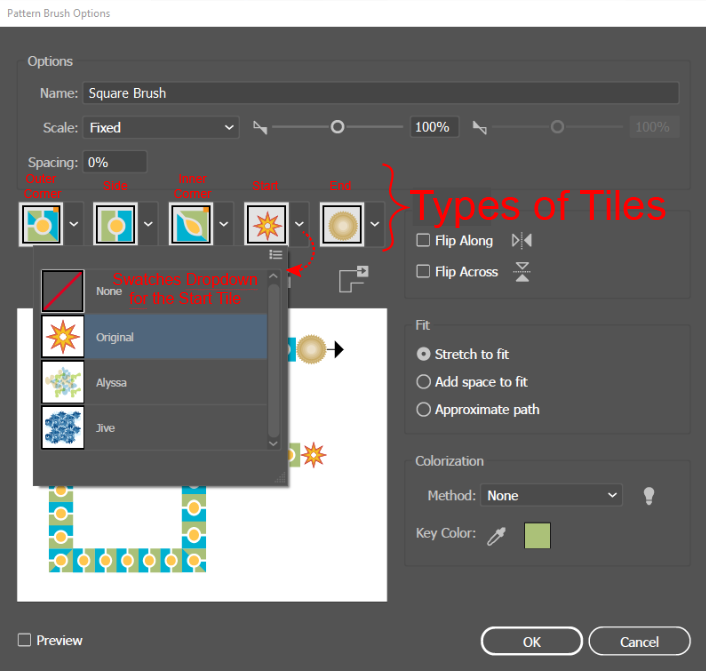
Pattern Brush Options Dialog showing the dropdown that you use to choose a Swatch to associate with a Tile.
Creating a Pattern Brush from Swatches has the advantage that you can use Ai's Pattern Editing Mode feature to construct the Brushes Tile patterns.
To create a Pattern Brush entirely from Swatches in Adobe Illustrator:
Create the Pattern Swatches that you want to use for the Brush's Side tile and any of the other 4 types of tiles. To create a Pattern Fill Swatch:
Create an object with the proper shape, size, and pattern to serve as the intended tile.
Select the object on the Artboard.
Execute the Object > Pattern > Make command. Ai will pop up a message telling you that "The new pattern has been added to the Swatches panel. Any changes made while in Pattern Editing Mode will be applied to the swatch upon exit." Click OK. Ai will show you a preview of the pattern and launch the Pattern Options dialog.
Adjust the Parameters, which are described in the Pattern Swatches article, and close the dialog. Ai will make the new Pattern Swatch available in the Brush Options dialog so that you can use the Swatch to define any of the 5 types of Pattern Brush tiles.
Go to the Brushes panel and click the New Brush () button. Ai will launch the New Brush dialog.
In the dialog, click the Pattern Brush radio button. Ai will launch the Pattern Brush Options dialog. Initially, the thumbnails for all 5 types of tiles will be undefined.
In the dialog, click the dropdown next to the thumbnail for the Side Tile and choose a Pattern Swatch that has a horizontally repeating pattern. Ai will show you the result in the Preview Window.
For each of the other 4 optional types of Tiles that you want to define, click the dropdown next to the thumbnail and select either a Pattern Swatch or one of Ai's auto-generated patterns. Ai will show you the result in the Preview Window.
At the bottom of the Brushes panel, click the OK button.
Modify an Instance of a Pattern Brush
You can change some of the properties of an instance of a Pattern Brush without changing any of the other instances of the same Brush. That is, when you have applied a Brush to several paths, you can change some (but not all) of the attributes of that brush on an individual path without changing those attributes on any of the other paths to which you have applied the same Brush. The properties that you cannot change are the definitions of the Tiles. If you want to change how the Tiles are defined, i.e., what object is associated with each type of Tile, you must Redefine the Brush. That is, the Pattern Brush Options dialog has the 5 dropdowns that you use to associate objects with tile types, but the Stroke Options (Pattern Brush) dialog, which you us to modify single instances of a brush, does not.
To modify an instance of a Pattern Brush in Adobe Illustrator:
Select the path to which a Brush has been applied.
Go to the Brushes Panel and click the Options of Selected Objects () button. Ai will launch the Stroke Options (Pattern Brush) dialog. Note that the Brush Stroke Options (Pattern Brush) does not have all the same fields as the Pattern Brush Options dialog. Most notably, you cannot give the Brush a new Name, or define new Tiles via the Stroke Options (Pattern Brush) dialog.
Update the fields that you want to change and click OK. Ai will change the appearance of the selected path only, and will leave the other paths to which the Brush has been applied unchanged.
Note that if you have modified one or more instances of a Brush, then if you want to Redefine the Brush (i.e., the template rather than an instance of the Brush) the new properties may override some of the modifications that you have made to individual instances of the Brush. The next section describes how Ai addresses this issue.
Redefine a Tile and Pattern Brush
Redefining a Pattern Brush is necessary whenever you want to change how one of its tiles is defined. Recall that, you cannot change how a Brush's Tiles are defined by modifying an individual instance of a Brush via the Stroke Options (Pattern Brush) dialog. To change even one tile on one instance of a Brush, you must redefine the entire Brush and then apply the new Brush to the instance that you want to change.
Fortunately, when you redefine a Tile, Ai will automatically create a new Brush and will apply the new definition to all the new instances that you create, and will ask you what you want to do with any old instances that you created before you redefined the Brush. Ai must ask because some of the properties of the new definition may conflict with the modifications that you made on individual instances of the old Brush. So, Ai will have to ask you whether you want to replace them or let them alone.
To redefine a Pattern Brush in Adobe Illustrator:
Go to the Brushes panel (Window > Brushes) and double click the Brush. AI will launch the Pattern Brush Options dialog.
Check the Preview checkbox.
Click the down-pointing arrow at the right side of any Tile that you want to change. Ai will reveal a dropdown a list that shows:
Its automatically generated options for the Tile, and
Any Pattern tiles that are in the Swatches Panel.
In the dropdown, select the generated option or the Pattern Swatch that you want to associate with that type of Tile. Ai will redefine the Tile and update the Preview.
Update any of the other Options (described below). Ai will update the Brush's definition and reflect the change in the preview.
Click the OK button. If you have already applied the old Brush to some paths, Ai will pop up a dialog that says: "That brush is in use and some strokes may have overridden its options. Do you want to apply the changes to existing brush strokes?" You can respond Apply to Strokes, Leave Strokes, or Cancel:
The Apply to Strokes option will:
Redefine the Brush to include the newly changed Options.
Apply the redefined Brush to all the existing and future instances of the Brush.
The Leave Strokes option will:
Leave the strokes on existing instances of the Brush (including any modifications) unchanged.
Leave the old Brush definition unchanged.
Automatically create a new Brush with the redefined Options and give it a new default name. When you create new instances of the Brush you may use either the old or the new, automatically created, Brush.
The Cancel option aborts the change.
As an alternative to this procedure, you can also redefine a Tile and create a new Brush, as described below, by dragging an object from the Artboard directly into the Brushes panel.
Redefine a Tile with an Artboard Object
As an alternative to the above-described method of redefining a Tile and Brush from an automatically generated option or from a Swatch, you can also redefine a Tile and create a new Brush by dragging an object from the Artboard directly into the Brushes panel.
To redefine a Tile and its Brush with an Artboard object in Adobe Illustrator:
Create an object with the proper shape, size, and pattern to serve as the intended tile.
Alt + drag the new object directly from the Artboard onto the Brushes panel and drop it onto the thumbnail that represents the type of tile that you want to change. Ai will display the Pattern Brush Options dialog with the new Tile definition in the Preview box.
In the Options dialog, click OK. Ai will create a new Pattern Brush that has the new Tile. If you have already applied the old Brush to some paths, Ai will pop up a dialog that says: "That brush is in use and some strokes may have overridden its options. Do you want to apply the changes to existing brush strokes?" You can respond Apply to Strokes, Leave Strokes, or Cancel:
The Apply to Strokes option will:
Redefine the Brush to include the newly changed Options.
Apply the redefined Brush to all the existing and future instances of the Brush.
The Leave Strokes option will:
Leave the strokes on existing instances of the Brush (including any modifications) unchanged.
Leave the old Brush definition unchanged.
Automatically create a new Brush with the redefined Options and give it a new default name. When you create new instances of the Brush you may use either the old or the new, automatically created, Brush.
The Cancel option aborts the change.
Pattern Brush Options
Name (Not available on the "Stroke Options (Pattern Brush)" dialog)
The Name field allows you to give a new Brush a 31-character name. This name appears as a tool-tip when you mouse-over the Brush's thumbnail in the Brushes panel. You can only update the Name field when you create or redefine the Brush.
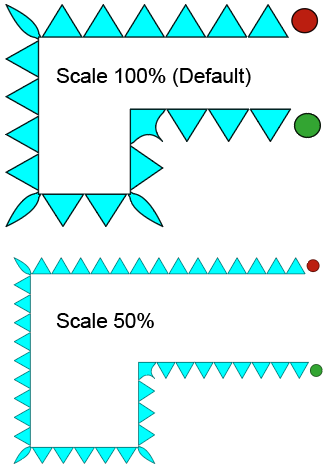
Scale
The result of Scaling a Pattern Brush.
The Scale options comprise a:
Scale dropdown, on which you can choose Fixed (but not variable) and/or stylus-based options, and a
Slider, on which you specify a percentage value, where 100% is the original size of the tile pattern object.
Spacing
The result of Spacing a Pattern Brusn
The spacing option increases or decreases the spacing between Side Tiles. The value of the Spacing field is expressed as a percentage of the default spacing.
Tile Buttons (Not available on the "Stroke Options (Pattern Brush)" dialog
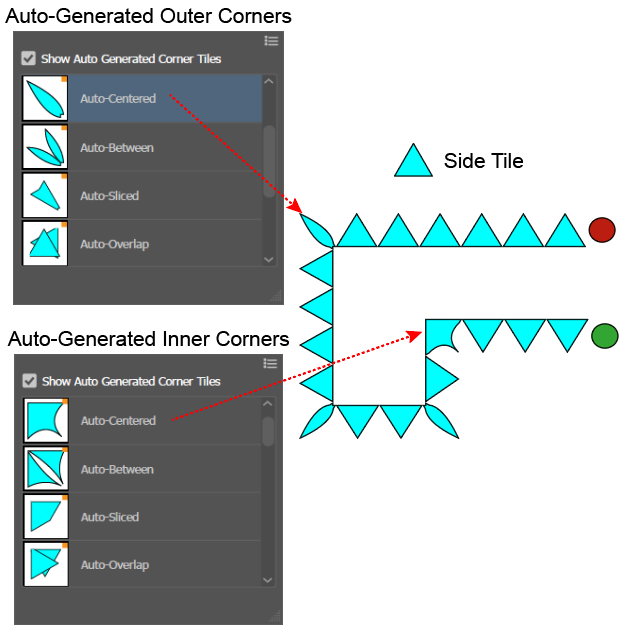
Automatically Generated Corner Tiles
The Tile Buttons allow you to select Pattern Swatches for any of the tiles that make up the 5 parts of the Pattern Brush. Simply, go to the button that represents the type of Tile that you want to specify, and click the buttons down-pointing arrow. Ai will display a scrolling list containing:
Pattern Swatches that are currently in the Swatches panel. Obviously, to select a swatch, you must have already added it to the Swatches panel.
For each of the Corner tiles, Ai Automatically generates four patterns that you can associate with the tile.
Auto Centered
Auto-Between
Auto Sliced
Auto-Overlap
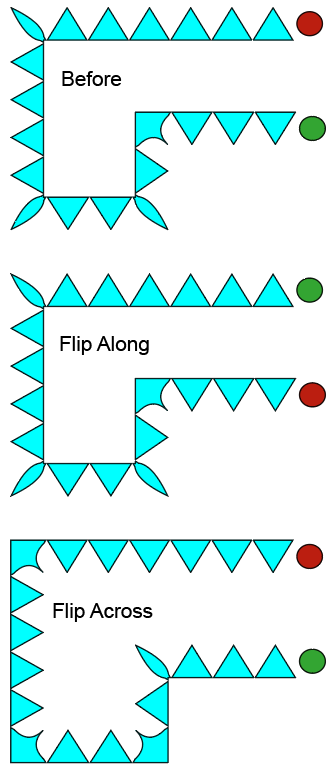
Flip
The Flip Along versus Flip Across options of the Pattern Brush.
Flip Along reverses the direction of the tiles along the course of the path. That is, the positions of the Start Tile and the End Tile will be reversed, and any tiles toward the original position of the End Tile, will point toward the new position of the End Tile.
Flip Across reflects the Tiles across the axis of the path.
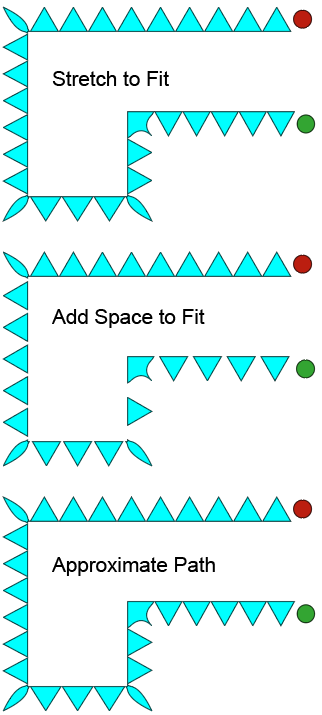
Fit
The Stretch to Fit, Add Space to Fit, and the Approximate Path options of the Pattern Brush.
The Fit section of the dialog provides 3 radio buttons that specify how the tiles will fit along the path to which the Brush is applied:
Stretch to Fit tells Ai to stretch or shrink the Tiles along the path so that they will fit evenly along the path to which the Brush is applied. This can sometimes distort the appearance of the tiles.
Add Space to Fit tells Ai to keep the size of the Tiles constant, but to add space between the Tiles so that they will fit more evenly along the path to which the Brush is applied.
Approximate Path tells Ai to keep the Tiles' size and spacing constant, but to alter how the Tiles are centered on the path to make them fit more evenly along the path to which the Brush is applied.
Colorization
The same Colorization method values apply to the Scatter Brush, Art Brush, and Pattern Brush.
A Note on Multicolor Brushes
If you want to create a multicolored Brush:
You must incorporate the colors into the object or objects on which the Brush is based. You cannot, however, create a Brush that is based on an object with a gradient (multicolored or otherwise). The best you can do is to use a Blend.
You will most likely want to leave the Colorization Method field set to None, because if you modify the Colorization Method to Tints or to Tints and Shades the multiple colors will disappear and be replaced by tints or tints and shades of the current key color. If you set the Colorization Method to Hue Shift, and then change the color of the underlying path, the colors will change unpredictably. Furthermore, using the Colorization Method, only enables you to change the color of an instance of the Brush by changing a path's Stroke color. It does not enable you to recolor the Brush itself.
To recolor an instance of a multicolored Brush, you must redefine the Brush. Fortunately, if you have a multi-colored Pattern Brush, you can recolor it with the Edit > Edit Colors > Recolor Artwork command (). If you use the Recolor Artwork command on any path to which you have applied a Pattern Brush, Ai will automatically create a new Brush with the recolored object, and will place it in the Brushes panel.
Recolor a Multi-Color Pattern Brush
If you have a multicolor Pattern Brush, to Recolor it, you must recreate a recolored copy of the Brush. Fortunately, AI is smart enough to make the process easy.
To Recolor a multicolored Pattern Brush in Adobe Illustrator:
Select an instance of the Brush that you want to Recolor. In the Brushes panel, Ai will highlight the Brush whose instance you selected.
Execute the Edit > Edit Colors > Recolor Artwork command ( ). Ai will display the Recolor Artwork dialog.
In the dialog, update the settings. As soon as you make the first update, Ai will:
Create and display a new, recolored entry for the Brush in the Brushes panel.
Recolor the Selected instance with the new color palette.
Click OK.
Make a New Version of a Pattern Brush
You can create a new version of a Pattern Brush by simply redefining one or more of the Tiles of an existing Brush.
To make a new version of a Pattern Brush in Adobe Illustrator:
From what will become the old version, extract the objects that are associated with each tile. To do that quickly, simply click and drag the Pattern Brush from the Brushes panel to the Artboard. Ai will place on the Artboard a Group containing a copy of each object that is assigned to one of the Brush Tiles.
Make the modifications to the tile objects that you need for the new version of the Brush. You can:
Optionally, edit the Group and all of its members (e.g., Select the Group and recolor it).
Ungroup (Ctrl + Shift +g) the Group.
Edit some or all of the ungrouped objects. You may also create one or more new objects of the correct size, shape, and pattern to function as the basis of a Tile in the new version.
Alt + drag one of the new objects directly from the Artboard onto the Brushes panel and drop it onto the thumbnail that represents the type of Tile that you want to change. Ai will display the Pattern Brush Options dialog as though you were creating a new Brush, assign the new Brush a default name, and place the new Tile definition in the Preview box.
In the Options dialog, click OK. Ai will create a new Pattern Brush that has the new Tile. If you have already applied the old Brush to some paths, Ai will pop up a dialog that says: "That brush is in use and some strokes may have overridden its options. Do you want to apply the changes to existing brush strokes?" You can respond Apply to Strokes, Leave Strokes, or Cancel.
On the popup dialog, choose the Leave Strokes option. Ai will:
Leave existing instances of the Brush (including any modifications) unchanged.
Leave the old Brush definition unchanged.
Automatically create a new version of the Brush with the object that you Alt-dragged from the Artboard assigned to the Tile on which you dropped it.
Optionally, continue to Alt + Drag objects from the Artboard and drop them onto the Tiles of the new version of the Brush.
Apply the new version of the Brush to paths to create instances of the new version of the Brush.
Colorization Method Options
When you have applied a Parameter Only Brush (i.e., a Bristle Brush or a Calligraphic Brush) to one or more paths, you can change the Brush color on an individual path (i.e., an instance of the Brush) by simply Selecting the path, targeting the Stroke, and then choosing the Current Color. In contrast, when you have applied an Object-Based Brush (Scatter Brush, Art Brush, or the Pattern Brush), to one or more paths, you cannot change the Brush color of an individual path by simply changing the path's stroke color. For these Brushes, to enable you to change the Brush color of an individual path (an instance of the Brush), you must first go to the Brushes panel and set the Brush's Colorization Method to a value other than None.
However, if the object on which the Brush was based had several colors and you have set a Colorization Method, you can change the color of any instance of that Brush by simply changing the path's Stroke color, but the coloring of the original object will disappear and be replaced with the colorized version that contains only tints of the new path Stroke color.
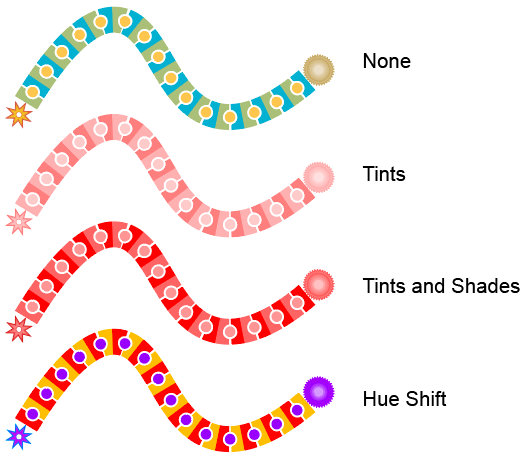
The Colorization Options tell Illustrator which of 4 methods it should use to recolor the stroke.
The options are:
Example contrasting the effect of the 4 Colorization Options on a multi-colored Brush with the Key Color set to RGB Red (FF0000).
None option tells Ai that after a change in the Current Color, it should do nothing and just continue to use the colors defined in the Pattern Brush object.
Tints option tells Ai that after a change in the Current Color, it should, essentially:
(A) Convert the Brush colors to a Grayscale version, and (B) Recolor the grayscale version with the Current Stroke Color replacing black and tints of the Current Color replacing the corresponding shades of gray.
Tints and Shades option tells Ai that after a change in the Current Stroke Color, it should essentially: (A) Convert the Brush object's colors to a Grayscale version. (B) Recolor the Grayscale version as follows: (a) replace gray (50% black) with the Current Stroke Color's hue, at full saturation, (b) replace darker grays with proportionately darker shades of the current color, and (c) replace lighter grays with proportionally lighter tints of the Current Stroke Color. This will yield a greater range of saturation than using the Tints option.
Hue Shift option tells Ai that after a change in the Current Stroke Color, it should: (A) determine the Brush object's Key color, i.e., the Brush color that contains most of the information. (B) Replace the Key color in the Brush with the Current Stroke Color. (C) Find the colors on the Color Wheel that are analogous to the Key color when the key color is replaced with the Current Stroke Color, and reassign the Brush colors accordingly. Note that for the Art Brush and Pattern Brush you can use the eyedropper tool in the Brush Options panel's Colorization area to select a new Key color from the Brush Objects colors. The Scatter Brush lacks this feature. The effect on the Hugh Shift option can be dramatic.
The key color is the color that contains most of an image's information (e.g., the figure rather than the ground) in the image. The term derives from printing with CMYK spot colors. The ColorWiki website puts it this way: "The K in CMYK stands for 'Key,' NOT black as many might have you believe. The Key plate, in traditional color separations, is the plate that holds the detail in the image. In CMYK this is usually done with black ink."
Note that, if you have already applied a Pattern Brush stroke, and then change the Brush's colorization method, Ai will pop up a dialog that says: "That brush is in use and some strokes may have overridden its options. Do you want to apply the changes to existing brush strokes?" You can respond Apply to Strokes, Leave Strokes, or Cancel:
The Apply to Strokes option changes the colorization method of all existing strokes and all new strokes to the new method.
The Leave Strokes option leaves the existing strokes unchanged but changes the colorization method for all subsequent strokes to use the new method.
Drawing Vector Graphics: Patterns by Von Glitschka at LinkedIn – provides not only a thorough presentation of Illustrator's Pattern Brush tools but describes the artistic design considerations related to creating and using Pattern Brushes.
Brush related Tutorials by hikeart that are thorough and concise:
 ) button. Ai will delete all the unused Brushes, clearing out the panel and making it easy for you to save it in a Library.
 )button. In the Control panel, when you see that a Selected path has a Brush Definition of Basic, it means that the path has no Brush applied. You cannot delete the Basic Brush.
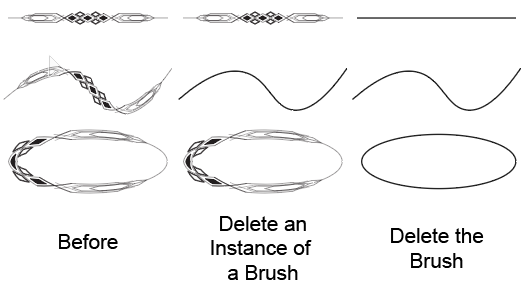
 ). Alternatively, you can drag the Artboard object into the Brushes panel. Ai will display the New Brush dialog that will present a radio button for each type of Brush.
 ) button. Ai will launch a Brush instance modification dialog, which will have a title that looks like this: Stroke Options (x). For example, if the Stroke on the selected path was an Art Brush, then Ai would launch the Stroke Options (Art Brush) dialog. Note that the Brush instance modification dialogs do not have all the same fields as the X Brush Options dialog.
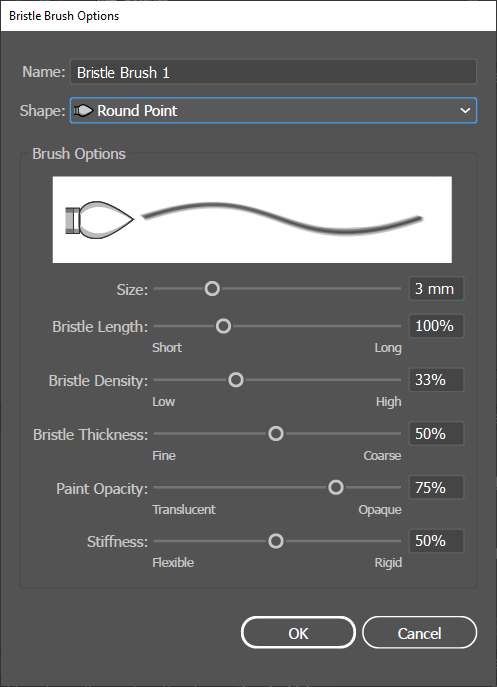

 ). If you use the Recolor Artwork command on any path to which you have applied a Scatter Brush, Ai will automatically create a new Brush with the recolored object, and will place it in the Brushes panel.