An Artboard is a facility for grouping some (or all) of a document’s objects visually into a composition, (i.e., a collection that is used for printing, exporting, or presenting artwork). Artboards are not structural containers (like layers, or groups) and are not represented in the layers panel. Rather, Artboards provide an independent way to group objects functionally, and they are represented independently, in their own Artboard panel. Thus, for working with Artboards, the Artboards panel is analogous to, but alternative to, the Layers panel. So, it makes sense that the two panels are docked together by default.
The numbers in the Artboard panel specify the order in which the artboards will print, and they allow you to print individual Artboards by referring to the number. So, for purposes of printing, a single Artboard is analogous to a page, and the collection of artboards is analogous to a multi-page document.
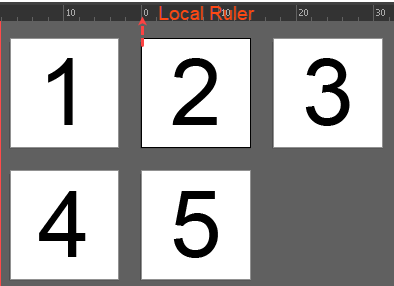
Fit All in Window View of a document with 5 artboards, showing Artboard 2 selected with its Local Ruler at the 0 Point
You can see all the document’s Artboards in the current document by executing the View > Fit All in Window (Alt + Ctrl + 0) command. Ai will then display all the Artboards shrunk to fit and arranged on the background of the document window (which is called the Pasteboard). So, for purposes of viewing and arranging the art, a single Artboard is analogous to a canvas, and the collection of artboards on the document's pasteboard is analogous to a wall in an art gallery.
You can create up to 1000 artboards in a document. To edit the artboards, e.g. to move, or resize them, you must first enter Artboard Editing Mode, which you do by clicking the Artboard tool in the Tool panel. In Artboard Editing Mode Ai exposes the Artboards' visual properties, and you can work with them in much the same way as you work with other Illustrator objects. For example, you can move and resize them with the Artboard cursor, the Smart Guides feature works on Artboards, and you can align them with the tools in the Align Panel.
To work with a single Artboard, you must first make it the current Artboard or the active Artboard by clicking it in the all-artboards view or by selecting its row in the Artboards panel. Then you can execute the View > Fit Artboard in Window (Ctrl + 0) command to make the current Artboard a workable size.
Artboard Editing Mode with Global Ruler
In routine work, the significance of Artboards is that:
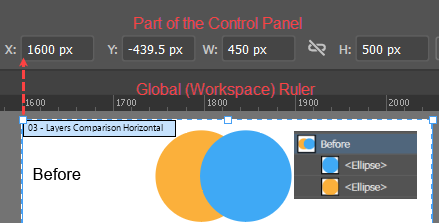
In the Transform panel, the X and Y measurements are relative to the Artboard Rulers. By default, each Artboard has its own Artboard Ruler and Ai positions the Artboard Ruler's origin (0, 0) at its top left corner. There is also a Global Ruler, which gives the position of all Artboards relative to a ruler origin point that you set for the entire document when in Artboard Editing mode. In Artboard Editing mode, you are always seeing the Global Ruler. However, when you are viewing the current Artboard, by default, you are seeing the Artboard Ruler, but you can switch to the Global Ruler by executing the View > Rulers > Change to Global Rulers command.
In the Align panel, you can choose to align or distribute objects, not only relative to the selection, or to a key object, but also with respect to the Artboard.
You can store objects on the Pasteboard, but you can only print or export objects that are on an Artboard.
The Select menu provides an option to Select All items on the Active Artboard (Alt + Ctrl + a).
The View > Fit Artboard in Window command refers to the current or active Artboard.
You can cut or copy an object from one Artboard and paste it into the same location on another Artboard by using the Edit > Paste in Place command (Ctrl + Shift + V).
You can cut or copy an object from one Artboard and paste it into the same location on all the Artboards by using the Edit > Paste on All Artboards command (Ctrl + Shift + Alt + V).
Artboard Panel
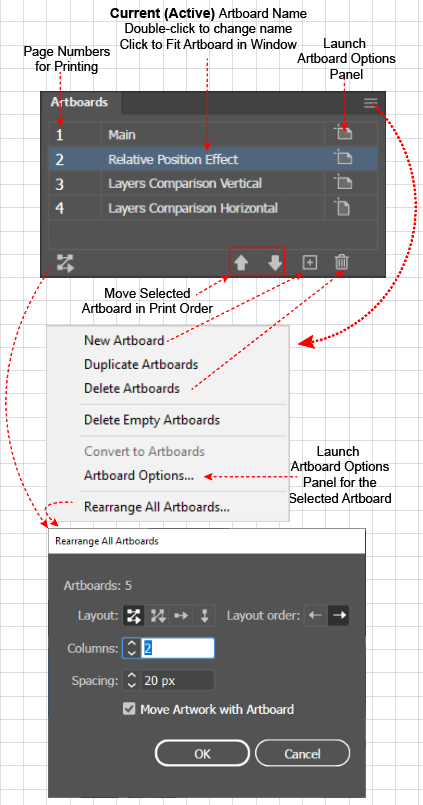
Artboard Panel Controls and Options
There are alternative ways of doing most Artboard operations, but the Artboards panel (Window > Artboard) has two important advantages. It:
Provides a dashboard and a central point from which you can access all the capabilities of working with Artboards.
Works like the other panels, so that your skills will transfer.
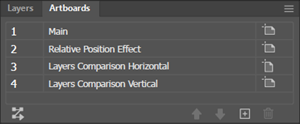
The Artboard panel features a grid that represents each of the document's Artboards as a row with a number, name, and a button. When you create an artboard, Ai assigns a default name. The numbers refer to the print order, and also allow you to print individual artboards. The current (active) artboard is highlighted in blue.
From the Artboard panel you have the following capabilities:
To change an Artboard's default name double click on the row. Ai will make the name editable so that you can override the default name.
To change an Artboard's print order, click the Arrow buttons at the bottom of the panel. Ai will move the current Artboard up or down the grid. You can also drag and drop a row to change its print order.
To add a new artboard, click the (+) Add Artboard button at the bottom of the panel.
To switch to another current Artboard and fit it into the document window, double-click its number in the grid.
To launch the Artboard Options panel so that you can set an Artboard's parameters, click the button in the Artboard's row in the panel.
To delete the current (blue highlighted) Artboard, click the trash can icon.
To delete all the Artboards that contain no art, Click the hamburger button at the top right of the panel. The panel will display a list of options. Choose the "Delete Empty Artboards" button.
To launch the Rearrange All Artboards dialog box, click the button in the bottom left of the panel or in the panel's hamburger button Options list, choose the Rearrange All Artboards option.
Creating Artboards
You can create artboards either when you create a new document, or while editing the document.
Create a Custom Artboard in a New Document
You create an artboard by default whenever you create an Illustrator document. When you click the File > New command, Ai launches the New Document dialog box, from which you can either:
Select a preset from one of 5 different categories of presets, which you can accept as is, or
In the Preset Details column on the right of the dialog box, you can override the preset and define a custom Artboard.
Create a Custom Artboard
To create a custom artboard when creating a new document in Adobe Illustrator:
In the New Document dialog, which Ai displays when you create a new document, override any of the following options:
Title
Width or Height Dimensions
Number of Artboards (For example, to create 5 identical artboards with the specified options, set this option to 5)
Orientation
Bleed
Color Mode
Raster Effects resolution preset.
Tell Ai to Preview the artboards in the default, pixel, or overprint mode.
Click Create
Creating New Artboards in an Illustrator Document
When working on a document, you can create new Artboards by using the Artboards panel or by a Visual process.
Create Artboards using the Artboards Panel
To create an Artboard via the Artboards panel in Adobe Illustrator:
Click the Create New Artboard (+) button at the bottom of the Artboard panel. Ai will:
Give the new Artboard a default name and add a new row for it in the Artboard panel.
Create a new artboard of the same size as the then currently active artboard.
Make the new Artboard the current Artboard, and display it in the document window.
Optionally, change the new Artboard's default name. Double click on the default name to make it editable and replace the default name with a new one.
Optionally, Change the new Artboard's properties. Click the button at the right of the new Artboard's row of the Artboard panel. Ai will launch the Artboard Options dialog box (see Editing Artboards below).
Creating New Artboards Visually
You can create new Artboards visually in two ways:
Drawing an Artboard.
Converting a Rectangle into an Artboard.
When you visually create a new Artboard in a document, Ai will record the additions in the Artboard panel and will set the visually defined dimensions as exact measurements in the Artboard Options dialog box.
Draw an Artboard
To create a new Artboard by drawing it in Adobe Illustrator:
Execute the View > Fit All in Window (Ctrl + Alt + 0) command, so that you can see all the artboards in the window.
Click the Artboard tool (Shift + O). Ai will launch Artboard Editing mode, in which all the Artboards will display with their name in the upper left corner and a small X control in the upper right (which you can use to delete the Artboard). Ai will show the current (active) Artboard with 8 resizing handles surrounding it.
While still in Artboard Editing mode (i.e., with the tool still active), deselect the current Artboard by clicking on the Pasteboard with the Artboard Editing Cursor. The current (active) Artboard's resizing handles will disappear.
Draw an Artboard by clicking and dragging the cursor on the pasteboard to define a rectangle. Ai will:
Make the new Artboard the current (active) Artboard, showing it in the Artboard Editing window with 8 resizing handles.
Give the new Artboard a default name in the upper left corner.
Optionally, adjust the new Artboard's properties: Double click the Artboard or the Artboard Editing tool. Ai will pop up the Artboard Options dialog box, where you can change the default name of the new Artboard or set its width or height properties, etc.
Click the Esc-key or any other editing tool to finish editing and exit Artboard editing mode.
Convert a Rectangle into an Artboard
To convert a rectangle to an artboard in Adobe Illustrator:
While in normal editing mode (i.e., not in Artboard Editing mode), move to a blank area of the Pasteboard (e.g. press the Spacebar to get the Hand tool and drag in the window to reposition the pasteboard).
On the Pasteboard, get the Rectangle tool and draw a rectangle of the size that you want to use for the Artboard.
With the rectangle still selected, execute the Object > Artboards > Convert to Artboards command.
Navigating Artboards
You can select a different Artboard as the current (active) Artboard by using:
The Artboards panel, or
The Artboard Navigation menu at the bottom of the Window.
Navigate Artboards via the Artboard Panel
To use the Artboard panel to select a different Artboard as the current (active) Artboard in Adobe Illustrator:
In the Artboard panel grid, click once on the number in the row of the Artboard that you want to make the active Artboard. Ai will highlight the Artboard.
Optionally, click again on the number to Fit the Artboard to the document window.
Navigate Artboards via Artboard Navigation Controls
Artboard Navigation Controls
To use the Artboard Navigation controls to select a different Artboard as the current (active) Artboard in Adobe Illustrator:
Click one of the controls: First, Next, Dropdown List, Previous, or Last). When you switch to a different Artboard, Ai will make it the current Artboard and Fit it to the document window.
Note:
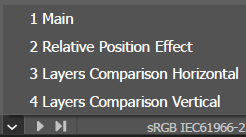
Artboard Navigation Control Dropdown List
The Dropdown list is useful because it shows both the name and number of each Artboard. The number represents the print order, and you can also use the numbers to specify an Artboard when you want to print it as a single "page."
Editing Artboards
Artboard Editing Mode
To edit Artboards, you must first, enter Artboard Editing Mode (e.g. by clicking the Artboard Tool ) . Then, Ai will:
Switch to the Editing Mode display, in which Ai will:
Show each Artboard with its number and name in the upper left corner.
Highlight the current (active) Artboard with a dashed boarder and 8 resizing control handles.
Switch to an Artboard cursors. On an inactive Artboard, the cursor will look like a normal (black arrow) cursor but with a small square modifier symbol. On the active Artboard, the cursor be a resizing cursor with two perpendicular arrows.
Display the Artboard controls in the Control panel and in the Properties panel. In these panels:
The Transform X, Y, W, and H values apply to the current artboard.
There are two critical controls. If you want to be able to move Artboards with their content (and not just move the Artboard by itself, leaving the art behind on the pasteboard), you must either: (A) in the Properties panel, click the "Move artwork with Artboard" checkbox, or (B) in the Control panel, toggle on the "Move/Copy artwork with Artboard" icon button.
If screen real estate is at a premium, the Control panel may offer the most graceful way of having the Artboard controls and the Artboard panel open at the same time.
Enter Artboard Editing Mode
To enter Artboard Editing mode in Adobe Illustrator:
Click the Artboard tool (Shift + o) or click the button in one of the rows of the Artboards panel.
Optionally, execute the View > Fit All in Window (Ctrl + Alt + 0) command to show all the Artboards in the editing mode window.
Exit Artboard Editing Mode
To exit Artboard Editing mode in Adobe Illustrator:
Do one of the following:
Click any other tool in the Tool menu, or
Click the Exit button in the Properties panel,
Press the Esc-key.
Optionally, execute the View > Fit Artboard to Window command (Ctrl + 0) to see the current Artboard at full size in the document window.
Artboard Editing Mode Operations
When in Artboard editing mode, you can visually:
Move an Artboard (with or without the Art) using the Selection tool .
Align Artboards.
Duplicate an Artboard with Alt + Drag.
Resize an Artboard with its control handles.
Move an Artboard
To move an Artboard, including its contents, from one place to another on the pasteboard in Adobe Illustrator:
Execute the View > Fit All in Window command Ctrl + Alt + 0). Ai will expand the area of the Canvas that is visible in the Window enough so that all Artboards are visible.
Click once on the Artboard tool (Shift + o) . Ai will:
Enter Artboard Editing Mode.
Display, in the upper left corner of each Artboard, its number and name.
Highlight the current (active) Artboard with a dashed boarder and 8 resizing control handles.
Switch to the Artboard cursor, an arrow with a square modifier symbol.
If you intend to move the artwork with the Artboard, ensure that you have done one of the following:
In the Control panel, turn on the "Move/Copy artwork with Artboard" toggle button , or
In the Properties panel, check the "Move artwork with Artboard" checkbox.
Click on the Artboard that you want to move. As soon as you depress the mouse key, Ai will (A) select the Artboard (making it the current Artboard) and (B) change from the Artboard cursor to the Move cursor (a cross of double headed arrows). Then either:
Drag the selected Artboard with the Move cursor.
Alternatively, press the arrow keys to nudge the selected Artboard into place.
Align Artboards on the Pasteboard
To align an Artboard (including its contents) on the pasteboard in Adobe Illustrator:
Execute the View > Fit All in Window command (Alt + Ctrl +0). Ai will expand the area of the Canvas that is visible in the Window enough so that all Artboards are showing.
Click once on the Artboard tool (Shift + o). Ai will:
Enter Artboard Editing Mode.
Display, in the upper left corner of each Artboard, its number and name.
Highlight the current (active) Artboard with a dashed boarder and 8 resizing control handles.
Switch to an Artboard cursor.
In the Artboards panel grid, select the rows of the Artboards that you want to align. If the Artboards are contiguous, you can either Shift + click on the first and last Artboard; if the Artboards are not contiguous, you can Shift + click on each grid row for each Artboard. Alternatively, you can marquee select all the artboards on the Pasteboard.
In the Align panel, the Control panel, or in the Properties panel, click an alignment icon.
Duplicate an Artboard Visually
To clone an Artboardin Adobe Illustrator:
Click the Artboard tool (in the Tool panel) to enter Editing mode.
Using the Editing mode cursor, Click + Alt + Drag on an Artboard to copy it (just as you would copy an object on an Artboard).
Rename the new Artboard (either in the Properties panel or in the Artboard panel.
Hint: When manipulating artboards visually, it can be useful to (A) Turn on View > Smart Guides and (B) Turn on View > Show Bounding Box.
Resize an Artboard Visually
To resize and artboard in Adobe Illustrator:
Select the Artboard.
Click and drag it by its control handles. Just as when resizing a rectangle, you can:
Shift + drag to preserve the aspect ratio, or
Alt + drag to resize from the center of the Artboard. you can use the Shift-key to constrain the angle of the drag to a multiple of 45 degrees.
Hint: When manipulating artboards visually, it may be useful to (A) Turn on View > Smart Guides and (B) Turn on View > Show Bounding Box.
Setting Artboard Options
Set an Artboard's Options
Artboard Options Dialog
To set an Artboard's options in Adobe Illustrator:
Select the artboard, using the Artboard panel, or the Artboard Navigation controls.
Double-click the Artboard tool. Ai will launch the Artboard Options dialog box.
In the dialog box, set the options and click OK.
Available Options
The available options are the:
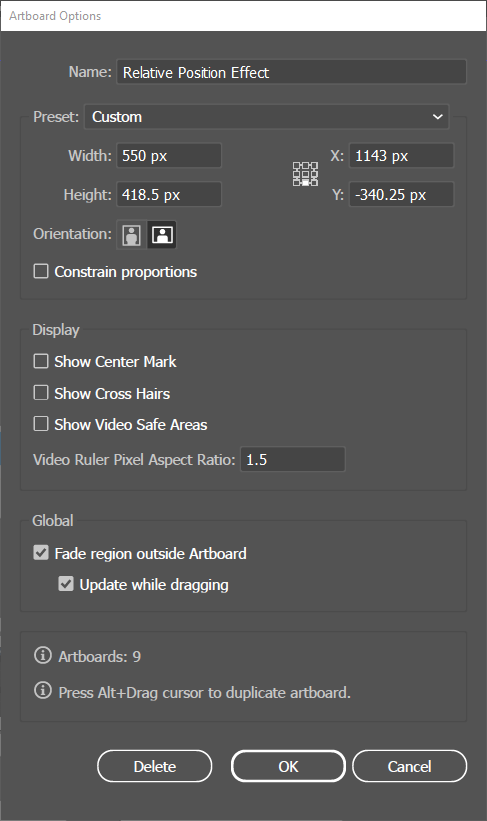
Artboard Names displayed in the Artboard Navigation control Name (field) is assigned, changed, and displayed in the Artboard panel and in the Control panel, and is also displayed when you click the down arrow in the Artboard Navigation control. The artboard Numbers come into play when printing, because you can tell the printing software which Artboard to print by specifying their numbers.
Preset (dropdown) is a list of frequently used Artboard dimensions listed by the devices for which they are used, e.g. iPad Pro, PAL Dl/DV Widescreen, etc.).
X and Y Position on Global RulerX and Y Position (fields) give the Artboard's position on the Global Ruler.
Orientation (icon buttons) specify portrait or landscape page orientation.
Constrain Proportions (checkbox) tells Ai to keep the current Aspect Ratio constant when you drag a corner of the Artboard to Resize it.
Show Center Mark (checkbox) tells Ai to display a faint cross hair mark in the center of the Artboard.
Show Cross Hairs (checkbox) tells Ai to display faint cross hair marks on the edges of the Artboard.
Show Video Safe Areas (checkbox) tells Ai to display Guides showing the area within which you must keep content that you intend for video display.
Video Ruler Pixel Aspect Ratio (field) Comparison of 2 Video Rulers with Pixel Aspect Ratios set to 1 and 2. Focus on the markings of the two horizontal rulers.
specifies the ratio of the width to the height represented on Video Rulers, which you show by the command (View > Rulers > Show Video Rulers). The Pixel Aspect Ratio PAR = width/height, or width = PAR * height. So, the PAR is how many times larger a unit of width (on a Video Ruler) is than a unit of height. If the PAR is 1, then 36 units of height corresponds to 36 units of width. If, however, the PAR is 2 (i.e., the width units are twice the size of the height units), then 36 units on the height ruler will correspond to only 18 units of width.
Fade Region Outside Artboard (checkbox) tells Ai to make the region outside the Artboard darker than the Artboard when you are in Artboard Editing Mode.
Update While Dragging (checkbox) tells Ai to keep the region outside the Artboard darker than that of the Artboard even when you are resizing the Artboard.
Artboards (display-only field) simply shows the current number of Artboards.
Common Artboard Operations
Common Artboard operations include:
Rearrange Artboards
Fit an Artboard to its Art
Export an Artboard
Move or Copy Objects Among Artboards
Rearrange Artboards
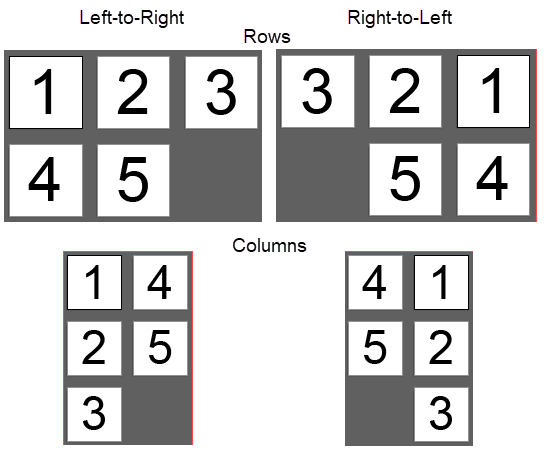
Comparison of Row and Column Grids with Left-to-Right and Right-to-Left Layout Order Settings of Each
The Rearrange Artboards feature intelligently places all the artboards on the Pasteboard into a block according to an arrangement that you specify in the Rearrange All Artboards dialog box. You can choose one of four arrangements:
A Grid of rows with a number of columns (that you specify in the dialog) in each row. Ai will then start from the top row and work its way down. You can also specify in the dialog, whether you want Ai to fill each row by starting from the left to right (the default) or vice versa.
A Grid of columns with a number of rows in each column (that you specify in the dialog). Ai fills each column from top to bottom. You can also specify in the dialog, whether you want Ai to start from the left most column and work its way right (the default) or vice versa.
A single Horizontal row. You specify whether you want Ai to fill the row from left to right (the default), or vice versa.
A single Vertical column, which Ai will always fill from top to bottom.
Rearrange All Artboards Simultaneously
To rearrange all the Artboards in a document in Adobe Illustrator:
Execute the Object > Artboards > Rearrange All Artboards command to launch the Rearrange All Artboards dialog box. You can also launch the dialog box from the Rearrange All Artboards icon at the bottom of the Artboards panel. The top row of the dialog box shows the number of Artboards that it will rearrange.
In the second row of the dialog specify the type of layout (row grid, column grid, horizontal row, or vertical column) and whether you want Ai to work from the left or from the right.
Specify the number of columns (if you have specified a grid of rows), or a specify the number of rows (if you have specified a grid of columns).
Specify the space between artboards.
Ensure that you have checked the "Move Artwork with Artboard," checkbox unless you want to move only the Artboards, and leave the artwork behind on the Pasteboard.
Click OK. Ai will arrange all the artboards as specified.
Fit an Artboard to its Art
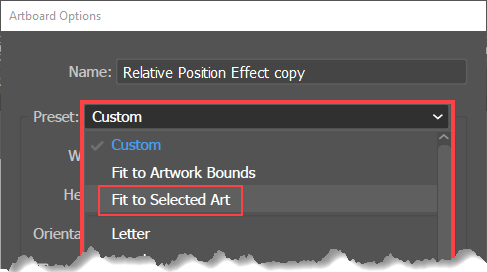
Fit to Selected Art of the Artboard Options dialog.
To fit the artboard to selected objects on the artboardin Adobe Illustrator:
Select the objects (i.e., the Art) around which you want to fit the Artboard. When you select the objects on an Artboard, Ai will automatically make it the current Artboard.
Double-click the Artboard tool. Ai will open the Artboard Options dialog.
In the dialog, go to the Presets field and click its down-arrow. Ai will display a list of preset settings for the size of the Artboard. But, at the top of the list (where you might never look for it) will be two other options (Fit to Artboard Bounds and Fit to Selected Art).
Click the "Fit to Selected Art" option. Ai will shrink-wrap the Artboard to the Art.
Export Artboards
The Export Artboard feature allows you to export some or all of the Artboards in a document and you can export several versions of each with different sizes and file types.
The Export software works with Artboards by number, in much the same way as the Print software works with page numbers. So, when you want to print only some of the artboards you specify a range of artboard numbers.
You can export Artboards in PNG24, PNG, 8, JPG 100, JPG 800, JPG 50, JPG 20, SVG, and PDF. Each of these file types has a number of options, e.g. background color, compression method, etc. To set the options, you must find and click the tiny gear icon with the tool tip "Advanced Settings for Exported File Types." Ai will launch the Format Settings dialog box, in which you can select each file type, and then view and set its options.
You can also export Artboards of different file sizes, which you specify by a scaling factor, 1 (the original size), 2 (200% of the original size), etc.
Furthermore, you can export, in a single operation, several versions of the selected Artboards. That is, you can export several versions, each having a different file type or several versions, each of a different size, or different combinations of both.
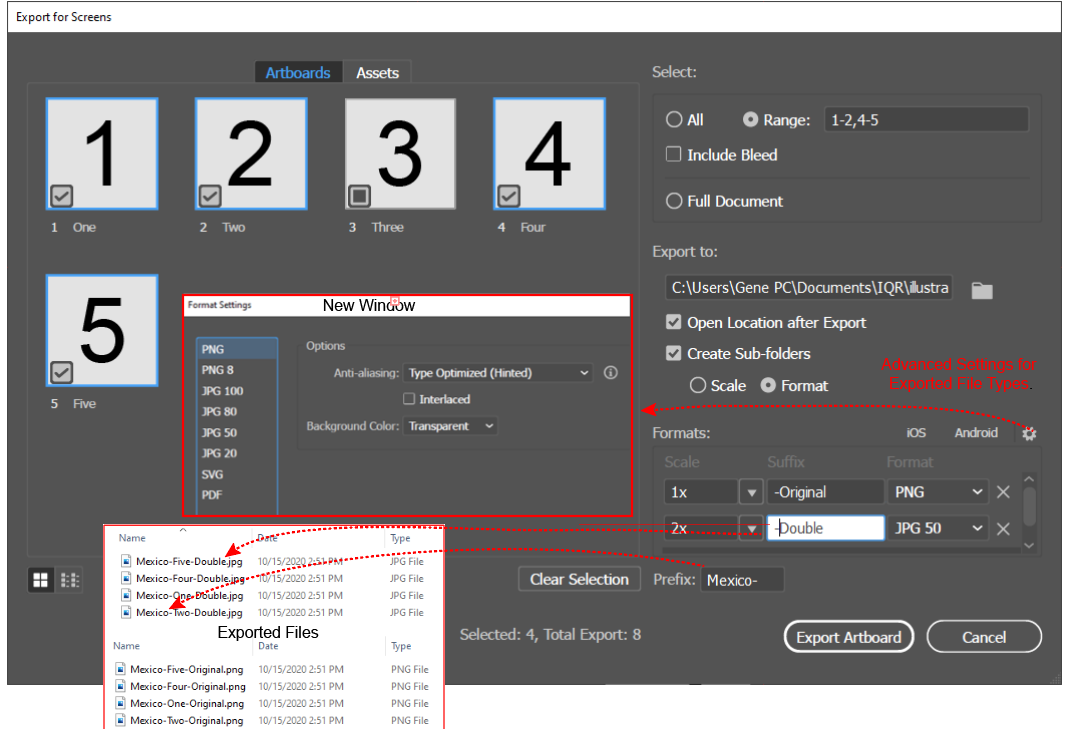
Example of the Export Artboards Dialog, the Format Settings Dialog, and the Resulting Files
To export Artboards in Adobe Illustrator:
Execute the File> Export > Export for Screens (Alt + Ctrl + E) command.
Click the Artboards tab.
Click one of the following radio buttons to specify whether you want to export:
All of the Artboards. If you choose this option, Ai will display an Include Bleed checkbox, which you can check to include the bleed in the export.
Some of the Artboards, specified by a Range of numbers. If you chose the Range radio button, select the Artboards to be included in the range, by clicking the Artboard thumbnails. If you choose this option, Ai will also display the Include Bleed checkbox, which you can check to include the bleed in the export.
Full Document, which will combine all the Artboards into a single document.
In the "Export to" section of the dialog box, click the File Folder icon to launch a File Explorer window in which you can specify the destination folder into which you want to export the Artboard files.
If you want Ai to automatically open the destination folder when you have finished exporting, check the Open Location after Export checkbox.
If you want Ai to create sub-folders for each different scale or (alternatively), to create sub-folders for each different Format, first click the Create Sub-Folders checkbox, and then click either the Scale or the File Format radio button.
Add as many rows as you like to the list of versions:
Go to the Formats section of the Export for Screens dialog box which displays a list of the different scale-factor versions or file type versions that you want to export for each Artboard.
Scroll to the bottom of the list, and click the " + Add Scale" button. You use this button regardless of which sub-folders you have told Ai to create, and whether or not you want to create a version for a different scale or for a different file type. Ai will create a new row, in which you can fill in the scaling factor.
In the new row enter the Scale, and (optional suffix), and the Format (i.e., the file type).
Click the Export Artboard button.
Move or Copy Objects among Artboards
To move or copy objects from one Artboard to another or from one Artboard to all the document's Artboards: in Adobe Illustrator:
Select the art on the source Artboard.
Copy it to the clipboard.
Do either of the following:
Go to the destination Artboard and execute the Edit > Paste in Place command. Ai will paste the object from the clipboard onto the destination Artboard in the same position from which it was copied or cut in the source artboard.
In the current document or in a new document, execute the Edit > Paste on All Artboards command. Ai will paste the object from the clipboard onto all the destination Artboards and place it in the same position from which it was copied or cut in the source artboard.