Illustration of the Align Panel with its four main functional areas outlined in red.
This article focuses on aligning and distributing objects.
The tools in the Align panel (Windows > Align) allow you to both align and distribute a selection of objects relative to any of three frames of reference, which you specify in the Align To dropdown. The three Align To options are:
Align to Selection: Align the entire set of currently selected objects relative to one another,
Align to a Key Object: Align all the objects relative to one of the selected objects (called a key object) that you can designate as the object to which you want the other objects to be aligned. or
Align to Artboard: Align the selected object or objects relative to the (left, right, or center; or the top, bottom, or middle) of the Artboard.
The Align Panel (shown in the accompanying figure) has four areas:
Align To drop-down list, in the lower right corner, which even though it is called Align To, specifies the frame of reference for both aligning and distributing.
Align area, at the top of the panel, which you use to align objects relative to the selected frame of reference.
Distribute Objects area, in the middle of the panel, which is for distributing objects relative to the selected frame of reference
Distribute Spacing area, at the bottom left of the panel, which allows you to transform a selection of objects into a uniformly spaced sequence of objects starting from a designated, key object. This area becomes active when, but only when you have designated a key object. To designate a key object, you first select objects that you want to distribute, and then single-click one of them. Ai will then place a thick border around the key object.
Aligning and distributing are analogous except when the Align to Key Object option is selected in the Align To dropdown list. Then Ai enables the Distribute Spacing area, in which you are able to specify a spacing distance and tell Ai to distribute the selected objects (relative to the key object) in a (horizontal or vertical) sequence in which Ai maintains the specified distance between the objects.
Aligning Objects
The Align panel's Align area comprises one row of icon buttons that allow you to align objects in a horizontal row or in a vertical column. The lines that run through the icons tell you both the direction of the alignment (horizontal or vertical) and its point of reference (top, middle, or bottom; or right, left or center). So, your decision process is:
In the Align To dropdown list select a frame of reference.
Go to the button group for the dimension of alignment: Horizontal or Vertical.
Select a button to tell Ai which object it should use to align all the objects, i.e. the left edge, right edge or center axis for Horizontal; or top edge, bottom edge, or middle axis for Vertical.
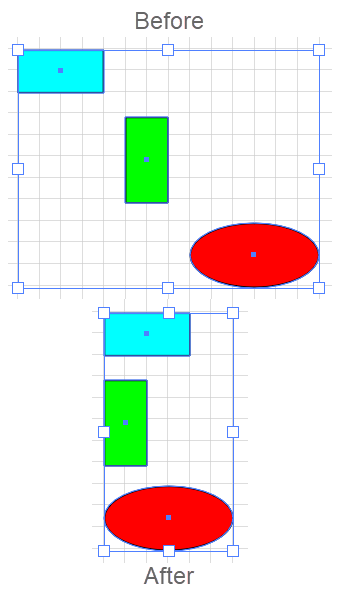
Align Objects Relative to a Selection
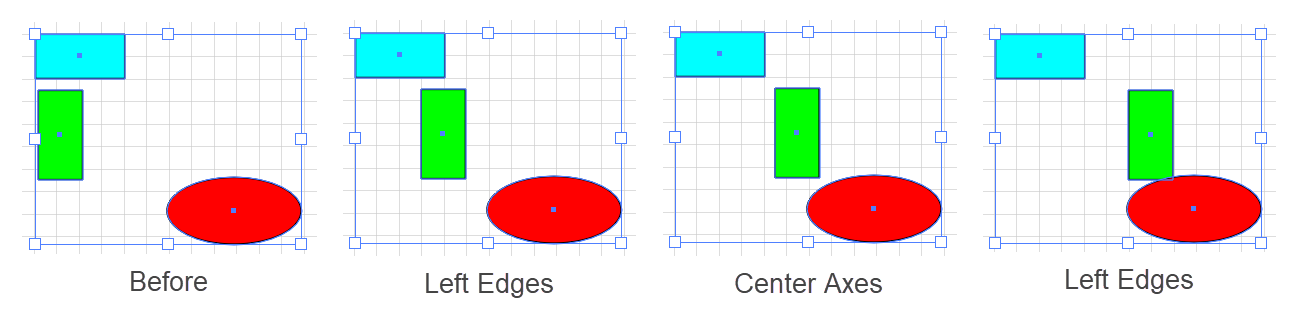
Align a Selection Horizontally Relative to the Left Edges
To align a selection of objects relative to one another within the borders of the selection in Adobe Illustrator:
Open the Align panel (Windows > Align).
Select the objects that you want to align. Assuming that you have Bounding Boxes turned on (View > Show Bounding Box), Ai will draw a bounding box around the set of objects.
In the Align panel's Align To dropdown list, select the "Align to Selection" option.
Select an Align Objects icon. Ai will align the objects relative to the top left corner of the bounding box. This alignment will work even if you have Bounding Boxes turned off, but the bounding boxes do display the frame of reference.
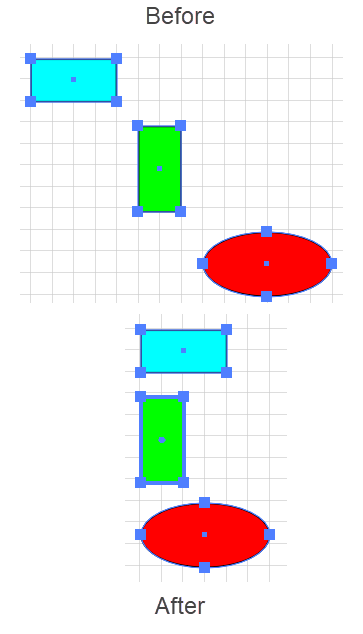
Align Relative to a Key Object
Example showing how to Align the Left Edges of a Selection Horizontally Relative to a Key Object, which remains fixed.
To align a set of objects relative to one specific object in the set in Adobe Illustrator:
Open the Align panel (Windows > Align).
Select the objects that you want to align.
Click on one of the selected objects that you want to function as the Key object. Ai will:
Draw a dark border around the Key object.
Automatically select the "Align to Key Object" option in the Align panel's Align To dropdown. (If you select the "Align to Key Object" option before you designate a key object, Ai will, by default, set the last object in the selection as the key object.)
Select an Align Objects button. Ai will align the objects relative to the key object.
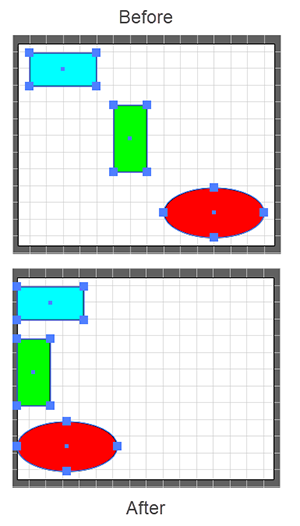
Align Objects Relative to the Artboard
Example of how to Align the Left Edges of a Selection Horizontally Relative to the Artboard.
To align a set of objects relative to the current Artboard in Adobe Illustrator:
Open the Align panel (Windows > Align).
Select the objects that you want to align.
In the Align panel's Align To dropdown field, select "Align to Artboard."
Select an Align Objects icon. Ai will align the objects relative to the Artboard.
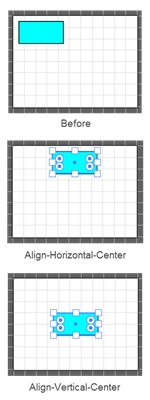
Center an Object on the Artboard
Steps in Centering an object on the Artboard: Select Align to Artboard then Align Vertical Center, and then Align Horizontal Center
To place an object in the center of the Artboard in Adobe Illustrator:
Open the Align panel (Windows > Align).
Select the object that you want to center on the artboard.
In the Align panel's Align To dropdown field, select "Align to Artboard."
Click the Horizontal Align > Center button and then the Vertical Align > Center button. Ai will move the object to the center of the Artboard.
Distributing Objects and Spacing
As mentioned above, the Align panel provides two areas for distributing objects:
Distribute Objects area, in the middle of the panel, which is for distributing objects relative to a selection or relative to the Artboard, but not relative to a key object.
Distribute Spacing area, at the bottom left of the panel, which allows you to transform a selection of objects into a uniformly spaced sequence of objects starting from a selected, Key object.
The logic of the distributing process is similar to that for aligning, in both cases, you:
Select a frame of reference from the Align To dropdown list.
Select a dimension of alignment: Horizontal or Vertical.
Select an axis: either left edge, right edge, or center for Horizontal; or left edge, right edge, or middle for Vertical. Ai will distribute all the objects relative to the specified axis.
The major difference between aligning and distributing is that when you are distributing selected objects relative to a key object, you may use either (A) the buttons in the Distribute Objects area or (B) the controls in the Distribute Spacing area.
You can initiate distributing objects relative to a key object by first selecting the group of objects that you want to distrubute, and then:
Select the Align to Key Object option in the Align To dropdown list. Ai will select the last item in the group as the key object.
Simply single click one of the objects in the group of objects that you have already selected. Ai will make that object the key object and automatically choose the Align to Key Object option.
Distribute Objects Relative to a Selection
Distributing Objects Relative to a Selection and 3 Different Horizontal Axes
To distribute a selected set of objects relative to one another within the borders of the selection in Adobe Illustrator:
Open the Align panel (Windows > Align).
Select the objects that you want to distribute. Assuming that you have Bounding Boxes turned on (View > Show Bounding Box) Ai will draw a bounding box around the set of objects.
In the Align panel's Align To dropdown field, select "Align to Selection."
Select one of the Distribute Objects buttons to designate the axes according to which you want Ai to distribute the objects. As illustrated in the accompanying figure, Ai will distribute the objects relative to the bounding box of the selection and so that the space between the designated axes of all the objects are equal. Having bounding boxes enabled is not necessary, but it does show that the borders of the bounding box form the limits within which the distribution takes place.
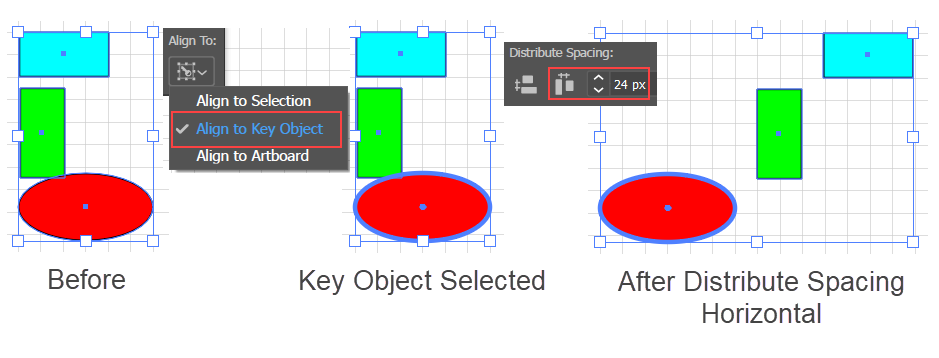
Distribute Objects Relative to a Key Object
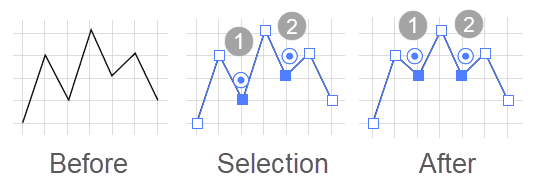
Steps in how to Distribute Relative to a Key Object with a Horizontal Center Axis Button Selected. Note that starting from the Key Object to the last object in the selection, the Center Lines of all objects are evenly spaced.
To distribute a set of selected objects relative to one of them in Adobe Illustrator:
Open the Align panel (Windows > Align).
Select the objects that you want to distribute.
Single-click on the Key object, i.e., the object relative to which you want to distribute the other selected objects. Ai will:
Draw a dark border around the Key object.
In the Align panel's Align To dropdown, automatically select the "Align to Key Object" option.
Select one of the Distribute Objects buttons to designate the axes according to which you want Ai to distribute the objects in the selection. Ai will distribute the objects relative to the Key object and relative to the boundaries of the selection.
As described below, in the Distributing Objects by a Specific Amount section, instead of choosing one of the Distribute Objects buttons, you could choose to use the Distribute Spacing controls.
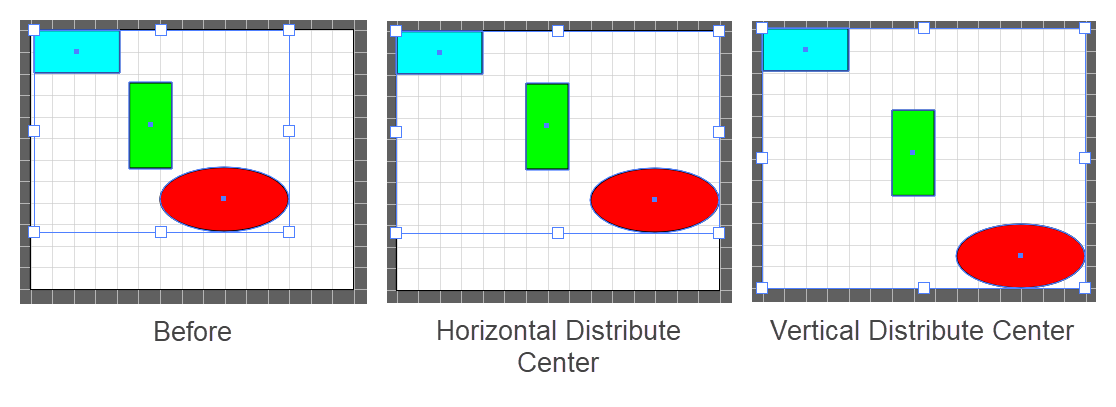
Distribute Objects Relative to the Artboard
Objects Distributed on the Artboard with both Horizontal Center and Vertical Center Buttons Selected.
To distribute a set of objects relative to the current Artboard in Adobe Illustrator:
Open the Align panel (Windows > Align).
Select the objects that you want to distribute.
In the Align panel's Align To dropdown field, select "Align to Artboard."
Select one of the Distribute Objects buttons to designate the axes according to which you want Ai to distribute the objects. Ai will distribute the objects relative to the Artboard and so that the space between the designated axes of all the objects are equal. In the figure, all of the objects are distributed so that the distance between their horizontal and vertical center lines are equal relative to the boundaries of the Artboard.
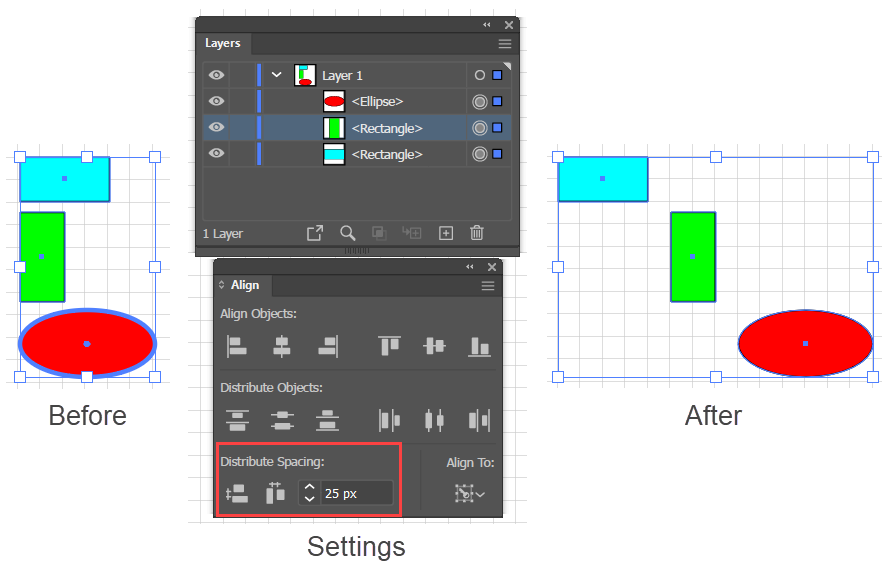
Distribute Objects by a Specific Amount
Example showing how to Distribute Objects with 25px Between their Horizontal Centers
To distribute objects in Adobe Illustrator so that there is a specific amount of separation between them:
Open the Align panel (Windows > Align).
Select the objects that you want to align.
Click on a Key object that you want to remain stationary and to be the origin of the distribution. Ai will:
Draw a dark border around the Key object.
In the Align panel's Align To dropdown, automatically select the "Align to Key Object" option.
Activate the Distribute Spacing area's amount field.
Before you click either the "Vertical Distribute Space" or the "Horizontal Distribute Space" button, enter a spacing amount in the Distribute Spacing area.
In the Align panel's Distribute Spacing area, select either the "Vertical Distribute Space" icon or the "Horizontal Distribute Space" icon. As soon as you click the button, Ai will distribute the objects vertically or horizontally by the specified amount.
Align or Distribute Anchor Points
You can use the Align panel not only for aligning or distributing objects, but also for aligning and distributing the anchor points of an open or closed path.
Example showing the alignment of two non-sequential anchor points.
To align or distribute selected Anchor Points relative one another in Adobe Illustrator:
Get the Direct Selection tool.
Shift + Click on all the Anchor Points that you want to align or distribute. Ai will do four things:
Make the last point that you click the key object, relative to which it will align the others.
Change the Align panel labels to refer to Anchor Points rather than to Objects.
In the Align panel's Align To dropdown list, Ai will automatically select the "Align to Key Object" item.
Enable the Distribute Spacing area.
In the Align panel, select one of the Align Anchor Points buttons, one of the Distribute Anchor Points buttons, or enter a Spacing amount and then click the Vertical or the Horizontal Spacing button. Ai will keep the last selected anchor point fixed, but will align or distribute the selected anchor points relative to the last selected point.