Nudge an Object
To move an object by small increments, i.e., to nudge it into place in Adobe Illustrator:
- Optionally, set the Keyboard Increment in the preferences panel (Edit > Preferences> General, or Ctrl + k).
- Select the art.
- Tap an arrow key.
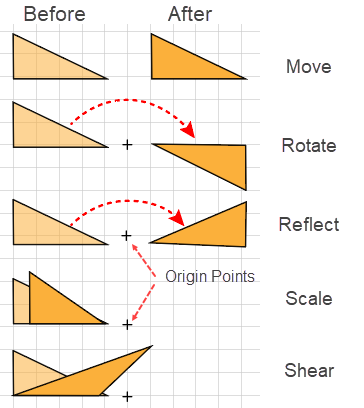
Illustrator provides tools for 5 basic types of transformations:
The tools allow you to do the 5 operations visually, but Illustrator also provides useful quantitative methods that allow you to do the transformations by means of a dialog box:
The quantitative methods include the:
The above methods are fast and convenient, but they are destructive, i.e., they permanently alter the object's anchor points and control handles. Therefore, once you save and exit the document, the original structure of the Object is destroyed, so that you cannot start over. In contrast, you could use the Effect > Distort & Transform > Transform dialog, which is non-destructive. The dialog makes it easy to work iteratively, because transformed objects remain modifiable, reversible, and the original paths remain editable.
Each tool has its own dialog box that allows you to exactly specify fields that define the transformation. Not only is this method precise, but it tells you exactly how the transformation works. In addition, all the tool dialogs allow you to, not only make the transformation, but also make a copy of the transformed shape.
The method of accessing the dialog box is similar for all 5 transformations:
The Windows > Transform panel (Shift + F8) has a general area, which is the same regardless of the object selected, and an area specifically for Live Shapes, which displays content only if the selected object is a Live Shape and then the Transformation panel will include a section that is devoted specifically to the transformations that apply to that type of shape.
The general Transformation panel fields allow you to:
Hint
When you have selected a target object, you can find both the general and the specific Transformation panel fields included in the Windows > Properties panel. However, the Transformation control in the Control panel includes only the general fields.
The visual methods use one of the transformation tools in Illustrator's Basic Toolbar.
Except for the move operation, the transformations take place relative to a fixed Reference point (or a line, in the case of reflection), and the tools work in a roughly similar way:
The organization and much of the content of this article follows that of the Transforming and Positioning Art section of Mordy Golding's 2010 Lynda.com course, Illustrator CS5 Essential Training.
There are several direct and indirect ways to move selected objects:
To move an object by small increments, i.e., to nudge it into place in Adobe Illustrator:
The basic, most used, move operations allow you to both move and copy an object.
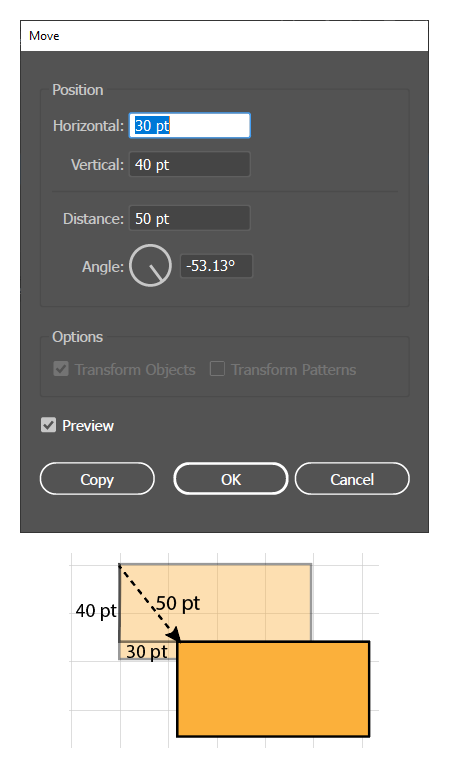
The Move dialog allows you to move an object either by specifying: (A) a horizontal or vertical displacement, or (B) by specifying a displacement distance and an angle of displacement.
To move or copy an object quantitatively, via the Move dialog box, in Adobe Illustrator:
To move or copy an object with the Select tool in Adobe Illustrator:
Hint
Shift + drag or Shift + Alt + drag constrains the move or copy operation to move horizontally, vertically, or along a 45 or 135-degree angle.
When you move or copy an object, Ai automatically remembers the parameters.
In Adobe Illustrator, to repeat a copy or move operation that you have just finished performing, simply :
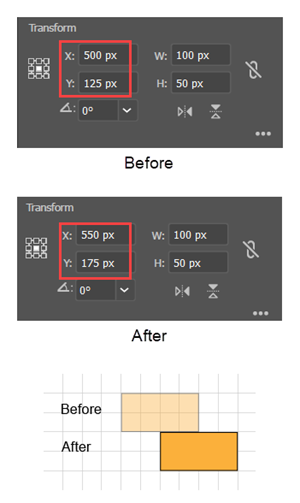
Setting the precise displacement with the X and Y fields of the Transform panel.
To move an object using the Transformation panel in Adobe Illustrator:
You can rotate a selection precisely with two quantitative methods (the Rotation Dialog or the Transformation panel, or you can work visually with the Rotation tool.
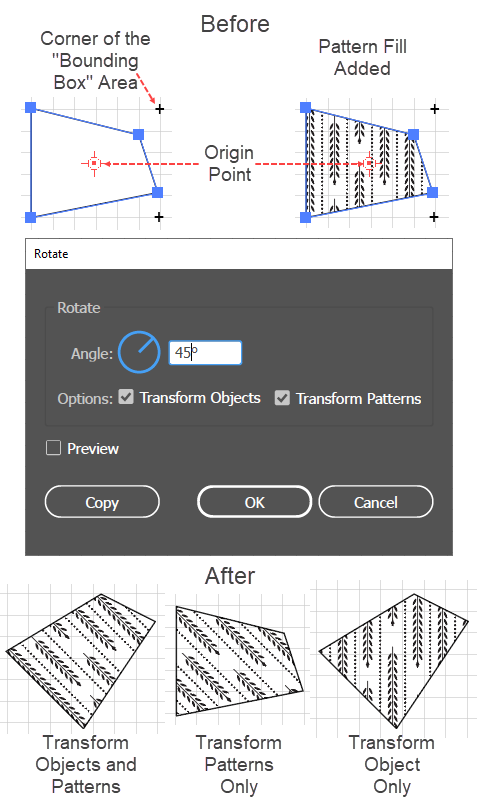
To rotate an object (or objects) using the Rotate tool dialog box settings in Adobe Illustrator:
Hint
The Rotate tool dialog box (unlike the Transform panel) does not provide a field to set the Reference point. Ai simply places a default Reference point at the center of the Bounding Area (the area that would be covered by the Bounding Box if it were turned on). Of course, it is not necessary to have Bounding Boxes enabled, but it is worth keeping in mind that Ai uses the Bounding Area as a frame of reference. Therefore, the center about which an object rotates will be, not the center of the object, but the center of the Bounding Box.
You can both set the Reference Point and pop up the Rotate Dialog in one operation. Simply single click the Rotate tool to activate it, select the object to be rotated, and then Alt + click. Ai will set the Reference Point and pop up the Rotate dialog box.
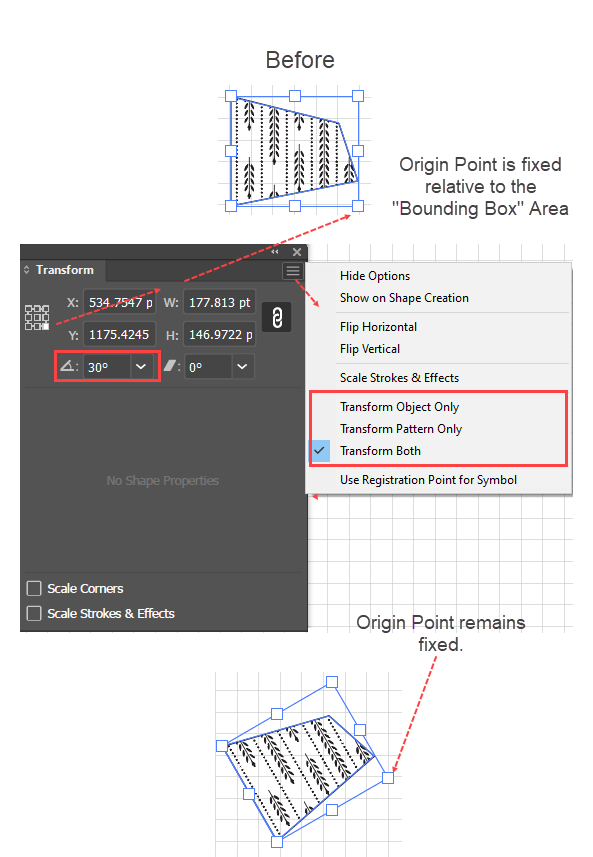
Using the Transform panel to rotate objects has the advantage that you can use the small, square 3 x 3 array of buttons (at the upper left of the panel) to set the Reference Point, i.e., the fixed point about which you want the object to rotate.
To use the Transform panel to rotate an object in Adobe Illustrator:
The Rotate tool has the advantage that you can set the Reference point (about which you want to rotate the object) visually and set it anywhere on the artboard, even outside of the object that you rotate.
To use the Rotate tool to rotate an object in Adobe Illustrator:
Hint
You can both set the Reference Point visually (anywhere on the Artboard), and use the Rotate dialog to precisely set the angle of rotation. Simply, Alt + click to set the reference point. Ai will both (a) set the Reference Point and (b) pop up the Rotate Dialog.
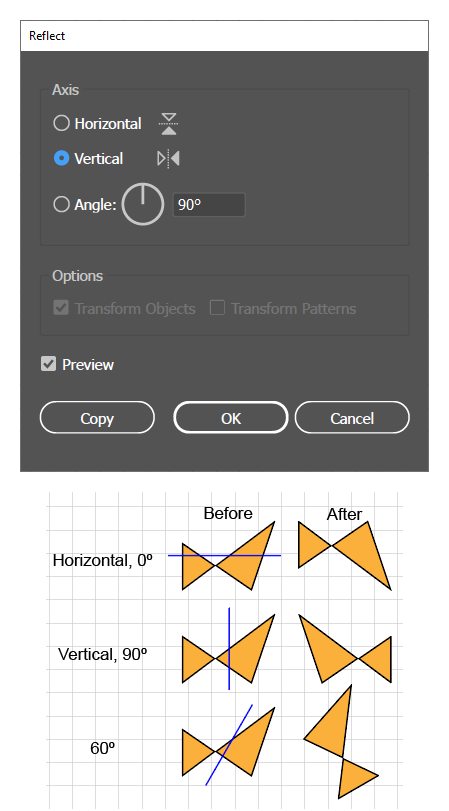
A reflection is a transformation of an object relative to a line, called the axis of reflection. The transformation moves or copies each point of the object to another point that is the same distance from the axis line, but on the other side. The reflection operation creates a mirror image of the reflected object or a figure with bilateral symmetry. The line of reflection is analogous to the mirror. There are two common ways to reflect objects:
The Dialog has the advantage that it allows you to precisely control the angle of the axis of reflection, but the dialog imposes the limitation that the axis line must pass through the center of the box that contains the object. By contrast, the Reflection tool does not allow you to precisely control the angle of the axis of reflection, but it does allow you to specify a true axis of reflection, which need not even pass through the object.
To reflect an object using the Reflect tool's dialog box in Adobe Illustrator:
To specify an axis of reflection and reflect an object relative to the axis in Adobe Illustrator:

Hint
Reflecting, with copying is often used to complete a symmetrical figure from a drawing of one half of it. To complete the missing half of a symmetric figure:
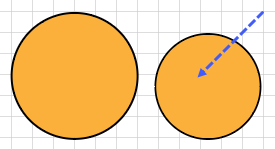
The phrase "scaling a figure" usually refers to uniform scaling, i.e., creating a similar figure in which the angles remain unchanged. However, Ai's Scale tool, and its Dialog box, can do not just uniform scaling but also non-uniform scaling, in which you can expand or contract the horizontal, and vertical dimensions independently. The tool and the dialog box are the main ways of doing scaling. The Transform panel can do scaling, but not by a scaling factor, but only by changing the absolute width and height values. In contrast, the Effect > Distort & Transform > Transform Effect can do percentage scaling in both the horizontal and vertical dimensions independently.
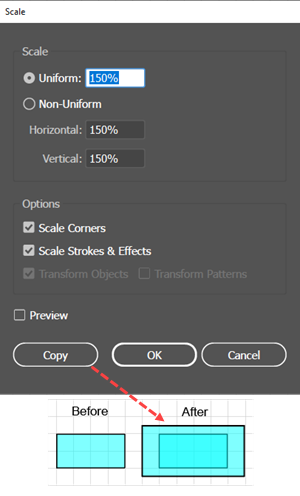
The Scale dialog allows you to multiply the dimensions of a selected object by a percentage factor times its current value (i.e., a scaling factor of 100% causes no change). By checking the Scale Corners or the Scale Strokes and Effects checkboxes, you can also tell the dialog to proportionally scale the target object's corners, or its Strokes and Effects
To scale an object or objects quantitatively using the Scale dialog box settings in Adobe Illustrator:
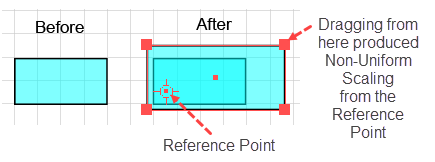
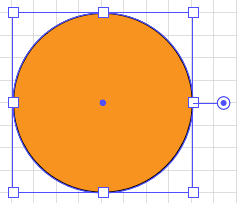
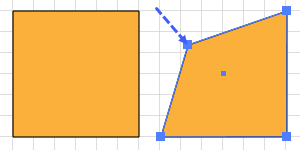
Example of using the Scale tool to set an off-center Reference Point and then dragging to produce non-uniform scaling.
To scale an object or objects using the Scale tool in Adobe Illustrator:

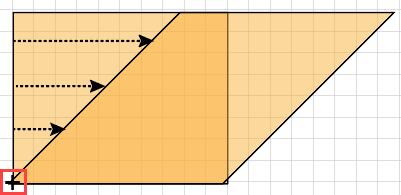
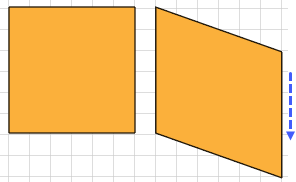
A horizontal shearing transformation will push all the points of a figure along the horizontal axis in such a way that all lines that are perpendicular to the horizontal axis slant away from the perpendicular at the same (specified) angle. So, if the figure is a rectangle; the transformation will push it over onto its side and make it into a parallelogram.
In Illustrator, not all shearing transformations need to push along the horizontal axis. In general, the direction along which the shearing transformation pushes is called the Shearing Axis and the amount of slant from the perpendicular is called the Shearing Angle. In Illustrator, you can set the Shearing Axis, the Shearing Angle, and a Shearing Reference Point (i.e., a point that remains fixed and will not be displaced by the transformation).
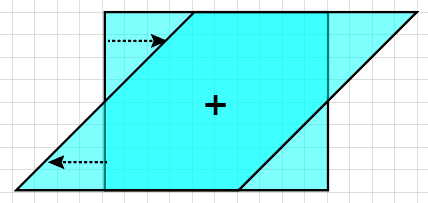
The Shear transformation measures the amount that it must push each point in the figure from two lines: (A) a line that is perpendicular to the Shear Axis and (B) a Shearing Angle line, which is slanted at the Shear Angle and that intersects the perpendicular at the level of the reference point. The amount and direction that Ai pushes each point is proportional to the distance that the Shearing Angle line is from the perpendicular line at that point on the perpendicular.
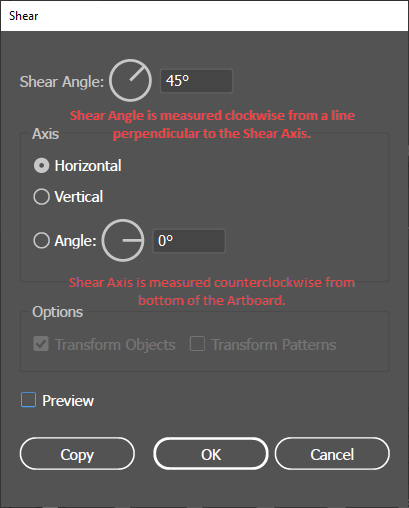
To Shear a figure quantitatively with the Shear dialog box in Adobe Illustrator:
To shear and copy an object or objects using the Shearing tool in Adobe Illustrator:
The bounding box provides an easy way to do rotation and scaling transformations, and it is also important for understanding several tool-based transformations.
Any selected object or selection of objects has an invisible bounding area, a rectangular region that encloses the selection. In most transformations, the bounding area acts as a framework that defines the transformation's scope and geometry. For example, the locations shown on the Reference point locater in the Transform panel defines the point of Reference for transformations relative to the bounding area.
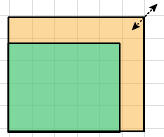
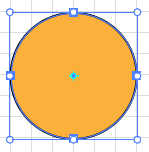
You can make the bounding area visible by executing the command: View > Show Bounding Box (Shift + Ctrl + B). As shown in the accompanying figure, the Bounding Box has 4 side controls and 4 corner controls.
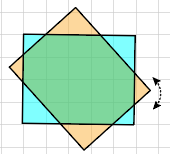
In addition, related to (but a bit different from the 8 bounding box controls) there are active areas, each of which Ai identifies with a distinctive cursor, from which you can initiate a move, rotation, stretching, or compression transformation.
To use the Bounding Box areas to make transformations in Adobe Illustrator, you must both place your cursor in a specific location and execute a specific gesture, as described below:
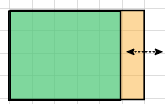
With the cursor on a Side control, which Ai identifies by a cursor with a horizontal, double-headed arrow, dragging the cursor will stretch or compress the selected object, while the opposite side will remain fixed.
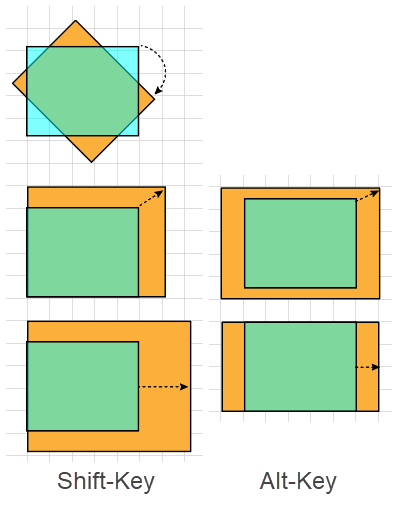
Bounding Box Modifier Keys
Illustrator provides two modifier keys that constrain the stretching, and compression of the Bounding Box and its content:
The Free Transform tool ![]() allows you to scale, skew, rotate, or distort a figure relative to a special bounding box.
allows you to scale, skew, rotate, or distort a figure relative to a special bounding box.
To visually transform a figure with the Free Transform tool in Adobe Illustrator:
 ). Depress the left mouse button, and reposition the cursor slightly until you see that Ai has filled the point. Then drag the corner toward the opposite corner. Shift + Click + Drag constrains the scaling to be proportional.
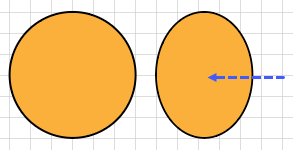

 ). Depress the left mouse button. When you see that Ai has filled the point, press the Ctrl-key and drag toward or away from the opposite corner.
  ). Depress the left mouse button. When you see that Ai has filled the corner point, press the Ctrl-key + the Shift-key + the Alt-key and drag the corner in a direction that is parallel to one of the dimensions of the bounding box.