Adobe Illustrator Smart Notes


 How It Works Sections    How-To Articles     Definitions    Menu Options  

Cutting Tools

Overview

Illustrator provides 3 general purpose and 3 special purpose tools for dividing paths.

General Purpose Cutting Tools

Illustration comparing how Cutting Tools cut
Comparison of how Cutting Tools cut.

The general purpose cutting tools are under the Eraser tool in the Toolbar; and include the Eraser, Scissors, and Knife tools. These tools divide open or closed paths. The accompanying diagram and the following narrative show how they compare:

  • All these tools, except for the Knife tool can cut either open paths or closed paths. The Knife tool has no effect on open paths.
  • The Eraser tool works like a real eraser. Unlike the Scissors and the Knife), the Eraser actually removes part of the path or shape through which it cuts. The width of the removed portion depends on the size of the "brush" used. However, only the Eraser tool automatically smooths the cut path and provides properties that you can set to adjust the amount of smoothing, the size of the cut, and so on.
  • The Knife tool works like a cake knife. It does not work at all for cutting an open path. It cuts a closed path into two slices, but (unlike the Eraser tool) it does not actually remove any of the shape.
  • You can drag the Eraser or the Knife tool across an entire shape (closed path).
  • The Scissors tool in contrast to the Eraser and the Knife tool can only cut a path at specific points where you click with the tool. So, cutting completely across a closed path requires two cut points, and therefore, the resulting cut is always a straight line.  Furthermore, when dividing a closed path, while the Eraser tool and the Knife tool create two closed paths the Scissors tool cuts a closed path into two open paths.

Eraser Tool

The Eraser tool acts like a negative paint brush and the eraser area has many of the same properties as a brush. You can use the tool to split, modify, or clean up paths, compound paths, paths inside Live Paint groups, and clipping paths.

Here are the main points:

  • The Eraser automatically smooths the gestures that you make with a mouse or a stylus pen.
  • Use the bracket keys ("[" or "]") to dynamically decrease or increase the size of the brush.
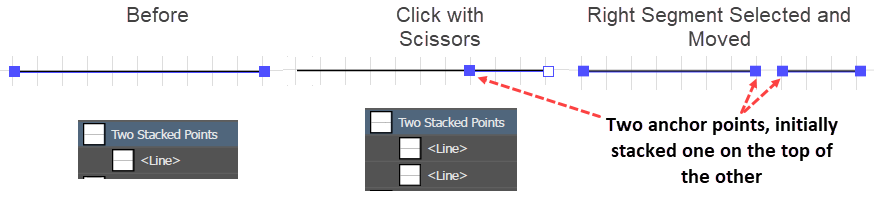
  • When you use the Eraser tool to cut through a closed, filled path, Ai preserves the stroke around the resulting closed paths.
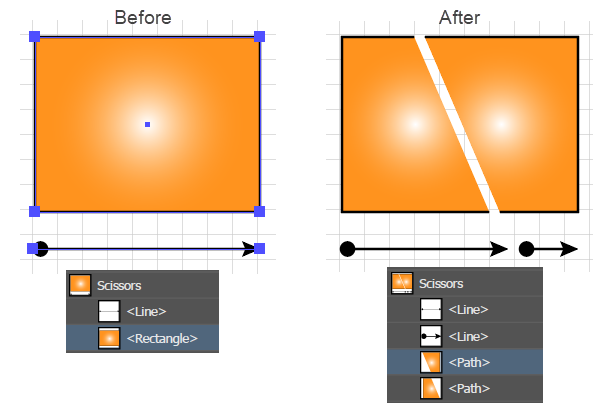
  • If you cut completely through a Live Shape (e.g. a rectangle), the result is two closed paths. That is, the resulting pieces are expanded.
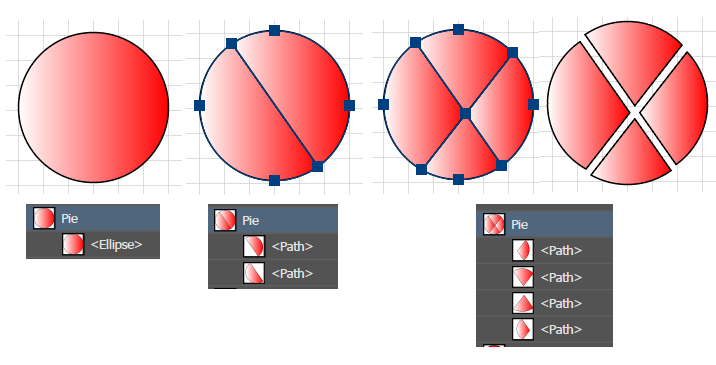
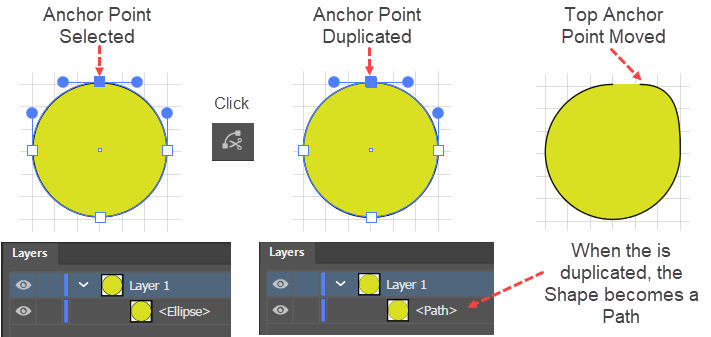
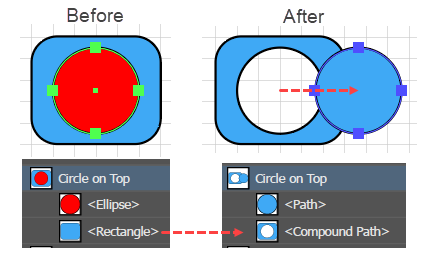
  • When you click with the Eraser to punch a hole in a closed path, you will find by observing the Layers panel that what was a normal path or shape has become a Compound Path.
  • Alt + Drag creates a marquee and erases whatever is inside of the rectangular area.
  • Shift + Drag constrains the erasure in a 0, 45, or 90-degree line.
  • As with other free-hand tools, you can adjust the size, shape, and orientation of the eraser.
Illustration showing that After erasing, the Eraser tool reapplies the original path's attributes and so preserves the original, fills, strokes, and effects.
After erasing, the Eraser tool reapplies the original path's attributes to the remaining bits and so preserves the original, fills, strokes, and effects.

To erase part of an open or closed path in Adobe Illustrator:

  1. Optionally, double click the tool (or if it is already active, just press Enter, to open the Eraser Tool Options dialog and adjust the settings.
  2. With the white arrow tool, Select an open or closed path (which may have fills, strokes, or effects).  When you select a path, only that path will be affected by the eraser tool. If you do not select any paths, the tool can affect any path.
  3. Get the Eraser tool.
  4. Click + drag on the path to cut a swath into (or completely through the path), or simply click inside a closed path to punch a whole.

Hint

After cutting through an open or closed path, the Eraser tool will re-render the resulting segments and re-apply the original path's appearance attributes and effects. To prevent Ai from re-rendering the resulting paths, you must Expand the original path before cutting it.

Scissors Tool

Illustration of how the Scissors tool works by creating two anchor points, stacked one on top of the other.
Clicking with the Sissors tool creates two anchor points stacked one on top of the other.

To cut an open or closed path in Adobe Illustrator:

  1. Select the path. If there are overlapping paths, the tool affects only the top path.
  2. Get the Scissors tool.
  3. For an open path, click anywhere except one of the end points. Ai will create two anchor points on top of one another.
    Example showing what happens to the Fills and Strokes when Paths are cut with the Scissors tool.
    Example showing what happens to the Fills and Strokes when Paths are cut with the Scissors tool. Here an open and closed path are cut with the Scissors tool and then the cut portions are moved apart.
  4. For a closed path, click any two anchor points or two path segments. At each click point, Ai will create two coincident anchor points, resulting in two open paths. The two open paths will have the same fill and stroke as the original closed path.

Hint

You can close the open paths by selecting the end points and invoking the Join command (Ctrl + j).

Knife

Visual Explanation of the relationship between Faces and Paths

Dragging with the Knife tool makes cut-lines in a closed path. Wherever the cut-lines form a face, Ai divides the closed path into an independent closed path. A face is any area that is not divided by a line segment, whether or not the line segment happens to be a boundary of another path. For example, if you have two overlapping circles, you have two shapes, but 3 faces.

If you use the knife tool to cut through a shape, you will get two faces and therefore, two closed paths. If you make two intersecting cuts, you will get four faces and four closed paths

To cut a shape with the Knife tool in Adobe Illustrator:

Example showing that if cuts with the Knife tool form Faces, Illustrator will make the faces into closed paths.

Example showing that if cuts with the Knife tool form Faces, Illustrator will make the faces into closed paths.

  1. Select a closed path.
  2. Get the Knife tool. The cursor will change to a knife icon.
  3. Place the cursor outside of the closed path, and then Click + Drag to make a free form cut or Alt + Click + Drag to make a straight cut.  Ai will create two selected, closed paths. Initially, the cut will look like a stroke, but you can use the Selection tool to move the cut sections apart to reveal that Ai has created two closed paths with strokes and fills like the original object.

Hint

Example of how to cut a slice from a pie with the Knife tool and the Shape Builder tool.

The process of cutting a wedge-shaped slice out of a circle illustrates the role of Faces in working with the Knife tool. Here is the procedure:

  1. Alt + Click + Drag from the outside of the circle into the interior to cut a straight line into but not completely through the circle.
  2. In the same way, make another cut that intersects the first, forming an approximate wedge.
  3. Get the Shape Builder tool and hover it over the circle. As you move it around the circle, Shape Builder will highlight the Faces with hatching.
  4. Click on the large Face that does not contain the wedge. Shape Builder will consolidate the area into a single face, which you can select and move out to "serve the slice of the pie".

Special Purpose Cutting Alternatives

Illustrator also provides these special purpose cutting commands:

  • Cut a Path at a Selected Anchor Point command button.
  • Divide Object Below command
  • Split into Grid command

Cut Path at Selected Anchor Points

Screenshot of the 'Cut Path at Selected Anchor Points' button in the Control panel.
Illustration of how the 'Cut Path at Selected Anchor Points' tool works.
How the 'Cut Path at Selected Anchor Points' tool works.

The Cut Path at Selected Anchor Points button is a productivity shortcut. It has the same effect on an anchor point as using the Scissors tool, but since it pops up when you Direct Select an anchor point, it is more convenient in a workflow where you are adjusting anchor points.

To cut a path at one or more selected anchor points in Adobe Illustrator:

  1. Get the Direct Selection tool and click an anchor point to select it. Ai will display the Cut Path at Selected Anchor Points button in the Control Panel and in the Properties Panel (but not in the Tools panel).
  2. Click the Cut Path at Selected Anchor Points button. Ai will duplicate the originally selected anchor point, i.e., it will create a new anchor point on top of the old one. This will cut a closed path and make it an open path. The newly created anchor point will be selected; so that you can, for example, easily move it by nudging it over by pressing an arrow-key, as shown in the accompanying figure.

Divide Objects Below Command

Illustration of cutting a Shape with a Path using the Divide Objects Below command.
Cutting a Shape with a Path using the Divide Objects Below command.

This command allows you to use one path or shape to cut another path or shape. It is useful because, unlike the case with the cutting tools, the cutting path can be, not just a free-hand path or a straight line, but can be arbitrarily complex and as precisely drawn as the situation demands.

To use a path or shape to cut through another shape in Adobe Illustrator:

  1. Place the (open or closed) cutting path on top of the shape that you want to cut through.
  2. Select the top, cutting path.
  3. Illustration showing what happens in the Layers panel when you cut a Shape with a Path using the Divide Objects Below command.
    What happens in the Layers panel when you cut a Shape with a Path using the Divide Objects Below command.
    Execute the Object > Path > Divide Objects Below command. The command will discard the cutting path, and cut the bottom path into two paths. The change is shown clearly in the Layers panel.
Illustration showing that The Divide Objects Below command can produce a Compound Path.
How to punch a hole with the Divide Objects Below command to produce a Compound Path.

Note

If the top object is a shape that fits inside the bottom shape, the command will punch a hole in the bottom shape, which will, by that fact, become a compound path.


Split into Grid Command

Illustration of the Split into Grid command.
Example showing that the Split into Grid command always converts the target shape into a rectangle.

To divide an object into rectangular rows and columns in Adobe Illustrator:

  1. Select the object, which is to be split.
  2. Execute the Object > Path > Split into Grid command. Ai will display the command's option dialog box.
  3. In the dialog box, adjust the dimensions of the cells, gutter, and/or the overall dimensions of the grid, and click OK. Ai will convert the target to a rectangular grid of the specified dimensions.

    When you enter the number of rows and columns, Ai will calculate the required height and width. If you add gutters, Ai will recalculate the row height and width. If you check the Add Guides checkbox, Ai will place guides at the boundaries of each row and column.

Screen shot of a Grid with Guides
Grid with Guides

Resources