A pattern swatch is a software object that displays art inside a shape (called a Tile) that when used as an object's Fill, will repeat as many times as necessary in order to fill the shape. It has 3 components:
A Simple Pattern versus a Seamless Pattern in which the horizontal "seam" is obscured by a vertical triangle that starts on one tile and is completed on the tile below it.
A Tile, which is a shape (e.g., a rectangle or hexagon) that contains some Art and can be used to create a tiling. A tiling (or tessellation) is the repeated use of copies of a Tile which can be placed adjacent to one another in such a way that:
The Tiles cover the entire fill of another shape.
No Tile overlaps another tile.
There are no gaps between adjacent tiles. That is, each edge of each tile pushes flush against an edge of some neighboring Tile without any space between the edges.
Tiling Art, i.e., a vector art composition, which may be (as illustrated in the accompaning figure) either:
A simple pattern in which all the parts of the artistic composition fit on the tile, and no part of the composition starts on one tile and is completed on another tile.
A seamless pattern in which some parts of the artistic composition start on one tile and are completed on another tile. If you want an object to span several tiles, you must cut the object into two parts and place both on the tile so that when two tiles are placed side by side, the tile spanning object starts on one edge of the tile and is completed on the opposite edge of the following tile. The point of this arrangement is to make it difficult for a viewer to detect the boundaries (seams) between tiles.
Tiling Settings that describe:
How the editing environment will look and work.
The type of Tile.
The size of the tile relative to the size of the Art.
Using Illustrator's Pattern Features
This section focuses on how to use Illustrator's pattern generation features for creating, editing, and using pattern swatches to Fill a shape.
Create a Pattern Fill
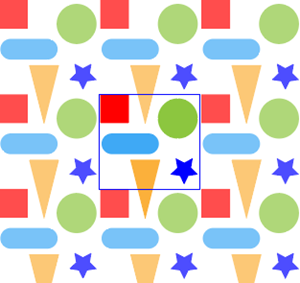
Example of creating a simple pattern with default settings and Art that fits completely on a single tile.
To create a Pattern Fill in Adobe Illustrator:
Create the Art. If you intend to use the pattern as a background element that you want to add a sense of stability to your design, but do not want the viewer to explore the pattern itself, you may want to use a Simple design (where all the objects fit intact on one tile). Alternatively, if the pattern itself is to be the main focus of the design, you may want to use a Seamless pattern (where the art will span several tiles). Illustrator's pattern creation and editing features support both alternatives.
Select the Tiling Art.
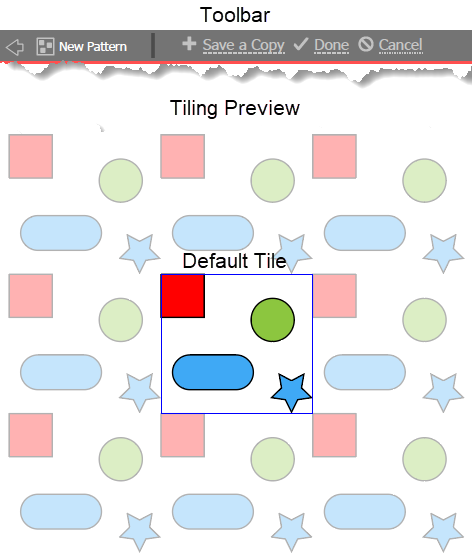
Execute the Object > Pattern > Make command. Ai will:
Launch the Pattern Options dialog and put the Artboard into Pattern Editing Mode. In Pattern Editing mode the Artboard show two distinctive features:
A Pattern Editing Mode Tool Bar that contains a back pointing arrow, a Save a Copy button, a Done button, and a Cancel button.
The Pattern Options dialog, showing the default values that apply when you create a new Pattern Swatch.
A Tiling Preview display that shows:
The Pattern Swatch, in which the Art is shown at 100% opacity and surrounded by a border, marking the default Tile dimensions.
Dimmed copies surrounding the full opacity Tile, which show how the tiling will look when used as a Pattern Fill. In the Pattern Options dialog, you can adjust the opacity and the number of Tile copies in the Tiling Preview.
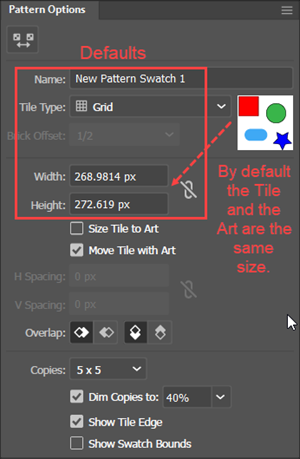
Create a Pattern Swatch using default settings for:
The Pattern Name, which it sets to "New Pattern,"
The Tile Type, which it sets to Grid"), and
Default Tile's Height is Reduced so that the Triangle spans the Top and Bottom Border
The Tile Width and Tile Height, which it sets so that the Tile just encloses the Art). Note the Size Tile to Art checkbox, which is unnecessary at this point. It is used to reset the tile to the size of the Art and to enable the fields that add horizontal and vertical spacing between tiles.
Add the Pattern Swatch to the Swatches panel.
While in Pattern Editing Mode, you can change any of the default parameters listed above. At this point, the process is essentially the same as the process of editing a Pattern, which is described in detail in the next section.
To exit Pattern Editing Mode and save the updates, click the back pointing arrow in the Pattern Editing Mode Tool Bar or click its Done Button. Ai will automatically update and re-render any shapes that use the tile.
Edit a Pattern Swatch
To edit a pattern Swatch in Adobe Illustrator:
Double click on the Swatch in the Swatches panel. Ai will launch the Pattern Options dialog box and will put the Artboard into Pattern Editing Mode. Now when you make changes, you are editing the saved Pattern Swatch.
Optionally, name the Swatch by updating the Name field in the Pattern Options panel. Ai will then display the name in the tool tip that pops up when you mouse over the Swatch in the Swatches panel.
Optionally, click the Save a Copy button to save a copy of the current version of the Pattern Swatch.
Optionally, execute the View > Outline (Ctrl + y) command to inspect the Art. This is particularly useful if you are using a Symbol as the Art.
Pattern Option Dialog fields that modify the Pattern Preview
In Pattern Editing Mode you can use the Pattern Options dialog to customize the environment.
To modify the Pattern Editing environment in Adobe Illustrator:
Update any of the 4 fields at the bottom of the Pattern Options dialog box:
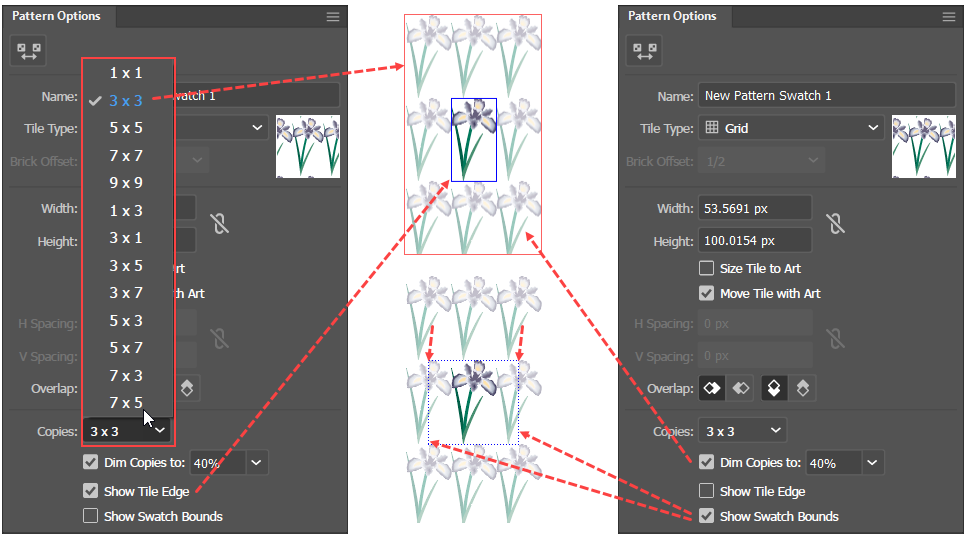
The Copies field allows you to adjust the number of copies of the tile that will show in the tiling preview.
The Dim Copies to checkbox and its associated number field allow you to indicate whether or not you want to dim the copies that surround the Tile in the tiling preview and if so, to set their opacity.
The Show Tile Edge marks the boundary of the Tile, as opposed to the boundary of the art. The area of the Art can be larger or smaller than the area of the Tile.
The Show Swatch Bounds checkbox makes Ai show the boundary of the Swatch by surrounding it with a dotted line. In the accompanying figure, note that when creating this Pattern, Ai has made the Swatch larger than the Tile. This setting will persist even if you click check the Size Tile to Art checkbox. Here Ai has decided to place the left half of the Art, a full copy of the Art, and the right half of the Art on a single Swatch.
Go on to edit the Pattern Swatch Art.
Edit the Pattern Swatch Art
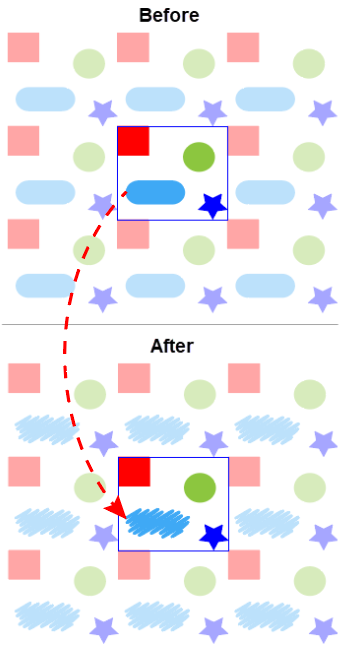
Example of applying a Scribble Effect to one of the objects in an Art composition that is completely contained on a single tile.
In Pattern Editing Mode you can make changes to the Art.
To edit the Pattern Swatch Art in Adobe Illustrator:
In the active portion of the Pattern Preview, you can:
Add objects,
Direct select an object and edit its Anchor Points or Control handles, or
Select one or more of the objects in the composition that makes up the Art and apply any of the transformations (move, rotate, reflect, scale, or shear).
Apply an effect to a selected object. However, if your Art contains active content (symbols, effects, plugin groups, nested patterns, stroke aligned inside/outside or graphs) Ai will automatically expand the active content.
To exit Pattern Editing Mode and save the updates, click the back pointing arrow in the Pattern Editing Mode Tool Bar or click its Done Button. Ai will automatically update and re-render any shapes that use the tile.
Alternatively, go on to use the Pattern Options dialog parameters to adjust the relationship between the Swatch and the Art by following the instructions either for Art that fits on a single Tile, or Art that is either larger or smaller than the Tile.
Edit Pattern Options for Art that Fits on One Tile
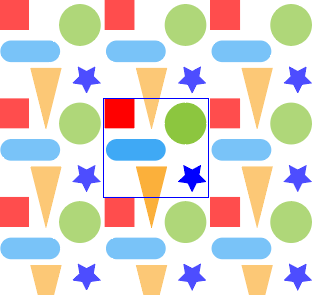
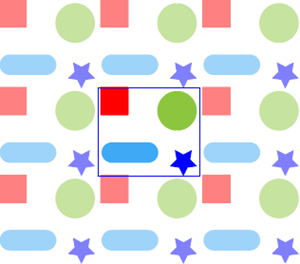
The Art (the four shapes) Fit inside the Tile
In cases where you do not want the pattern to be seamless, but rather you want to highlight the pattern's symmetry (e.g., using the pattern as background or for texture), you can create an artistic composition that fits on a single tile. Then you can select the art, and invoke the Pattern tool (Object > Pattern > Make). In the Pattern Options dialog, you can then simply accept the default setting for the Width and Height fields, which will make the entire artistic composition fit on a single tile. Here are the details.
To edit the pattern options in Adobe Illustrator when all the Art objects fit on one tile:
Increase or decrease the spaced between Tiles quantitatively by updating the H Spacing and V Spacing fields.
Click the Size Tile to Art button. This will not change the values in the Width and Height fields, because the Tile will have been set to the size of the Art by default. It will, however, enable the H Spacing and V Spacing fields.
Place the cursor in an H Spacing or V Spacing field, and press the up or down arrow-keys to increase or decrease their value. Negative values are valid. Adding spacing will increase the margin around the Art on the Tile. Decreasing the spacing will reduce the margin. Negative values will cause the Art to overlap.
As an alternative to adjusting the H Spacing and V Spacing, fields, you can use the Pattern Tile Tool Icon at the top left of the panel. The Icon is a toggle button that shows and hides a bounding box control that you can use to visually move the Tile boundary away from or toward (and indeed into) the Art. This tool's bounding box has small control handles and is distinct from the bounding box that the Art shows when you select it with the Selection tool and have enabled the View > Show Bounding box option. If you have selected a Brick type of Tile, the bounding box will also have a diamond shaped control point on its top side, which you can use to adjust how far the bricks are offset from one another. When you toggle the bounding box on, Ai disables the Show Tile Edge checkbox.
If Art from adjacent Tiles overlap, use the two pairs of radio buttons in the Pattern Options dialog's Overlap area that specify which sides (left or right, top or bottom) of the Art appears in the foreground. If the Art is wider than the Tile, you can use the first pair of radio buttons the specify that Art on the left Tile should be in front of the Art on the right Tile or vice versa. If the Art is taller than the Tile, you can use the second pair of radio buttons the specify that Art on the top Tile should be in front of the Art on the bottom Tile or vice versa.
In the Pattern Options dialog box, you may want to select a new Tile Type. In the Tile Type dropdown, you can select one of the following five options:
The Grid option tells Ai to use rectangular Tiles and to arrange them in rows and columns, like a spreadsheet.
The Brick by Row option tells Ai to use rectangular Tiles and to arrange them in rows so that they are offset from one another in a way that resembles the bricks in a wall. This arrangement has no visible columns.
The Brick by Column option tells Ai to use rectangular Tiles and to arrange them in columns that are offset from one another. This arrangement has no visible rows.
The Hex by Column option tells Ai to use hexagonal Tiles and to arrange them so that the parallel sides of the hexagon are oriented vertically.
The Hex by Row option tells Ai to use hexagonal Tiles and to arrange them so that the parallel sides of the hexagon are oriented horizontally.
Click the Done button at the top of the Pattern Options dialog box.
Edit Pattern Options for Art that Spans Several Tiles
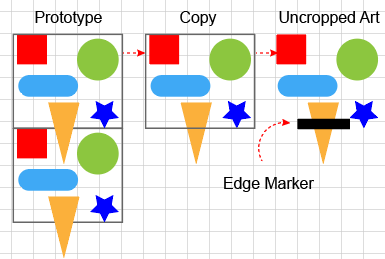
Prototype Used to Plan the Art for an Uncropped Seamless Pattern.
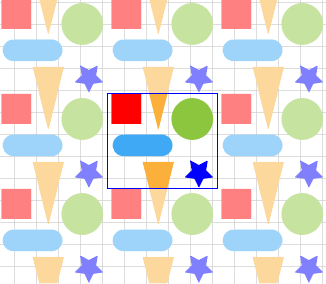
When you want the tiling to be seamless, you do not want an artistic composition that fits on a single tile. Rather, you will want to hide the edges of the tile by having some parts of the Art extend beyond the boundaries of the Tile (i.e., be cut off by the tile) and be completed on an adjacent tile. In the accompanying figure, the orange triangle extends beyoud the tile and is completed on the tile below it.
Fortunately, it is not necessary for you to work out how to manually crop the design to a tile so that some objects are cut into parts that are place on opposites sides of the tile in just the right way so that they appear to cross the tile borders. Instead, the Pattern Options can help you crop the tile to the Art.
However, working with a design that is larger than the tile means that when you invoke the Pattern tool (Object > Pattern > Make), you cannot accept the default values for the Pattern Options dialog's Width and Height fields, which make the Tile large enough to fit the Art. Rather after you create the Swatch, you will have to reduce the Size of its Tile so that it crops the Art.
Here are the details.
Illustration of making some Uncropped Art into a Pattern Swatch that is Seamless along its horizontal edge.
To create a Seamless Pattern Swatch in Adobe Illustrator:
Manually draw a prototype object to layout a first approximation of the Art and the boundaries of the Tile, so that some objects extend beyond the Tile's borders. These objects will then hide the edges (seams) that they traverse. The first figure in this section shows a Prototype in which only one object (the triangle) extends beyond the top Tile's bottom border into the Tile below. Note, that we want the final repeating tile to resemble the bottom Tile in the Prototype, in which the pointed end of the triangle pokes into the top of the Tile and the blunt end of the triangle sits on the Tile's bottom edge. You could crop the Art to the bottom tile and use it as the pattern, but Ai can use the uncropped Art, which will allow you to edit and refine the layout of the Art and Tiles using the Tiling Preview.
Copy the Art, place a temporary shape on it to mark the edges wherever an object overlaps the Prototype Tile's border.
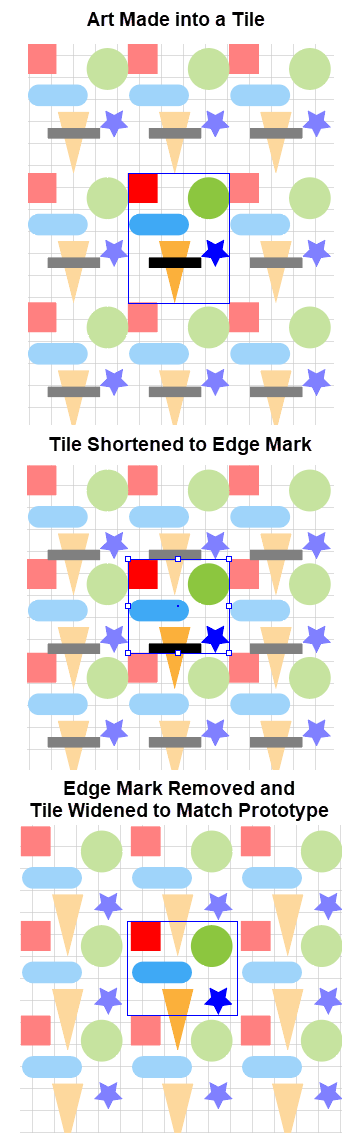
Select the resulting Art, and execute the Object > Pattern > Make command. Ai will create a Pattern Swatch in the Swatches panel, open the Pattern Options dialog, show the tiling preview, and go into pattern editing mode. By Default, Ai will make the Tile the same size as the Art.
In the Pattern Options dialog, click the Pattern Tile Tool Icon () at the top left of the panel. Ai will add resizing handles to the Tile's bounding box (as shown in the second panel of the second figure.
Using the temporary markers, shrink the Tile's borders to the area that you have marked. Then delete the markers. The second figure in this section shows how this tile resizing works in our example.
Make any other edits to the art objects or the tile dimensions to get a balanced look in the Tiling Preview.
Click the Done button at the top of the editing window. Ai will update the Pattern Swatch.
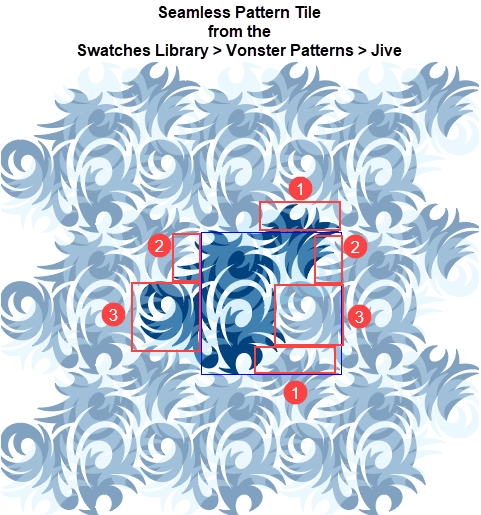
The Vonster Jive seamless pattern with three places where a part of the design overlaps an edge of the Tile. The numbers show where, in order to render the design on a single tile, each overlapping portion must be placed at the opposite edge of the finished tile.
Edit Pattern Options for Cropped Art
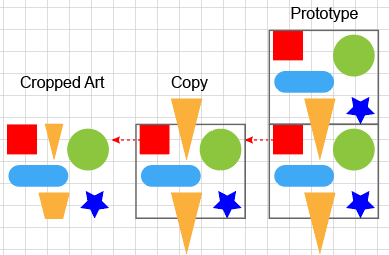
Cropping Art from a Complete Repeating Tile in the Prototype
Even though Illustrator can help you make a Seamless Pattern Swatch by cropping the Art to a tile, when the design is complex, it is essential to design iteratively, and to start with a design that is already carefully prepared to be repeating and cropped to a specific Tile size.
To create a pattern swatch from cropped art in Adobe Illustrator:
Use a prototype object to layout the Art and the Tile, so that some objects extend beyond the Tile's borders. These objects will then hide the edges (seams) that they traverse. The first figure in this section shows a Prototype in which only one object (the triangle) extends beyond the top Tile's bottom border into the Tile below. Note, that we want the final repeating tile to resemble the bottom Tile in the Prototype, in which the pointed end of the triangle pokes into the top of the Tile and the blunt end of the triangle sits on the Tile's bottom edge. In this case we crop the Art to the bottom tile and use it as our pattern.
Making Cropped Art into a Pattern Swatch that is Seamless along its Horizontal Edge
Copy the Art from a Tile in the Prototype where all the overlapping portions of objects are represented and form a complete repeating tile (e.g., the bottom Tile in the Prototype shown in the figure).
Make sure that the rectangle that represents the Prototype Tile is on top of the other objects; then execute the Window > Pathfinder > Crop command.
Select the resulting Art, and execute the Object > Pattern > Make command. Ai will create a Pattern Swatch in the Swatches panel, open the Pattern Options dialog, show the tiling preview, and go into pattern editing mode. By Default, Ai will make the Tile the same size as the Art, which in this case is what you want.
Make any other edits to the art objects or the tile dimensions to get a balanced look in the Tiling Preview.
Click the Done button at the top of the editing window. Ai will update the Pattern Swatch.
Use a Pattern Swatch
After you have created and edited a Pattern Swatch, you can use it much as you would any other Fill.
To use a Pattern Swatch in Adobe Illustrator:
In the Layers panel or on the Artboard, select the shape in which you want the pattern to appear.
In the Appearance panel, click the down-pointing arrow in the Fill row. The Appearance panel will open its version of the Swatches Panel.
In the Swatches panel, click the Pattern Swatch. The Pattern Swatch will tile the interior of the shape.
To move the Pattern Fill tiling within the shape:
Double-click the Selection tool. Ai will display the Move dialog.
Uncheck the Transform Objects checkbox and check the Transform Patterns checkbox.
Place the cursor in the Horizontal field and use the up or down arrows to move the pattern right or left. Similarly, place the cursor in the Vertical field and use the up or down arrows to move the pattern down or up.
Pattern Option Description
The Name field assigns the Pattern Swatch the name that you will see in the tool tip that pops up when you mouse over the Swatch in the Swatches panel.
The Copies field allows you to adjust the number of copies of the tile that will show in the tiling preview.
The Dim Copies to checkbox and its associated number field allow you to indicate whether or not you want to dim the copies that surround the Tile in the tiling preview and if so, to set their opacity.
Checking the Move Tile with Art checkbox compels Ai to move the Tile when you move the Art. If this box is unchecked, you can move the art independently of the Tile, and even move it off the Tile entirely.
The Show Swatch Bounds checkbox makes Ai show the boundary of the Swatch by surrounding it with a dotted line.
In the Tile Type dropdown, you can select one of the five options:
The Grid option tells Ai to use rectangular Tiles and to arrange them in rows and columns, like a spreadsheet.
The Brick by Row options tells Ai to use rectangular Tiles but to arrange them in rows so that they are offset from one another in the way that resembles the bricks in a wall. This arrangement has no visible columns.
The Brick by Column option tells Ai to use rectangular Tiles but to arrange them in columns that are offset from one another. This arrangement has no visible rows.
The Hex by Column option tells Ai to use hexagonal Tiles and to arrange them so that the parallel sides of the hexagon are oriented vertically.
Hex by Row option tells Ai to use hexagonal Tiles and to arrange them so that the parallel sides of the hexagon are oriented horizontally.
The Brick Offset field, which is available only if you choose a Brick by Row or Brick by Column Tile Type, determines the amount of the offset, measured in fractions of a tile.
The Size Tile to Art checkbox, shrink-wraps the Tile around the Art, i.e., it makes the Tile dimensions just large enough to contain the Art. Checking this checkbox also: disables the Width field and the Height field and enables the H Spacing field and the V Spacing field.
The Width and Height fields determine the dimensions of the Tile. These fields are available only when the Size Tile to Art checkbox is unchecked.
The H Spacing and V Spacing fields, which apply only when the Size Tile to Art checkbox is unchecked, determine how much horizontal and vertical space (margin) Ai should place around a Tile that is shrink-wrapped to the Art. You can use the Pattern Tile Tool to adjust the horizontal and vertical spacing visually.
The Pattern Tile Tool Icon ( at the top left of the panel, is a toggle button that shows and hides a bounding box control that you can use to visually move the Tile boundary away from or toward (and indeed into) the Art. This tool's bounding box has small control handles and is distinct from the bounding box that the Art shows when you select it with the Selection tool and have the View > Show Bounding box option turned on. If you have selected a Brick type of Tile, the bounding box will also have a diamond shaped control point on its top side, which you can use to adjust how far the bricks are offset from one another. When you toggle the bounding box on, Ai disables the Show Tile Edge checkbox.
Resources
Drawing Vector Graphics: Patterns by Von Glitschka at LinkedIn – provides not only a thorough presentation of Illustrator's pattern tools but an enlightening presentation of the artistic design considerations related to creating patterns.