Illustrator provides two main types of containers: Layers and Groups. Layers are the highest-level containers: that is:
All objects must be in some layer, but objects need not be in a Group.
When you create the first object in a new document, Illustrator will create a default layer and place the object in the layer.
Layers can contain any type of object, including Groups, but Groups cannot contain Layers.
Layers
A layer is an object (i.e.,, a type of software module) that functions as a container. A layer can contain objects, compound objects, groups, and sub-layers. Layers allow you to organize objects and groups into functionally related collections so that all the related objects can be locked, hidden, or moved together in the stacking order. Ai displays information, not only abut layers, but also about their contents in the Layers panel. The Layers panel works like a document dashboard; it contains a surprising amount of information about an Illustrator document and its objects, and it is the place that you want to start when you want to understand what is going on with an artwork (i.e., what structures and appearances the artwork has and in what order they are applied to generate the figure on the artboard).
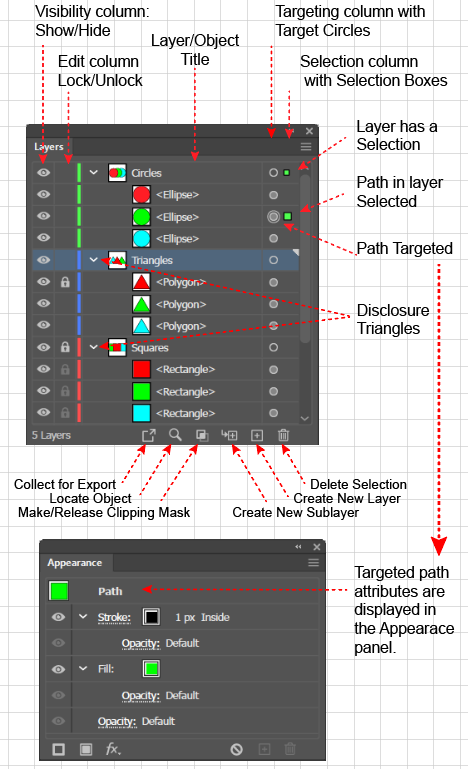
The Layers panel displays objects in a hierarchical format (that resembles a table of contents), displays status information about the objects, and allows you to change objects' attributes. For example, from the Layers panel you can see and change an object's: name, locking status, visibility (show/hide), selection status, type of appearance (basic or complex), and its targeting status. Recall that selecting an object is different from targeting its appearance. In the Layers panel, you can either select an object or target its appearance or both.
The Layers panel and the Appearance panel work together. The Appearance panel is the second place that you want to look to understand what is going on in an artwork. When you target an object in the Layers panel, the Appearance panel reports on the appearance settings of the object. The top row of the Appearance Panel reports the highest-level item that is targeted.
If, in the Layers panel, you target two or more objects, the Appearance panel will report that the objects have Mixed Appearances, but it will report any attributes that all the targeted objects have in common.
Layers Panel Features
Layers Panel as a Dashboard
Hierarchical Display
In the Layers panel, each object gets its own row, which displays the object's name and thumbnail.
To distinguish container objects from their contents, Ai indents the row of each content object.
You can change how the Layer's panel looks by opening the panel menu and choosing "Panel Options …." To display the Layers Panel Options menu, click the hamburger menu at the top of the panel. Ai will display a popup menu. Go to the bottom of the popup menu and click the "Panel Options … " item. Ai will display the Layers Panel Options dialog.
Color Coding
Color Coding Layers - How the color of a Layer in the Layers panel identifies the Layer's contents on the Artboard.
To make it easier to see what objects belong to what layers, Ai color codes the Layers. When you create an object in a Layer, or when you select an object, the structure elements (anchor points, etc.) will have the color that is associated with that Layer.
Status Indicators
Layers Panel Status Indicators
The two columns of icons that flank each side of the list of layers and their contents, indicate the status of the listed items. The columns (from left to right) indicate if an item (an object or a container) is visible or hidden, editable (locked or unlocked), targeted or not, and selected or not.
Clicking an icon changes the status.
Highlighting in the middle column indicates that the layer is selected and that newly created objects will appear in that layer.
In the screen shot, the Circles Layer is selected as are two circles. Ai indicated the selected layer by: (A) distinctive shading, (B) a selection indicator, and (C) a small triangle in the upper right corner of the layer entry. If all the objects in the layer are selected, the layer's selection indicator will be the same size as that of the others. However, if not all the objects in the layer are selected, Ai will show a smaller version of the layer's selection indicator. You can move the selected items in a layer to another layer by dragging the small selection indicator from one layer to another.
Targeting Column Indicators
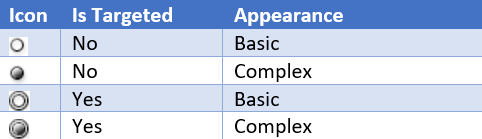
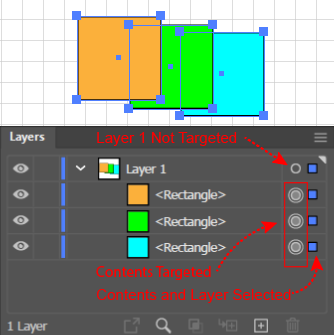
In the targeting column, the targeting circle can be in one of four states. A circle with:
Meaning of Layers Panel Targeting Column Status Indicators
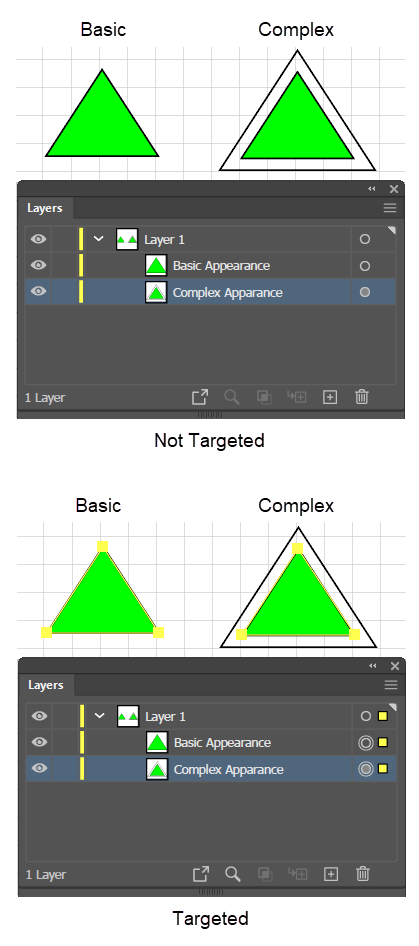
An Empty center indicates that the object has only a basic appearance.
A Filled center indicates that the object has a complex appearance, e.g., it has more than one fill or stroke, has an effect, or has an opacity adjustment.
A Double ring indicates that the object is targeted.
A Filled center and a Double ring indicates that the object is both complex and targeted.
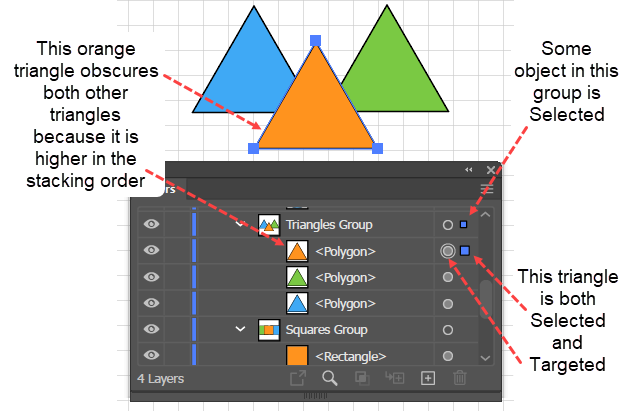
Target Circle Status Indicators Example
Targeting versus Selecting
Selecting a Group but not Targeting its Contents
Targeting and selecting are related but different:
Targeting (clicking a circle in the object's targeting column) refers to choosing an object in order to modify its presentation, i.e., its appearance attributes.
Selecting (clicking a square in the object's Selection column) refers to choosing an object in order to modify its structure, i.e., its anchor points and control handles.
However, when you select a simple object (as opposed to a group), you usually want to target that same object. So, to make the system easy to use Ai automates the targeting by a process, it calls "Smart Targeting." When you select an object, Smart Targeting automatically targets the object that it thinks you are most likely to want to target.
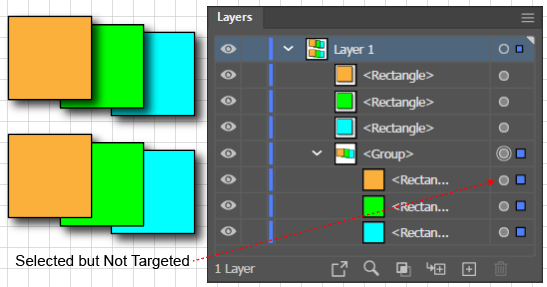
If you click with the Selection tool on an object that is part of a group, Smart Targeting will assume that you want to select the entire group and its contents, but that you want to target only the group itself, as in the accompanying screen shot.
When you select a layer in the Layers panel but do not target it, Smart Targeting never assumes that you want to target the layer, but it does select and target each object of its contents.
You can override Smart Targeting by clicking in the appropriate target circles.
The object that is targeted in the Layers panel is displayed in bold at the top of the Appearance panel.
Groups
You create a group when you want several objects to act as if they were a single object. These are the key points:
A Group is an object (i.e., a type of software module) that functions as a container. A group's contents can include paths, compound paths, and other groups, but it cannot contain layers.
When you group objects, Ai will both:
Create a container, and
Place the objects inside of it.
When you ungroup, you delete the container (and any appearance attributes it might have), but not its contents.
Stacking Order inside a Group
The Layers panel shows groups with a disclosure triangle that you can use to show or hide the contents of the group.
The objects inside a group have a stacking order, i.e., an object that is nearer the top of the group will obscure any objects that it overlaps and that are lower in the stacking order.
A group acts somewhat like a single object and has its own row in the Appearance panel. When you click with the Selection tool on any object that is inside a group, Ai will select the group itself and all the contents of the group (which you can confirm by looking at the Selection column of the Layers panel). Selecting the container and all its contents means that you can drag a selected group to move it just as though it were a single object.
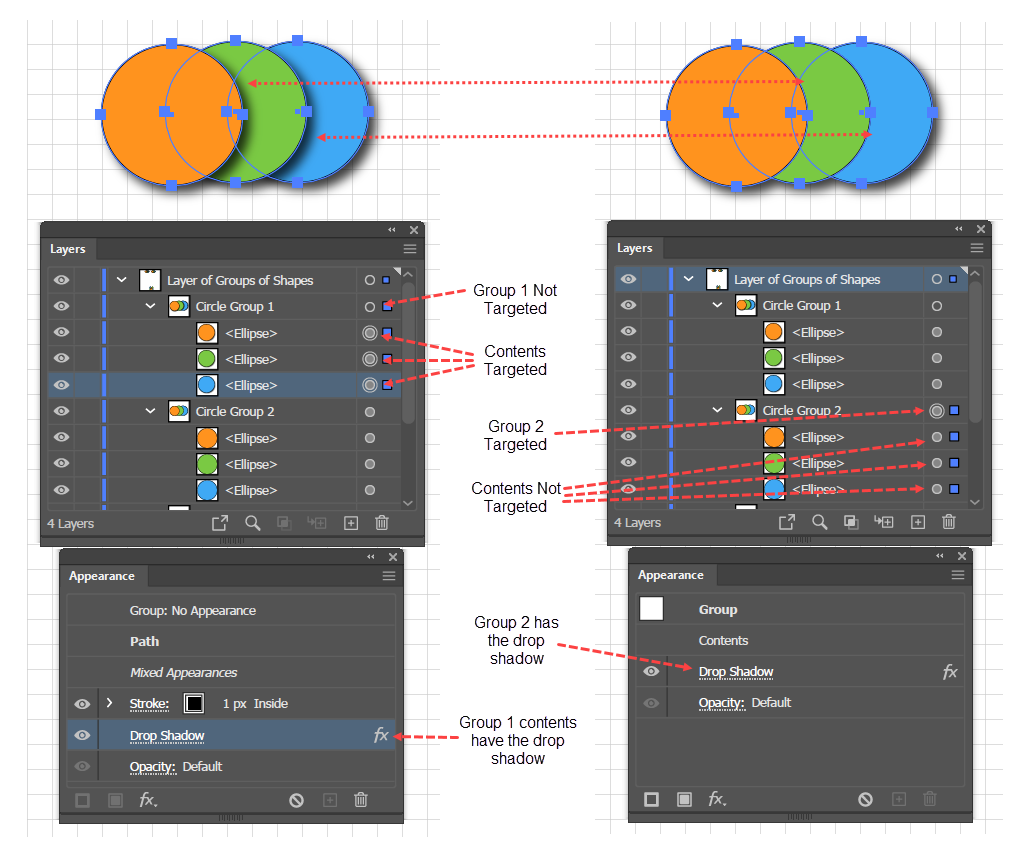
Targeting a Group vs targeting its Contents
When you select a group with the Selection tool, Ai targets the group itself (which you can observe in the Targeting column of the Layers panel).
Because a group is an object in its own right, a group can have an appearance independent of its contents. When a group is targeted, you can apply effects to a group, independently of the objects that it contains.
In order to apply appearance attributes (e,g, an Effect) to a group, you must target it. Recall that targeting and selecting are related, but different operations.
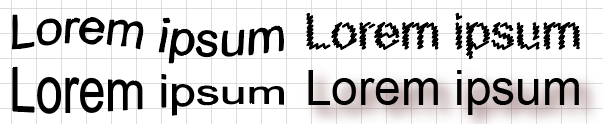
Text (Illustrator's term is Type) is a special type of Group that contains characters rather than simple paths. Therefore, like other groups, you can apply Effects to Type. Not all effects are applicable to Type, but many are including the Distort and Transform effects (such as Zig-Zag, Warp effects (such as Fish), and Stylize effects (such as Scribble and the ever lovely Drop Shadow).
Type with Effects
Layer Operations
This section is about common tasks that you can do with the Layers panel.
Create a Layer
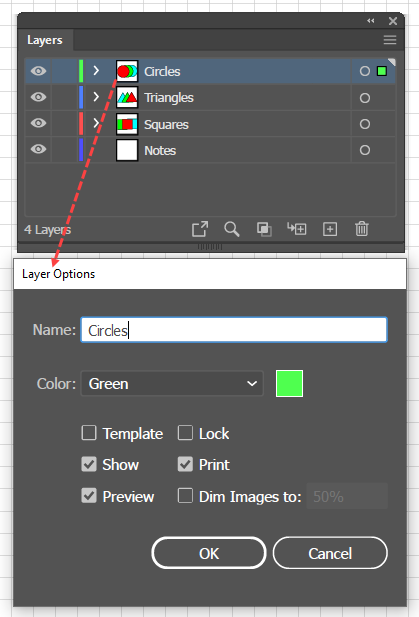
Updating Layer Options
Recall that when you create a new document, Ai always creates an initial layer, Layer 1.
To create a layer in Adobe Illustrator:
Click the layer above which you want to add the new layer.
Give it a default name, e.g. Layer 2, and assign it a color Click the Create New Layer button. Ai will create a new layer.
To change a layer's name, color, or other properties:
Click the layer's thumbnail. Ai will display the Layer Options dialog box.
Make the appropriate changes, and Click OK.
Hint
Meaningfully naming layers and objects is especially important when you are editing nested objects in isolation mode, because then the breadcrumbs will be a useful guide to your current position in the document's hierarchy of layers and objects.
Select Objects Using the Layers Panel
Selecting and Targeting All the Contents of a Layer without Targeting the Layer Itself
You can, of course select an object by clicking it in the document window, or you can select several objects by shift clicking them or by dragging a selection box around them, but you can also use the layers panel to select objects.
To use the Layers panel to select objects in Adobe Illustrator:
Go to the object's row in the Layers panel.
Click in the row's Selection box. Ai will: (A) color the object's Selection box with the Layer color, and (B) with the same color, highlight the item in the document window. If the item is the first one in its Layer to be selected, Ai will also place a small Selection box next to the layer's row. If the selected object was the last unselected object in the Layer to be selected, Ai will place a large Selection box next to the layer's row to indicate that the layer and all its contents are selected. However,
as illustrated in the accompanying figure,
when you select all the objects in a layer, Ai will not target the layer, i.e., it will not highlight the layer's targeting circle. On the other hand, if you select the row for the Layer itself, Ai will select and target not only the L:ayer, but also all of its contents.
To select additional items (possibly in other layers), Shift + click on the objects' rows.
Select All the Objects in a Layer Using the Layers Panel
To use the Layers panel to select all the objects in a layer in Adobe Illustrator:
Go to the Layers panel.
Click in the layer's Selection indicator column. Ai will select all the items in the document window and will update the corresponding (box shaped) indicators in the layer.
Hint:
Note that in the Selection column:
A large Selection box indicates that either (A) the object is a container, and all the contents of the object are selected or (B) that the selected object is not a container.
A small box indicates that the object is a container and only some (but not all) of its contents are selected.
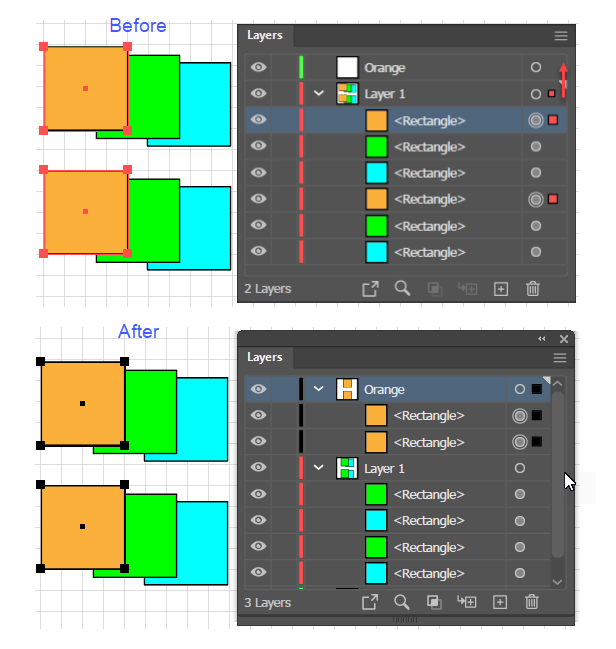
Move Objects between Layers
Use the Layers panel to Move Objects to Another Layer
You can move selected objects from one layer to another by individually dragging and dropping them into a layer, but you can also use the Layers panel to move all the selected objects in one layer to another layer.
This is especially convenient when you want to re-organize an old, large, messy layer into several, new and tidy layers. Note that you can select objects in the artboard and use the Layers panel to move them to another layer. This has the nice advantage that you do not even have to know the names (if any) that you have given the objects in the Layers panel.
To use the Layers panel to move several selected objects from one layer to another in Adobe Illustrator:
Select the objects that you want to move by: (A) clicking them in the Artboard, (B) using the Layers panel, or (C) using the Select > Object menu.
Click on the source Layer's small Selection box and drag it to the destination Layer.
Copy Objects with the Layer's Panel
To copy objects from a source layer to a destination layer using the Layers panel in Adobe Illustrator:
In the Layers panel, go to the source layer and select (Shift + click or Ctrl + click) in the Selection column of the objects that you want to copy.
Alt + click on the source layer's Selection box and drag it to the destination layer.
Copy an Appearance with the Layers Panel
To copy an object's appearance from a source object to a destination object using the Layers panel: in Adobe Illustrator:
Go to the source object's Targeting circle.
Drag and drop it onto the destination object's Targeting circle. Ai will replace the source. object's appearance (fills, strokes, and effects) with that of the destination object.
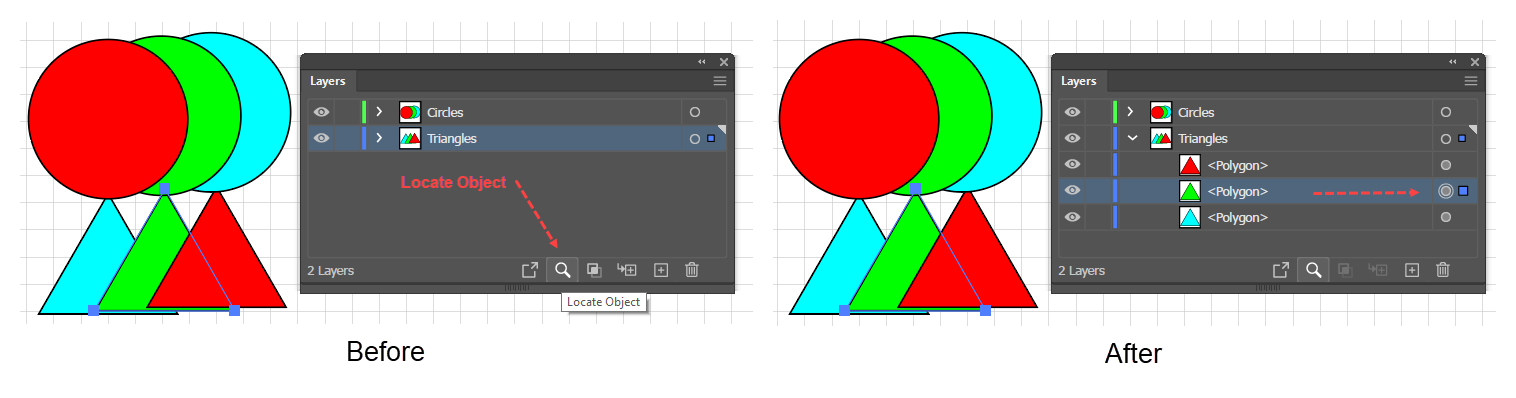
Find a Selected Object in the Layers Panel
To find an object in the Layers panel that you have selected on the artboard in Adobe Illustrator:
Go to the Layers panel.
Click the Locate Object icon at the bottom of the panel. Ai will open all of the layers, sublayers, or groups that contain the selected object. Ai will also update the Selection indicator for any layer that contains the selected object.
Using the Layers panel's Locate Object tool to find the Layers panel entry for a selected Artboard object.
Copy a Layer from One Document to Another
To copy several layers from a source to a destination document in Adobe Illustrator:
In the source document, lock all the layers that you do not want to copy.
Ctrl + a, to select all the unlocked layers.
Ctrl + c, to copy all the selected layers into the clip board.
Open the destination document.
In its fly-out panel menu, choose Paste Remembers Layers, which tells Ai to keep all the objects in their original layers.
Paste the layers from the clip board into the destination document using the Paste in Front command (Ctrl + f). If you just do Ctrl + v, Ai will copy the layer contents, not to their original coordinates, but to the middle of the destination document.
Group Operations
Since Groups are objects, Layer panel operations such as selecting, moving, or copying objects also apply to Groups. This section focuses on operations that are unique to Groups.
Create a Group
To group objects, i.e., place several objects into a Group object in Adobe Illustrator:
Select the objects that are to be its contents.
Execute the Object > Group (Ctrl + g) command.
Delete a Group - Ungroup Its Contents
To ungroup objects, i.e., to delete a Group object but not its contentsin Adobe Illustrator:
To allow you to edit the contents of a group without having to first ungroup them and then regroup them after editing, Illustrator provides a facility called Isolation mode. There are several ways to use it, what follows describes the most intuitive technique.
To Update a Group's Contents in Adobe Illustrator:
Double click the object that you want to edit. Ai will enter isolation mode.
Update the selected object.
To exit isolation mode and stop editing the group's contents, click on an area of the artboard that is outside the group. In the Layers panel, the group will once again behave much like a path object.
Update the Appearance of a Group Object
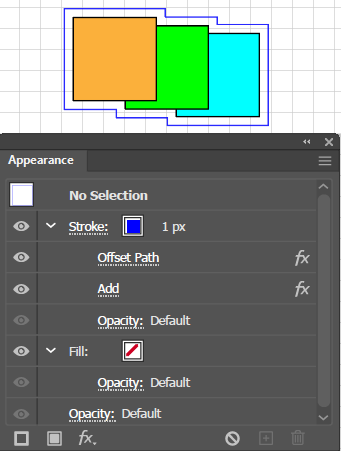
Example: Apply an Offset Outline Effect Around a Group
To update the appearance of a group object (as opposed to its contents) in Adobe Illustrator:
Select the Group (with the Selection tool, click once on any object that is in the Group) or click on the Group's Selection box in the Layers panel. Smart targeting will target the group.
Apply the Appearance.
Example: Apply an Offset Outline Around a Group:
Select the Group (click once on any object in the group).
Go to the Appearance panel and click the Add New Stroke icon.
Go to the Effects menu (fx) and select Path > Offset Path. Ai will display the Offset Path popup.
Go to the Effects menu (fx) and select Pathfinder > Add. Ai will display the Offset Path popup.