Adobe Illustrator Smart Notes


 How It Works Sections    How-To Articles     Definitions    Menu Options  

Paths and the Pen Tool

Overview

In Illustrator, a vector object is made up of one or more paths. A path can have both a structure and an appearance. This article is about structure. However, if you do not give a path some appearance attribute, at least a stroke, you will not be able to see it unless it is selected. For that reason, the examples on this page are constructed with fill set to none, path set to black (usually 1 pixel). For more about appearances, see the Appearances and Effects page.

Path Structure

The structure of a path is made up of a chain of path segments each of which is a Bézier curve. We will get to how you create Bézier curves and string them together in to paths later. This section focuses on how Bézier curves work.

Bézier Path Segments

Bézier Curves in Illustrator

Each Bézier curve (each link in the chain that makes up a path) is defined by 2, 3, or 4 points, which you create by clicking, or clicking and dragging, with the Pen tool.  Each Bézier segment must have a starting and an ending point, which are called Anchor Points and which Ai (Adobe Illustrator) shows as small squares.  It may also have two Control Handles: a starting or launching control handle connected to the starting anchor point, and an ending or landing control handle connected to the end anchor point.  A control handle looks like a ball on a stick.  The ball is called the Control Point.  In Illustrator, you do not really draw a path, you merely place the anchor points and control points, and based on their position, Ai renders the curve.

Diagram of Control Handle, Control Points, and Anchor Points
One Bézier segment made up of two Anchor Points and two Control Handles

When you save a newly created path, Ai does not store the curve itself; it merely saves the positions of all the anchor points and control handles, and when you display the curve, Ai retrieve the stored points, mathematically calculates the entire curve, and re-renders the curve on the monitor.   To generate the segment Ai:

  1. Divides the distance between its two anchor points into a huge number of very small increments, at the end of which Ai will place a point. We can think of these incremental points as time points because it does take some time for Ai to render the path.
  2. Plugs the anchor point and control point data into a general mathematical formula to derive a specific formula that determines the position of the curve at each time point.
  3. Then for each Bézier segment in the chain, Ai plugs the time point values into the specific formula to determine where it will place each corresponding point on the curve that connects each pair of anchor points.  So, we can think of Ai as rendering a curve point-by-point, but using a very large number of individual points (time points) and doing so, much too quickly for us to see.

Each time you display the path or zoom in on it, Ai repeats the entire process, point-by-point, and segment-by-segment.

How Bézier Curves Work

Bezier Curve Bounding Figure
Bézier Bounding Figure

Between the two sequential anchor points of each segment, Ai calculates a smooth path that stays inside a Bézier Bounding Figure. Assume for the moment that the curve has two control handles. Then the Bézier Bounding Figure would be a trapezoid formed by:

  1. The stick of the starting (launching) control handle.
  2. A line connecting the control point of the starting (launching) control handle to the control point of the ending (landing) control handle.
  3. The stick of the ending control handle.
  4. A line connecting the two anchor points.

If one of the control handles is missing, the bounding figure will be a triangle. If both control handles are missing, the figure will degenerate into a straight line.

While the path generation process inside the figure is mathematical, and therefore cannot help us when drawing with the Pen tool, some simple generalizations about how the formula works can help us predict how Ai will draw the path segment between any two anchor points:

  1. Between two adjacent anchor points, the curve must always be smooth (i.e. it never has sudden jumps, corners, or cusps.
  2. Because of the way that the mathematical formula works, the smooth curve must fill as much of the Bézier bounding figure as it can, subject to the following constraints:
    1. The path must be tangent to the starting Control Handle at the starting Anchor Point. That is, at the instant that the path segment leaves the starting anchor point, its launch direction or heading must be the same as the direction of the starting control handle, if there is one. 
    2. Similarly, the path must be tangent to the ending Control Handle at the ending Anchor Point. That is, the curve must bend enough so that as the path segment approaches the ending anchor point, its heading must change so that, its landing direction is the same as that of its ending control handle, if there is one. 
  3. Since the path segment in a Bézier Bounding Figure must be a smooth curve and must both start and end tangent to the control handles, it follows that at the starting anchor point, the starting control handle must be exerting nearly all the influence on the segment's direction.  Similarly, at the end of the segment, at the ending anchor point, the ending control handle must have nearly all the influence on the path's direction.
  4. Since subject to the above restrictions, the curve must fill as much of the Bézier Bounding Figure as possible, the longer a control handle is the larger the bounding box will be and the more influence that control handle will have on the curvature. If one handle is much longer than the other, that control handle will dominate the curve.
    Diagram of an Asymmetrical Bounding Figure flanked by two that are bilateraly symmetrical.
    An Asymmetrical Bounding Figure flanked by two that are that are bilateraly symmetrical.
  5. However, since the curve must be smooth, and both control handles share influence on the curvature of the path, at some point on the line connecting the two anchor points, the influence of the two control handles must be equal. It follows that if the control handles have the same length and direction, the bounding figure and the Bézier segment will be symmetric. Symmetric curves will occupy approximately 75% of the bounding figure. It also follows that if there are no control handles, the curve will be a straight line.
Diagram of Bounding Figures for Bézier curves with two, one, or no Control Handles
Bounding Figures for Bézier curves with two, one, or no Control Handles

Chains of Path Segments

Anchor Points as Links in a Chain

Diagram illustrating the Nomenclature of a shared anchor point in a made up of two Bézier curves with a shared Anchor Point.
A Path with 3 Anchor Points showing the Anatomy of a Shared Anchor Point

Now, instead of focusing on how Ai renders a single segment, let us consider what happens at the anchor points. A path is made up of a chain of segments and the entire process of drawing a path (no matter how many anchor points there are in the path) always happens two anchor points at a time.

There are three things to notice:

  1. Since a path is made up of a chain of anchor points, all path segments (except the first and last anchor point in the chain) will share an anchor point. And a shared anchor point may have, not one control handle (like a simple Bézier curve) but 2 control handles: (1) an ending (or exiting) control handle of the trailing segment (segment 1 in the accompanying figure), which determines its landing direction and (2) a starting (or entering) control handle of the leading segment (segment 2 in the accompanying figure), which determines its launch direction. 
  2. A path, which is made up of a chain of smooth Bézier segments, can change direction abruptly, at a single point, only at a shared anchor point, i.e., where one segment (the trailing segment) ends, and another segment (the leading segment) begins.
    A diagram of a chain of 3 Path Segments Linked by Shared Anchor Points
    Chain of 3 Segments and 4 Anchor Points
  3. Third, the Pen tool assumes that you will most often want to draw smooth points, and so is designed to draw two control handles at a time that do not change direction. In fact, when you click and drag with the Pen tool, Ai will draw two control handles, both of the same size and both aligned so that the curve will not change direction at that point.

We will describe more about using the Pen tool later, but for now it is enough to know that to create an Anchor Point with no control handles, you simply click with the mouse, and to create an Anchor Point with control handles you click and drag. However, At a shared Anchor Point, as you click and drag, Ai guessing that you probably want to create a smooth curve, creates both the ending Control Handle of the trailing segment and the starting Control Handle of the leading segment, and aligns them so that the curve both lands at and takes off from the shared Anchor Point in the same direction.

So, if you want a path to change direction at a shared Anchor Point, you must do one of the following:

  • Drag the mouse in the direction that you want the leading segment to launch, and then change the direction of the trailing segment's landing Control Handle, or
  • Drag the mouse in the direction that you want the trailing segment to land and then change the direction of the leading segment's launching Control Handle.

This will make more sense with examples, but for now, just note that this can make the Pen tool seem to behave oddly and be hard to predict. It helps to analyze the drawing process in terms of drawing four types of shared Anchor Points.

Types of Shared Anchor Points

In a path with many shared anchor points, we can classify the points according to the configuration of the control handles:

  1. A corner point is an anchor point that has no Control Handles.
  2. A smooth point is an anchor point that has two Control Handles that are arranged in a straight line so that the landing direction of the trailing segment, is the same as the launch direction of the leading segment
    Diagram compairing four types of path anchor points
    Four types of Anchor Points
  3. A hybrid point is an anchor point that has only one Control Handle and so, is a hybrid between a corner point (with none) and a smooth point (with two).
  4. A change-direction point (e.g., a cusp or an angle) is an anchor point with two control handles that are NOT arranged in a straight line but arranged at an angle so that the landing direction of the trailing segment is different from the launch direction of the leading segment, which makes the change in direction happen at that point.

How Drawing with the Pen Tool Works

Path Drawing Principles

Here are the principles of drawing with the Pen tool.

Ai's Pen tool allows you to create corner points and smooth points in a single operation. As we will see below, to create change-direction points, hybrid anchor points, you need to use a two-step process. 

We will discuss how to draw change-direction points and hybrid points later in the Drawing with the Pen Tool section. For now, consider the two default, one-step operations:

  • To create a corner point, with no control handles: simply click with the Pen tool.
  • To create a smooth point with two control handles that have the same magnitude and direction: click and drag. Ai will create:
    1. The ending control handle of the trailing segment, which will determine the direction at which the segment will land on the anchor point, and
    2. The starting control handle of the leading segment, which determines the direction at which the leading segment will launch from the shared anchor point.

The amount that you drag determines the size of the control handles. The control handles are locked together, so that moving one also moves the other by the same amount, which forces the bounding figures of the trailing segment to be the same size as that of the leading segment at the anchor point. The landing direction on the point and launch direction from the point are the same, which forces the curve to be smooth.

Here are some key drawing tips:

  • To undo an action, do the usual thing: Ctrl + z.
  • As soon as you click (or click and drag) to create the next anchor point, Ai will join the two points with a line.  How Ai draws the line depends on the direction of the control handles. When you click and drag, the path will always follow the leading control handle.
  • If you create two consecutive corner anchor points (without any control handles), Ai will create a straight line. 
  • To create a path that makes a sharp change in direction at an anchor point, you must change the direction of one of the two control handles independently of the other. To do that, press the Alt-key, grab one of the control handles, and drag its ball to another position. That will make the path take off from the anchor point in a different direction than the direction at which it landed at that anchor point. Note that if the path at a shared anchor point is not smooth, Ai may show a Live Corner Widget.  You can drag this widget to shape the corner and you can toggle this widget off and on by View > Show (Hide) Corner Widget. Screen shot of a Live Corner Widget
  • If you do not draw the lines so as to create a closed shape, e.g., a triangle, you will have to press the escape-key to stop drawing.  Otherwise, wherever you click Ai will put down another anchor point and connect it with a path to the previous point. If, with the Pen tool still selected, you draw a closed shape, Ai will stop connecting the points, and the next time you click, Ai will assume that you want to start drawing a new line or shape and will create a new, unconnected anchor point.

    Creating Paths with Two Anchor Points

    The Pen tool's default behavior can make it counter intuitive to create paths with only two anchor points, which look like Bézier curves.  Ai's default click-and-drag method of creating two control handles at the same time works well for creating a chain of smooth points. However, if there are only two anchor points and one segment (as when you want to draw an arch, a loop, or a sine wave, the process can be awkward at first. However, two things help.

    First, even with the simplest possible paths with only two points, visualizing the Bounding Figure is enlightening.

    Diagram of the Bézier Bounding Figure for an Arch, Loop, or or Sine Wave Figure
    Bézier Bounding Figure for an Arch, Loop, or or Sine Wave Figure

    The above illustration shows how the Bézier Bounding Figure controls the drawing of the paths. Each path takes off from the starting Anchor Point (1). Its take-off angle is tangent to control handle (1-2), which ends at the first control point (2). As the path moves along, the influence of control point (2) wanes and the path comes under the influence of the second control point (3). Finally, the ending control point (3) completely controls the path, and as the path lands at the ending anchor point (4) it is tangent to the control handle (3-4).

    Illustration of the Bézier Bounding Figures for a path with five Anchor Points
    Bézier Bounding Figures for a 5-Point Path

    As the accompanying illustration of a 5-point path shows, the practice of visualizing the Bounding Figure can help us understand how the Pen tool shapes paths of any length. Visualizing the Figure is easy. You just work your way along the path and for each segment, mentally: Connect the two, sequential anchor points. Then, connect the Control Point of the starting Control Handle to the Control Point of the ending Control Handle. The path must stay within the (dotted) lines.

    Second, as you draw out a path, you can work segment-by-segment as Ai does. If you are drawing smooth points, at the starting Anchor Point, you drag out the Control Handle in the direction that you want the path to take off. However, at the ending Anchor Point, you are drawing two control handles at once: the ending Control Handle of the current segment and the starting Control Handle of the next segment. Focus on the ending control handle of the current segment. To complete the current segment, at the ending Anchor Point, drag out the Control Handle in a direction opposite to the direction in which you want the path to land.

    Diagram showing the Dragging Direction vs Path Direction
    Dragging Gestures for a Segment with two Smooth Points

    The best short video introduction that I have found is How to Use the Pen Tool in Adobe Illustrator – Curves by hikeart.

Drawing with the Pen Tool

Having covered the principles of drawing with the Pen tool in the previous section, this section will focus on path drawing procedures. Drawing a path always comes down to accurately and efficiently creating and modifying a chain of anchor points and control handles, and for that process understanding the Pen tool cursor is essential. 

The Pen tool cursor has several drawing modes that may change as you draw.  Each drawing mode has a distinctive purpose and in each mode the Pen tool has distinctive capabilities.  Ai displays a modifier icon in addition to the Pen icon to signal what mode the cursor is in and what you can do when the Pen tool is in that mode.  The cursors, with their mode modifiers are frequently referred to as if they were completely distinct types of Pen tool cursors. For example the cursor with an Asterix modifier, which signals that you can start drawing a new path, is often referred to as the Start Path cursor. The following defines all the Pen tool modes and what the Pen tool cursor icons mean.

Pen Tool Path Creation Cursors

In the table below, the rows highlighted in green, are particularly important for creating paths, which will be the first topic that we will cover in this section. The other modes are used mainly for modifying or tweaking the arrangement of path points as you are creating a path, a process that will be covered in a later section, Editing Paths with the Pen Tool.

Pen Tool Cursors
Mode Modifier Signal:
you can now
Comment
Start Path
(Create)
Astrix (*) Start drawing a new path. Click or click and drag to create the first (corner or smooth) point. After you click, but before you move the cursor, Ai transitions to the Delete Anchor Point (-) cursor so that you can quickly start over.  As soon as you start to move the cursor off the anchor point, Ai transitions to the Active Path cursor (and Ai will show you a preview of the line that would be drawn if you clicked. Ai calls this a Rubber Band preview. (Deke McClelland calls a cursor with the asterisk modifier the Create cursor.)
Active Path (Continue) None Continue adding anchor points to the active path. After you have placed an anchor point and begin to move the cursor, Ai displays a Pen cursor that has no modifier symbol. (Deke McClelland calls this the Continue cursor.) When you see this cursor, indicating that the Pen tool is in Active Path mode, and you move the cursor, Ai shows a preview of the line segment that Ai is in the process of drawing. You can now click or click and drag at the location indicated by the end of the rubber band preview to create another anchor point.
Add Anchor Point Plus (+) Click to add an anchor point to a path segment. The Pen tool goes into Add Anchor Point mode when you hover over a path segment. When you see the cursor with the plus (+) modifier you can simply click on the path to insert an anchor point.

You can also enter Add Anchor Point Mode using the corresponding tool in the Pen Tool Group .

Delete Anchor Point Minus (-) Click to delete an anchor point that is under the cursor. The Pen tool goes into Delete Anchor Point mode when you hover over an anchor point. Then when you see the cursor with the minus (-) modifier, you can simply click on the path to delete the anchor point.

You can also enter Delete Anchor Point Mode using the corresponding tool in the Pen Tool Group .

Reactivate Path
(Resume)
Slash (/) Extend a path from an end point. The Reactivate Path mode comes into play whenever you have an open path (not necessarily selected) on the artboard, and you get the Pen tool. Then when you simply hover over the artboard or over the interior of the path, you see the Start Path cursor. However, if you hover over either endpoint of the path, the Pen tool will enter Reactivate Path mode and display a cursor with the slash (/) modifier (which Deke McClelland calls the Resume cursor). If you then click on one of the path's endpoints, the Pen tool will select the end point and make the path active so that when you move off the point, you can resume adding anchor points.
Anchor Point Caret (^) Modify an Anchor point. The Pen tool goes into Anchor Point mode when the Pen tool is active, and you depress the Alt-key. In Anchor Point mode, you will want to work with the path selected and with Bounding Boxes toggled off (Ctrl + Shift + b).  In this mode you can: (A) click on a smooth point to convert it to a corner point, (B) click on a corner point and drag out a pair of control handles, (C) click on one of the control handles of a smooth point to delete it and convert the point to a hybrid point, or (D) click and drag on one of the control handles of a smooth point to move it independently of the other control handle and convert the point to a change-direction point. 1

You can also enter Anchor Point Mode using the corresponding tool in the Pen Tool Group .

Close Path Small circle (o) Close the active path creating a closed path. The Pen tool goes into Close Path mode and displays the cursor with the small circle (o) modifier when you have created a path with several anchor points and then hover over the starting point. When the tool is in Close Path mode, you can click to create a closed path, i.e., a shape. Ai will then stop drawing the path, i.e., deactivate it, so that if you now hover over the path, you will see the Start Path (*) cursor. To stop drawing a path, without closing it (creating an open path), click the Escape key.

Note

The Pen tool also goes into Anchor Point mode and displays the slash cursor whenever you are working on an active path and you create a new point. During the time immediately after you create the new point but before you move off the point, Ai switches the Pen tool to Anchor Point mode so that you can modify the control handles before you continue. The Anchor Point tool used to be called the Convert Anchor Point tool. Adobe renamed it when it added a new feature, which is that when you hover over a straight segment, the tool will display a curved segment modifier, which means that you can drag the segment to add curvature.

Creating Various Types of Path Points

Illustration Contrasting Corner, Smooth, Hybrid, and Change-Cirection Point.
Four Types of Points

This section describes how to create each of the four types of links (shared anchor points) in the chain of anchor points that make up a path. Each description is illustrated by an example of creating a three-point path, where the described type of point is in the middle link in the chain. The Four Types of Points figure at the right, illustrates each example.

Recall that there are two broad categories of points:

  1. One-Step (Default) Points.
    1. Corner Point with no control handles.
    2. Smooth Point with two, aligned control handles.
  2. Two-Step Points.
    1. Hybrid Point with only one control handle, which is therefore, a hybrid between a corner point and a smooth point.
    2. Change-direction Point, with two control handles that are not aligned, but form an angle so that the path changes direction abruptly at the single anchor point.

The following sections describe how to create these points, and the examples illustrate the operation of the cursor modes.

One-Step (Default) Points

Create a Corner Point

To create a corner point in Adobe Illustrator:

  1. With the Pen tool, click (but do not drag) on the Artboard where you want to place the anchor point.
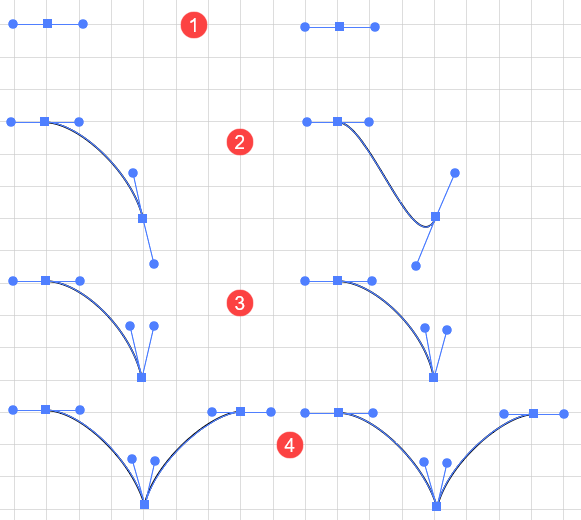
Example: Creating a path with 3 corner points

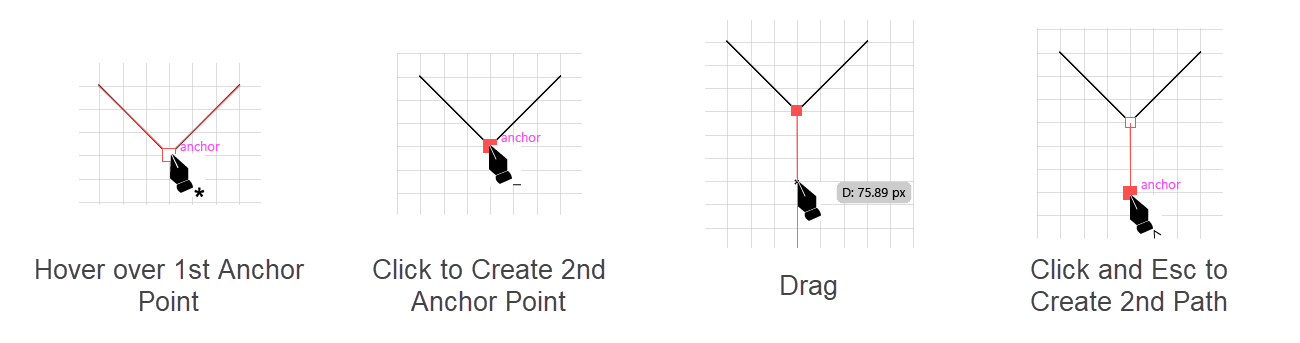
This is a simple matter of clicking 3 times, and then pressing the Escape-key to stop drawing. What follows describes the cursor modes.

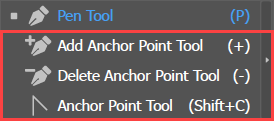
  1. Get the Pen tool. Since you are starting a new path, before you click to create the point, you will see the Start Path cursor. As soon as you click to create the point, the cursor will switch to the Delete Anchor Point cursor.  The Delete Anchor Point cursor will remain while you are hovered over the point.
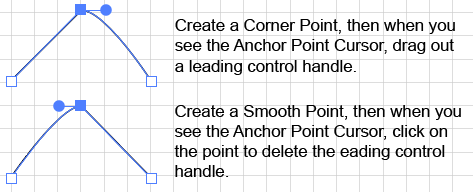
    As soon as you move off the first point, the Pen Tool switches to the Active Path (Continue) cursor. Ai will show a rubber band preview of the segment that would result if you placed an anchor point at the location where you are hovering the cursor.
  2. Click, but do not drag, to place a second point. Whenever you click to create a point (after the first one), Ai will display the Convert Anchor Point cursor while you hover over the just-created point.  With this cursor active, you could (but not in this example) drag out a control handle to create a hybrid point. As soon as you move off the newly created point, Ai switches to the Active Path (Continue) cursor, and again displays the rubber band preview. 
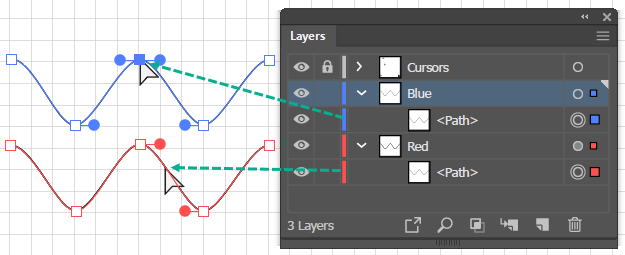
  3. Click to create the third and final corner anchor point.
  4. Press the Escape-key to stop drawing. Whenever you are creating an open path (as opposed to a closed shape), you must use the Escape-key to stop drawing.

Create a Smooth Point

To create a smooth point in Adobe Illustrator:

  1. Get the Pen tool (the shortcut is the p-key) and Click and drag where you want to place the anchor point. The Pen tool will create an anchor point with two aligned (mirror image) control handles.  Shift + Click and drag to constrain the control handles to an angle of 0, 45, or 90 degrees.
Example Creating a path with 3 smooth points

This is as simple as clicking and dragging 3 times. What follows describes the cursor modes.

  1. Get the Pen tool. As you move the cursor over the artboard, you will see the Create Path cursor. Click and drag to create the first point. If you mouse over the first path point, the Pen tool will display the Delete Anchor Point cursor, signifying that you can delete the point and start over.
  2. Click and drag again to create a second point, which will show the effect of the two control handles clearly. When you click, the Pen tool will place the anchor point and as you drag, it will extend two control handles in opposite directions but both in line with the direction that you drag. The two handles are locked, i.e., as you drag further, both handles will get longer but will stay the same size, and as you changed the direction that you drag, both handles will move in unison. Now here is the part that is not obvious. Even though the two control handles seem to point in opposite directions they both influence to forward direction, the direction in which you drag. The stick part of a control handle determines the angle or the path at the anchor point. The ball part of the control handle controls the size of the bounding figure. Note that the sticks of the two anchor points control the same angle, but on different segments:
    • The first, control handle (from left to right) will determine the direction in which the first, trailing, segment will land on the anchor point. The second control handle will determine the direction in which the second, leading, segment will take off from that anchor point. 
    • If you mouse-over the just created anchor point, the Pen tool will display the Anchor Point (formerly the Convert Anchor Point) cursor, so that you could move one of the control handles and convert the point into a hybrid point or into a change-direction point.
    • Since the two handles are locked, unless you take some additional action to move one or both of the control handles out of alignment, they cannot change direction and at that point, the path must remain smooth.
    • The more you drag, the longer the handles will get, the larger the bounding figure will become, and the more the segments that they control will have to move toward them in order to fill their bounding figures.
  3. Click and drag to create the end point.
  4. Press the Escape-key to deactivate the path and stop the Pen tool from adding points.

Two-Step Points

To create these points, you must (1) place a point and (2) adjust one or both control handles.

Create a Hybrid Point

A hybrid Anchor Point is one that has only a single control handle. So, in theory, to create a hybrid point, you could first either: (A) place a corner point, or (B) place a smooth point. And then second, either: (A) add a control handle to the corner point, or (B) delete a control handle from the smooth point. In practice, creating a corner point first is easier.

To create an interior hybrid point in Adobe Illustrator:

  1. With at least one Anchor Point already created, click with the Pen tool to create another corner point. Note that as soon as you click and place the anchor point, the Pen cursor will change to the Anchor Point cursor (^).  
  2. With the Convert Anchor Point cursor active, drag out a leading control handle. The anchor point will become a hybrid point.
Example: Creating a 3-point path with a Hybrid point in the middle
  1. Get the pen cursor. Since you are starting a new path, before you click (or click and drag) to create the point, you will see the Start Path cursor. As soon as you click (or click and drag) to create the point, the cursor will switch to the Delete Anchor Point (-) cursor.  The Delete Anchor Point cursor will remain while you are hovered over the point.
    As soon as you move off the first point, the Pen tool displays the Active Path (Continue) cursor, and will show a rubber band preview of the segment that would result if you placed an anchor point at the location where you are hovering the cursor.
  2. Click, but do not drag, to place a second point. Whenever you click to create a point (after the first one), Ai will display the Pen tools Anchor Point cursor while you hover over the just-created point.  With this cursor active, drag out one control handle to create a hybrid point. As soon as you move off the newly created point, the tool again switches to the Active Path (Continue) cursor, and displays the rubber band preview. 
  3. Click (or click and drag) to create the third and final corner anchor point.
  4. Press the Escape-key to stop drawing. Whenever you are creating an open path (as opposed to a closed shape), you must use the Escape-key to stop drawing.

Create a Change-direction Point

A change-direction point is an interior anchor point (not a beginning or ending point) that has two control handles that are not aligned, as in a smooth point, but which change directions.

To create an interior change-direction point in Adobe Illustrator:

  1. Click and drag to create a smooth anchor point at which the leading control handle points in a direction that either (A) forces the trailing segment to land in a desired direction or that (B) forces the leading segment to launch in a desired direction.
  2. Press the Alt-key to switch to the Anchor Point cursor (^), and use it to adjust the other control handle, opposite the one that was pointed in the right direction by the drag operation. If you dragged so that you properly placed the landing direction of the trailing segment, use the Anchor Point cursor (^) to move the starting control handle of the leading segment to get it to launch in the proper direction. If you dragged so that you properly placed the launch direction of the leading segment., use the Anchor Point cursor (^) to move the ending control handle of the trailing segment to get it to land in the proper direction.
Example: Creating a 3-point path with a change-direction point in the middle
Illustration of how to create a change-direction point.
Change-direction Point Example
  1. Get the Pen tool. As you move the cursor over the artboard, you will see the Create Path cursor. Click and drag to create the first point. When you click, the Pen tool will place the anchor point and as you drag, it will extend two control handles from the point. Both handles will be of equal size and in line with the direction that you drag. If you mouse over the just created first point, the Pen tool will display the Delete Anchor Point cursor signifying that you can delete the point and start over.
  2. Click and drag to create a second smooth anchor point. Since we want a change-direction point, one of the control handles must be pointing in the wrong direction. Consequently, you have a choice, you can either: (A) drag in a direction that causes the trailing segment to land properly but leaves the leading segment taking off in the wrong direction (the left side of the accompanying figure), or (B) drag in a direction that causes the leading segment to take off properly but leaves the trailing segment landing in the wrong direction (the right side of the accompanying figure).
  3. Press the Alt-key to switch to the Anchor Point cursor (^), and use it to move the control handle that you left pointing in the wrong direction. You should end up with two control handles that form a "V" at the change-direction point.
  4. Click and drag to create the end point. Press the Escape-key to deactivate the path and stop the Pen tool from adding points.

Open and Closed Paths

Create a Closed Path

To create a closed path with the Pen tool in Adobe Illustrator:

  1. Create a chain of anchor points (as described above).
  2. From the end anchor point of an active path, hover over the beginning anchor point until you see the Close Path cursor (o).
  3. Click on the beginning anchor point and drag the control handles to the location necessary to get the curvature that you want.

Create an Open Path

To create an open path with the Pen tool in Adobe Illustrator:

  1. Create a chain of anchor points (as described above).
  2. Press the Escape-key to stop drawing an Active path that is not closed. Ai will return to the Start Path mode.

Preview Path Segments

To toggle the rubber band preview on or off in Adobe Illustrator:

  1. Go to Edit > Preferences > Selection & Anchor Display.
  2. Select (or deselect) the checkbox labeled Enable Rubber Band for Pen and Curvature Tool.

Edit an Active Path

Illustration of the three Special Purpose Anchor Point Tools in the Pen Tool dropdown.
Special Purpose Tools

While there are special-purpose tools (grouped with the Pen tool) for adding or deleting anchor points, and for modifying control handles, they are most useful for changing paths that you have previously created and that are no longer active.

When you are still in the process of adding anchor points to an active path (instead of leaving the Pen tool, going to one of the special tools, using the tool, and then returning to the Pen tool), you can do any of the following editing operations without leaving the Pen tool:

  • Go back and hover over a previously created anchor point. The Pen tool will display its Delete Anchor Point cursor (), so that you can delete the point.
  • Go back to a previously created segment, and hover over it. The Pen tool will display it Add Anchor Point cursor () so that you can add a new anchor point to the segment.
  • Whenever you simply click, but not drag, to create a new point, Ai will create a corner point and (if the point is not the first point), as soon as you release the mouse button, but before you move the cursor off the point, the Pen tool will display its Anchor Point cursor (), not to be confused with the Anchor Point tool's cursor (). You can use the Anchor Point cursor to drag out a single leading control handle to make the corner point into a hybrid point. If the anchor point is the first point in the path, as soon as you create it, the Pen tool will display its Delete Anchor Point Cursor, signifying that you can click to delete the point and start over.
    Illustration showing how to created the two types of Hybrid Points.
    Two Types of Hybrid Points
  • Whenever you Click + drag, Ai will create a smooth point and as soon as you release the mouse button, the Pen tool will display its Active Path cursor. But if you go back and hover over the newly created smooth point (if the point is not the first point in the path), the Pen tool will display its Anchor Point cursor (), not to be confused with the Anchor Point tool's cursor (). With the Anchor Point cursor, you can click on the smooth point to remove its leading control handle and convert it into a hybrid point.
  • At any time while you are in an active path, you can press the Alt-key to get the Anchor Point Tool and its cursor (), as opposed to the Pen tool's Anchor Point cursor (). With it you can return to any previously created point (other than the end point) in an active path and:
    1. Click on a smooth point (with two, aligned control handles) to convert it into a corner point (with no control handles).
    2. Click + drag on a corner point to convert it to a smooth point. The point will sprout two aligned control handles.
    3. Click + drag on any single control handle to change its direction.
    4. Hover over a segment until you see the curve path cursor, and then drag on the segment to bend it in the direction that you drag. Ai will add or modify the control handles at one or both of the segment's anchor points to implement the bend.
  • Press the Ctrl-key to temporarily get the selection tool that you used last. If you have been creating and editing paths, the last used selection tool will usually be the Direct Selection tool. When you release the Ctrl-key, the Pen tool will remain active. This maneuver can save time when you are creating a path with many anchor points and you want to backtrack and modify previously created points without leaving the pen tool. For example, the following is a common work scenario. Suppose that you are creating a long path and you decide that two anchor points back you have a corner point that should be a smooth point. Then you could:
    1. Press the Ctrl-key to temporarily activate the Direct Selection tool and select a previously created corner point.
    2. Release the Ctrl-key to return to the Pen tool.
    3. Press and hold the Alt-key to get the Anchor Point Tool cursor (), go to the selected point, and drag out control handles to convert it into a smooth point.
    4. Press the Ctrl-key and select the active path's end point.
    5. Release the Ctrl-key and resume adding points to the path.

Editing Inactive Paths

When editing previously created paths that are no longer active, you have three options. You can use the:

  • Direct Selection tool to move anchor points, segments, or control handles.
  • Special Purpose path editing tools to add anchor points, delete anchor points, or change the direction of control handles. You do not need to select the path before you make edits with the 3 Special Purpose tools; so, they are useful if you only want to make a few changes.
  • Pen tool path editing modes to add anchor points, delete anchor points, or change the direction of control handles. To use the Pen tool's editing modes on an inactive path, you will first have to select the path and then switch to the Pen tool; so, this method is probably most useful if you want to make several changes or if you want to extend the path. To add more anchor points to either end of an open path, you must select the path, get the Pen tool, and then hover over the starting or ending anchor point until you see the Activate Path cursor and click the path to make it active.

Basic Selection with the Arrow Tools

Recall that there are two selection tools:

  • Selection tool (or Black Arrow tool, with shortcut: v-key) which is for selecting entire objects (path outlines, or groups). By default, this creates a bounding box. To turn off the bounding box: View > Show Bounding box.  You use this tool when you want to do something to the entire path, e.g., transform it by moving, rotating, or scaling it).
  • Direct Selection tool (or White Arrow tool with shortcut: a-key), which is for selecting path components (anchor points or segments).  You use this tool when you want to edit the structure of the path, e.g., move a segment, anchor point, or control point.

If you click on an Anchor Point with the Direct Selection tool (as shown at the top of the accompanying), Ai will:

Illustration of what happens when you Direct Select an Anchor Point or a Path Segment
What happens when you Direct Select an Anchor Point or a Path Segment
  • Select the anchor point.
  • Highlight the selected anchor point by filling it with the layer-color, that is, the color assigned to its layer in the Layers panel.
  • Show the other anchor points as empty squares, with no fill.
  • Highlight the selected anchor point's entering and exiting control handles (if any) by filling them with the layer-color.

You can now use the selection tool to drag the selected point or its control handles. In addition, with a point Direct Selected, you can use the arrow keys to nudge the selected point to a new location.

If you click with the Direct Selection tool on a segment, Ai will (as shown at the bottom of the accompanying figure), highlight the control handles that determine the Path's take-off and landing in the selected segment.

You can now drag the segment or use the arrow keys to nudge the segment into place.

Editing Paths with the Direct Selection Tool

You can use the Direct Selection tool to make simple, precise edits to individual path anchor points and segments.

Move an Anchor Point with the Direct Selection tool

To move an anchor point in Adobe Illustrator

Diagram showing the before and after picture of moving Anchor Point.
Move an Anchor Point
  1. Select the anchor point using the Direct Selection tool.
  2. Drag the selected point or use the arrow keys to nudge it into place. You can adjust how much an arrow key tap will move the anchor point by updating the Keyboard Increment field in the Preferences panel (Edit > Preferences > General, or Ctrl + k).

Move a Path segment with the Direct Selection tool

To move a Path Segment in Adobe Illustrator

Diagram showing the effect of moving a path segment.
Move a Path Segment
  1. Select the segment with the Direct Selection tool. The selection tool will show the control handles that determine the path's curvature, (i.e., the leading handle from the previous anchor point, which controls the segment's launch direction, and the trailing segment of the next anchor point, which controls the segment's landing direction).
  2. Drag the segment to a new location or use the arrow keys to nudge it into place. You can adjust how much an arrow key tap will move the segment by updating the Keyboard Increment field in the Preferences panel (Edit > Preferences> General, or Ctrl + k).

Move a Control Handle with the Direct Selection tool

Diagram showing the effect of moving a single control handle
Move a Single Control Handle

To independently move a single Control Handle in Adobe Illustrator

  1. Select the handle using the Direct Selection tool.
  2. Drag it to a new location. The selected control handle will move independently of the control handle on the other side of its anchor point.

Make a Smooth Point into a Change-direction Point with the Direct Selection Tool

To make a change-direction point, you must move both control handles so that they form a "V".

Illustration showing how to move both Control Handles to create a Cusp point.
Moving two Control Handles to create a Cusp point

To move a Control Handle with the Direct Selection tool in Adobe Illustrator

  1. Select a handle using the Direct Selection tool and drag it out of line with the other control handle on the anchor point.
  2. Optionally click and drag the other control handle at the same point so that it makes an acute angle with the other control handle.

Copy an Anchor Point with the Direct Selection tool

Diagram showing how to Copy an Anchor Point with the Direct Selection tool
Copy and Anchor Point

To clone an Anchor Point in Adobe Illustrator

  1. Select the Anchor Point with the Direct Selection tool.
  2. Alt + drag the point to a new location. As soon as you start Alt + dragging, Ai will create a copy of the Anchor Point and of the two surrounding Anchor Points that determine how the path should land on the newly copied point. This will create a new path which you can Select and move independently.

Editing Paths with the Special Purpose Tools

The special purpose path editing tools are grouped with the Pen tool.

Add an Anchor Point with the Add Anchor Point Tool

Screen shot of the Add Anchor Point</em> Tool button
Add Anchor Point Tool

To insert an Anchor Point into a path segment using the Add Anchor Point tool in Adobe Illustrator:

  1. Get the Add Anchor Point tool, which is grouped with the Pen Tool (you need not select the path).
  2. Hover over one of the path's segments until you see the Insert Anchor Point (+) cursor.
  3. Click on a path segment where you want to add the point. When this tool is selected, you also can delete an anchor point by Alt + clicking on it.  
Screen shot of the Delete Anchor Point tool
Delete Anchor Point Tool

Delete a Point from a Path via the Delete Anchor Point Tool

To delete an anchor point from a path segment using the Delete Anchor Point tool in Adobe Illustrator:

  1. Get the Insert Anchor Point tool, which is grouped with the Pen Tool (you need not select the path).
  2. Hover over one of the path's segments until you see the Delete Anchor Point (-) cursor.
  3. Click on a anchor point that you want to delete. When this tool is selected, you also can insert an anchor point by Alt + clicking on a segment.  

Curve a Path Segment

Screen shot of the Anchor Point Tool button
Anchor Point Tool

To add curvature to (i.e., to bend) a path segment with the Add Anchor Point tool in Adobe Illustrator:

  1. Get the Anchor Point tool, which is grouped with the Pen Tool (you need not select the path).
  2. Hover over one of the path's segments until you see the cursor display a mode indicator that looks like a bent path segment.
    Bending a path with the Anchor Point Tool
    Bend Path Segment
  3. Click and drag the segment. The tool will add or modify the segment's entering and exiting control handles so that the segment bends from its initial position (where you clicked) to the final location (where you dragged) the segment and released the mouse.  

Place an Anchor Point Coincident with Another Anchor Point

You might use this technique to create a branching figure, e.g., if you wanted to make a V-shaped path into a Y-shaped path by adding the tail of the y so that the top of the tail is coincident with the bottom of the V, as shown in the accompanying figure, Coincident Anchor Points.  Note that this process is different from extending the path, because:

  • You are not working with an end point.
  • The old and the new points are not connected or merged into a single path.

To place an anchor point on top of an existing point, that has NOT been direct selected in Adobe Illustrator:

  1. Get the Pen tool, which will display the Start Path (*) cursor. 
  2. Hover over the point until Ai indicates that you are on top of the existing point, but you can still see the Start Path cursor.  The type of indication that you get will be self-evident, but will differ depending on the state of the path (selected or not) and on whether or not you have enabled Smart Guides.  
    Diagram showing the steps for placing a coincident Anchor Points
    Coincident Anchor Points
  3. Click to place the new point. The Pen tool will display the Delete Anchor Point tool showing that you have just placed the first point on a new path.
  4. Move the cursor and add any additional anchor points to the new one. As soon as you place the second Anchor Point, the Pen tool will display the Anchor Point tool. When you move off the new point, you will again see the Active Path (continue) cursor. Click Escape to stop drawing.

Note that these two paths are not connected, they just look like they are, but if you select one of them you will be able to move it separately.  To connect the two paths that have coincident points you will have to marquee-select the two paths at the coincident point and execute the Join command (Ctrl + j).

Convert a Smooth Point to a Corner Point via the Anchor Point tool

Convert a Smooth Point to a Corner Point via the Anchor Point tool
Change a Smooth Point to Corner Point via the Anchor Point Tool

To make a smooth point into a corner point by using the Anchor Point tool in Adobe Illustrator

  1. Get the Anchor Point tool, which is grouped with the Pen tool. Ai will display the Anchor Point cursor. You do not need to select the path.
  2. With the Anchor Point cursor, click on the smooth point. Ai will convert it to a Corner Point with no control handles.

Convert a Corner Point into a Smooth Point via the Anchor Point tool

Diagram showing how to convert a Corner Point into a Smooth Point via the Anchor Point tool
Change a Corner Point to Smooth Point - Anchor

To make a smooth point into a corner point: 

  1. Get the Anchor Point tool, which is grouped with the Pen tool. Ai will display the Anchor Point cursor. You do not need to select the path.
  2. With the Anchor Point cursor, click + drag on a corner point. When you first click (but before you move) the anchor point, the tool will highlight the point. With the mouse button still depressed, as you begin to drag, the cursor will change form and look like you were moving the point with the Direct Selection tool. As you drag away from the point, the tool will create two, linked control handles, converting the corner point to a smooth point.

Convert a Smooth Point into a Change-direction Point via the Anchor Point tool

Diagram showing the steps in converting a Smooth Point into a change-direction point using the Anchor Point tool.
Convert Smooth Point to change-direction point

A change-direction point must have control handles that form an acute angle.

To make a smooth point into a change-direction point in Adobe Illustrator

  1. Direct Select the target point, so that both control handles are showing.
  2. Get the Anchor Point tool, which is grouped with the Pen tool. Ai will display the Anchor Point cursor.
  3. Drag (rotate) the first control handle so that it forms an angle with the other control handle. You have now created a change-direction point, i.e., a single anchor point at which the path abruptly changes its direction.
  4. Optionally, get the Direct Selection tool and select the anchor point again so that it displays the other control handle, and then move it to a new direction.

Editing Paths with the Pen Tool

Pen Tool Path Editing Modes and Cursors

The following table lists the Pen tool cursor modes. The blue highlighted rows are particularly important for path editing.

Pen Tool Cursors
Mode Modifier Signal:
you can now
Comment
Start Path
(Create)
Astrix (*) Start drawing a new path. Click or click and drag to create the first (corner or smooth) point. After you click, but before you move the cursor, Ai transitions to the Delete Anchor Point (-) cursor so that you can quickly start over.  As soon as you start to move the cursor off the anchor point, Ai transitions to the Continue cursor (and Ai will show you a preview of the line that would be drawn if you clicked. Ai calls this a Rubber Band preview. (Deke McClelland calls a cursor with the asterisk modifier the Create cursor.)
Active Path (Continue) None Continue adding anchor points to the active path. After you have placed an anchor point and begin to move the cursor, Ai displays a Pen cursor that has no modifier symbol. (Deke McClelland calls this the Continue cursor.) When you see this cursor, indicating that the Pen tool is in Active Path mode, and you move the cursor, Ai shows a preview of the line segment that Ai is in the process of drawing. You can now click or click and drag at the location indicated by the end of the rubber band preview to create another anchor point.
Add Anchor Point Plus (+) Click to add an anchor point to a path segment.

The Pen tool goes into Add Anchor Point mode when you hover over a path segment. When you see the cursor with the plus (+) modifier you can simply click on the path to insert an anchor point.

You can also enter Add Anchor Point Mode using the corresponding tool in the Pen Tool Group .

Delete Anchor Point Minus (-) Click to delete an anchor point that is under the cursor. The Pen tool goes into Delete Anchor Point mode when you hover over an anchor point. Then when you see the cursor with the minus (-) modifier, you can simply click on the path to delete the anchor point.

You can also enter Delete Anchor Point Mode using the corresponding tool in the Pen Tool Group .

Reactivate Path
(Resume Cursor)
Slash (/) Extend a path from an end point. The Reactivate Path mode comes into play whenever you have an open path (not necessarily selected) on the artboard, and you get the Pen tool. Then when you simply hover over the artboard or over the interior of the path, you see the Start Path cursor. However, if you hover over either endpoint of the path, the Pen tool will enter Reactivate Path mode and display a cursor with the slash (/) modifier (which Deke McClelland calls the Resume cursor). If you then click on one of the path's endpoints, the Pen tool will select the end point and make the path active so that when you move off the point, you can resume adding anchor points.
Anchor Point Caret (^) Anchor point. The Pen tool goes into Anchor Point mode when the Pen tool is active, and you depress the Alt-key. In Anchor Point mode, you will want to work with the path selected and with Bounding Boxes toggled off (Ctrl + Shift + b).  In this mode you can: (A) click on a smooth point to convert it to a corner point, (B) click on a corner point and drag out a pair of control handles, (C) click on one of the control handles of a smooth point to delete it and convert the point to a hybrid point, or (D) click and drag on one of the control handles of a smooth point to move it independently of the other control handle and convert the point to a change-direction point. 1

You can also enter Anchor Point Mode using the corresponding tool in the Pen Tool Group .

Close
Path
Small circle (o) Close the active path creating a closed path. The Pen tool goes into Close Path mode and displays the cursor with the small circle (o) modifier when you have created a path with several anchor points and then hover over the starting point. When the tool is in Close Path mode, you can click to create a closed path, i.e., a shape. Ai will then stop drawing the path, i.e., deactivate it, so that if you now hover over the path, you will see the Start Path (*) cursor. To stop drawing a path, without closing it (creating an open path), click the Escape key.

Note

The Pen tool also goes into Anchor Point mode and displays the slash cursor whenever you are working on an active path and you create a new point. During the time immediately after you create the new point but before you move off the point, Ai switches the Pen tool to Anchor Point mode so that you can modify the control handles before you continue. The Anchor Point tool used to be called the Convert Anchor Point tool. Adobe renamed it when it added the path bending feature, which allows you to hover over a straight segment and see a curved segment modifier, which means that you can drag the segment to add curvature.

Note that whenever you select a path and you get the pen tool, and then you hover over the path at:

  • A segment, the Pen tool displays the Delete Anchor (-) cursor. 
  • An anchor point, the Pen tool displays the Delete Anchor (-) cursor. 
  • An end point, the Pen tool displays the Activate Path (/) cursor. 
  • A location off the path, the Pen tool displays the Start Path (*) cursor and if you click, you will start a new path. 

The following articles describe how to edit inactive paths with the Pen tool.

Add an Anchor Point via the Pen Tool

To insert an anchor point into a path segment using the Pen tool in Adobe Illustrator:

  1. Ensure that the path is selected or that any anchor point, or segment is Direct Selected.
  2. With the Pen tool, hover over one of the path's segments until you see the Insert Anchor Point (+) cursor.
  3. Click on a path segment where you want to add the point. Repeat step 2 in another location to add more anchor points.

Delete an Anchor Point via the Pen Tool

Illustration of the effect of deleting an Anchor Point with the the Pen Tool
Delete an Anchor Point via the Pen Tool

To delete an anchor point (other than an end point) from a path in Adobe Illustrator:

  1. Ensure that the path is selected with either selection tool.
  2. With the Pen tool, hover over the target anchor point.  Ai will display the Delete Anchor Point (-) cursor. 
  3. Click to delete the point. Ai will delete the anchor point and connect the anchor points that were formerly adjacent to the deleted point with a line segment.

Convert a Smooth Point to a Corner Point via the Pen tool

Diagram showing the steps in converting a smooth point to a corner point with the Pen tool.
Smooth Point to Corner Point with the Pen Tool

To make a smooth point into a corner point in Adobe Illustrator

  1. Ensure that some part of the path is selected and that the Pen tool is active.
  2. Hover over the target point.  Ai will display the Delete Anchor Point (-) cursor.
  3. Press the Alt-key to temporarily switch to Pen tool into Anchor Point mode.  
  4. With the Convert Anchor Point cursor, click on a smooth point to convert it to a corner point.

Convert a Corner Point into a Smooth Point via the Pen Tool

Diagram showing the steps in converting a Corner Point into a Smooth Point via the Pen Tool
Convert Corner to Smooth Point with the Pen Tool

To make a smooth point into a corner point: 

  1. Select the target path with the Selection tool or select some part of the path with the Direct Selection tool. You do not need to select the target corner point that you want to convert.
  2. Get the Pen tool.
  3. Hover over the target anchor point.  Ai will display the Delete Anchor Point (-) cursor.
  4. Press the Alt-key to temporarily switch to Pen tool into Anchor Point mode.  Ai will switch to displaying the Convert Anchor Point cursor ().
  5. With the Convert Anchor Point cursor, click + drag on a corner point (to create control handles) to convert the corner point to a smooth point. Note in the accompanying figure, that when you first click (but before you move) the anchor point, the tool will highlight the point. With the mouse button still depressed, as you begin to drag, the cursor will change form and look like you were moving the point with the Direct Selection tool. As you drag away from the point, the tool will create two, linked control handles, converting the corner point to a smooth point.

Joining Anchor Points

The Object > Path > Join command ((Ctrl + j) connects two selected points.
To join two non-coincident points with a line in Adobe Illustrator:

  1. Marquee-select them with the Direct Selection tool.
  2. Object > Path > Join (shortcut: Ctrl + j). Ai will connect the selected points with a line.

To make two non-coincident points coincident:

  1. Marquee-select them with the Direct Selection tool.
  2. Execute the Object > Path > Average (shortcut: Alt + Ctrl + j) command. Ai will display the Average dialog box. Select the Axis, and Click OK.

To join two non-coincident points into a single point:

  1. Make the two points coincident:
    1. Marquee-select them with the Direct Selection tool.
    2. Execute the Object > Path > Average (Alt + Ctrl + j) command.
  2. Join the two points by executing the Object > Path > Join (shortcut: Ctrl + j) command. Ai will fuse the two coincident points into a single point.

The shortcut, Ctrl + Alt + Shift + j, does both average and join operations simultaneously.

Workflow Tips

While you are using the Pen tool and are still in the process of creating an active path, you can adjust the path's anchor points and segments in the following ways:

To undo an anchor point creation operation while on an active path: Ctrl + z.

To delete the most recently added endpoint from an active path: click the Backspace-key. Ai will delete the point, deactivate the path, and you will see the Start Path cursor.  Clicking Backspace a second time, will delete the entire path.

To temporarily activate a selection tool, press the Ctrl-key. Ai will temporarily switch from the Pen tool and its cursor to whichever selection tool you used last When you release the Ctrl-key, Ai will switch back to the Pen tool and you can resume building the path.

To nudge an anchor point into place:

  1. Press Ctrl get the temporary Direct selection tool and click to select the point.
  2. Press an arrow-key. Ai will move the point by the increment defined in the Keyboard Increment field in Edit > Preferences > General (Ctrl + k).  Ai will deactivate the path and go into Start Path mode. 

To nudge in increments of 10-times the Keyboard Increment, press Shift + arrow-key.

To see the direction handles on selected paths: Select > Object > Direction Handles.

Switch from the Precise Cursor to the Normal Cursor

If your Pen tool cursor changes shape from the familiar pen nib cursor icon to a reticle-shaped or x-shaped) cursor, Ai is in precise cursor mode.  To activate or deactivate precise cursor mode, go to Edit > Preferences > General and check or uncheck the "Use Precise Cursor" checkbox. 

To toggle the Precise Cursor off and on: press the caps-lock key.

Resources

How to Use the Pen Tool in Adobe Illustrator – Curves and How to Draw Lines Using the Pen Tool in Adobe Illustrator by hikeart.  Best short, how-to overview.

Pen Tool Fundamentals with Deke McClelland. Tutorial format very thorough. Teaches work-flow tips and covers common errors.

Illustrator CC One-on-One: Fundamentals with Deke McClelland.

Joining and averaging paths with Mordy Golding.

Adobe Help: Work with Live Corners.

Adobe Help: Edit paths.

Cubic Bézier Curves - Under the Hood by Peter Nowell. Provides an animation that shows how control handles really work.

Bézier Curves  A detailed but elementary treatment that should be accessible to a student with no more than one year of college math.

Wikipedia Bézier Curve