Blending Two Closed Paths. Note that the only elements that actually have Anchor Points and Control Handles are the starting object, the ending object, and the spine. All of which are contained in the Blend Object.
In its simplest form, Blending Objects is a process that takes a pair of real shapes and adds between them a numberer of virtual shapes that make them appear to morph into one another. You can specify one of 3 types of morphing and the number of intermediate shapes (i.e., steps) in the blending process.
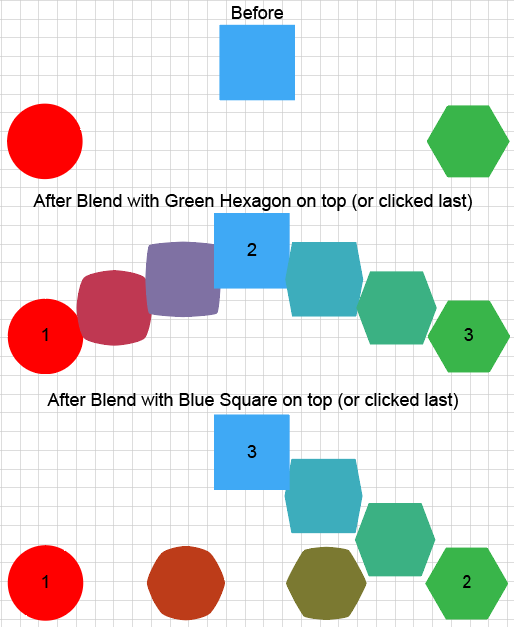
You can also Blend more than two objects. If you blend more than two objects, Ai will Blend them in pairs. That is, it will blend object 1 into object 2 and then blend object 2 into object 3, etc.. Furthermore, you can Blend, not just shapes, (closed paths), but also open paths, Groups, and Compound Paths.
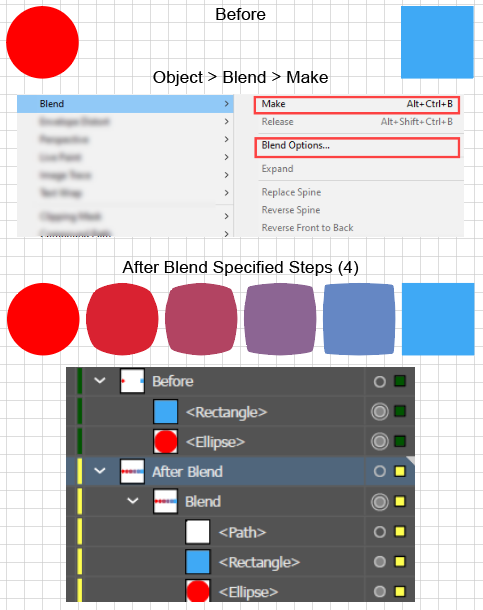
You create a blend with the Object > Blend > Make command or with the Blend tool, which has the advantage that you can visually specify the order in which the objects Blend and can specify what parts of the objects Blend into one another.
In terms of structure, when you create a Blend, Ai makes a Group-like container called a Blend Object that Ai gives the default name of Blend. The Blend object simply contains the original starting and ending objects, and if the original objects are closed paths, Ai will also add a path called a Spine.
In terms of its appearance, the Blend object looks like a sequence of intermediate virtual objects that, following the Spine, transition in size, shape, and color from the starting object into the ending object in each object pair. The intermediate objects are virtual, i.e. they do not have anchor points, control handles, fills or strokes, but are merely an appearance, which is generated by a program that is part of the Blend Object.
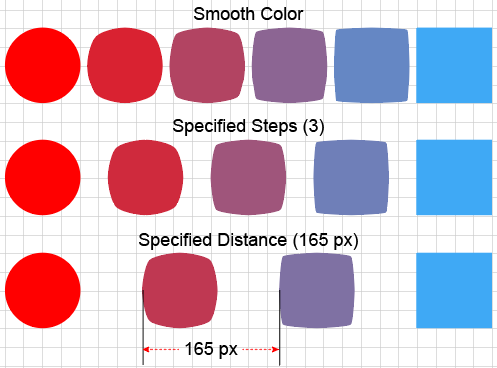
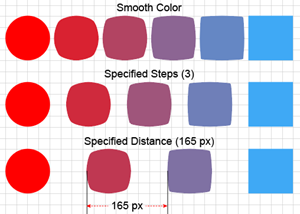
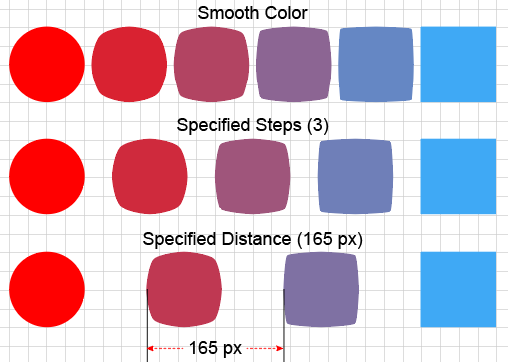
Structure and Appearance of the 3 types of Object Blending, Spacing Options
You can control how the intermediate objects are spaced by specifying one of 3 options. In the Object > Blend > Blend Options dialog, you can tell Ai to:
Add enough virtual objects so that the colors blend smoothly (the Smooth Color option).
Add a particular number of virtual objects (the Specified Steps option).
Add virtual objects so as to maintain a particular distance between the corresponding edges of each object (the Specify Distance option).
The original objects are not destroyed when you create the Blend object, they are merely incorporated into the Blend Object container, which means that you can update the Blend to optimize its appearance. You can, for example:
Setting the 3 types of Object Blending, Spacing Options.
Before you create a Blend, with either the Object > Blend > Make command or with the Blend tool, you will want to set the options that determine how Ai will space out the Blend's virtual objects, and how it will orient those objects (relative to the page or relative to the Spine). Since the original real objects are not destroyed but are preserved in the Blend container, you can also modify the options after you see the result.
To set the object blending options:
Execute the Object > Blend > Blend Options command. Ai will display the Blend Options dialog box.
Select one of the three options for spacing and one of the two options for orientation.
Spacing
There are 3 spacing settings:
Smooth Colors. Ai automatically determines and inserts the optimal number of steps (intermediate virtual objects) needed to smoothly blend the colors. As shown in the figure, this setting does not automatically generate a smooth gradient.
Examples of the 3 Object Blending, Spacing Options.Specified Steps. You specify the number of virtual objects that Ai should insert between real objects, regardless of the color settings. If you want a gradient-like effect, specify a large number of steps.
Specified Distance. You specify the amount of space that Ai should put between the corresponding edges of the objects, e.g., the left edge of the first real object to the left edge of the first virtual object. If you want a gradient-like effect, specify a short distance.
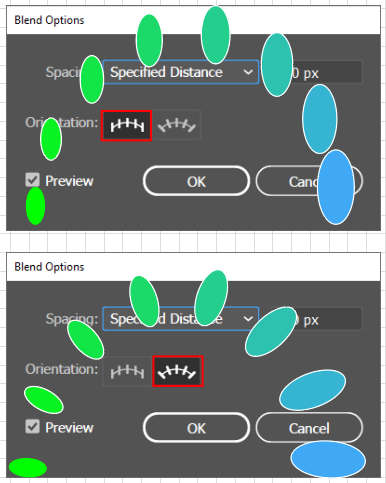
Orientation
You can choose to orient the blended objects relative to the Page or Relative to the path.
Object Blending, Orientation Options
Blend Objects using the Blend Make Command
Create a Blend with the Blend Command
To blend two objects with the command:
Set the Blend options (Object > Blend > Blend Options).
Select the objects.
Execute the Object > Blend > Make command. Ai will create a special group-like object that, in the Layers panel, Ai labels a Blend, and the objects will appear to morph into one another. If there are 3 or more objects, Ai will blend them in pairs, in the order that they are stacked in the Layers panel.
Blend Objects using the Blend Tool
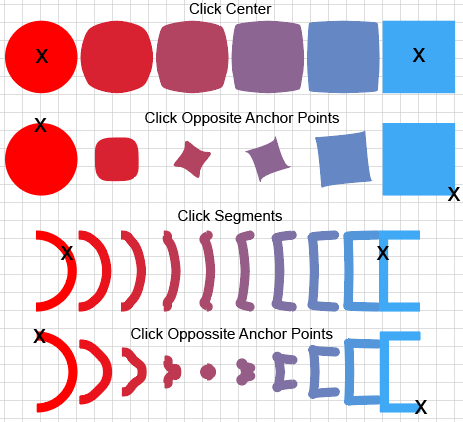
Clicking with the Blend Tool to morph objects into one another by their centers, path segments, or specific Anchor Points.
Using the Blend tool allows you to (A) choose the order in which you join the objects and (B) choose the specific path segments or anchor points on each pair of paths that you want to be morphed into one another.
To Blend a pair of objects with the Blend tool in Adobe Illustrator:
Set the Blend options (Object > Blend > Blend Options).
Select the Objects.
Get the Blend tool. The cursor will change to one with a hollow black square.
On the first Object, click near the center, on a segment, or on an Anchor Point. As you hover over an Anchor Point, the cursor's hollow square will turn black to indicate that you have successfully targeted the point.
Blending 3 or more Objects. With the Blend command, the stacking order determines the order in which Ai blends pairs of objects. With the Blend tool, the order that you click the objects determines the order in which Ai blends pairs of objects.
On the second Object, click near the center, on a segment, or on an Anchor Point. When you are on top of a good target, Ai will switch to a cursor with a plus (+) sign. As shown in the accompanying figure, if you click on two Anchor Points that are not in corresponding locations on the first and second Objects, the Blend will twist.
Click the ending path. Ai will apply the Blend.
Updating a Blend Object
Since creating a Blend Object does not destroy any of the original, real objects, but merely stores them in the Blend container Object, you can update a Blend in several ways:
After you create a Blend, you can still modify its Spacing options, Orientation options, or the Spacing option's steps or distance settings.
To modify a Blend Object's Options in Adobe Illustrator:
Select the Blend Object either on the Artboard or in the Layers panel. Ai will Select the Blend and its contents, but will target only the Blend. This makes sense because the Blend Options are properties of the Blend Object (i.e., the container), not of its contents.
Execute the Object > Blend > Blend Options command. Ai will launch the Blend Options dialog.
In the dialog, check the Preview checkbox so that when you make a change, Ai will display the update.
Do either or both of the following:
Switch to a different Spacing or Orientation Option. Ai will update the Blend's appearance.
In either the Specified Steps number field, or the Specified Distance length field, place the cursor in the field and press the up or down Arrow-keys. Ai will update the appearance with each click.
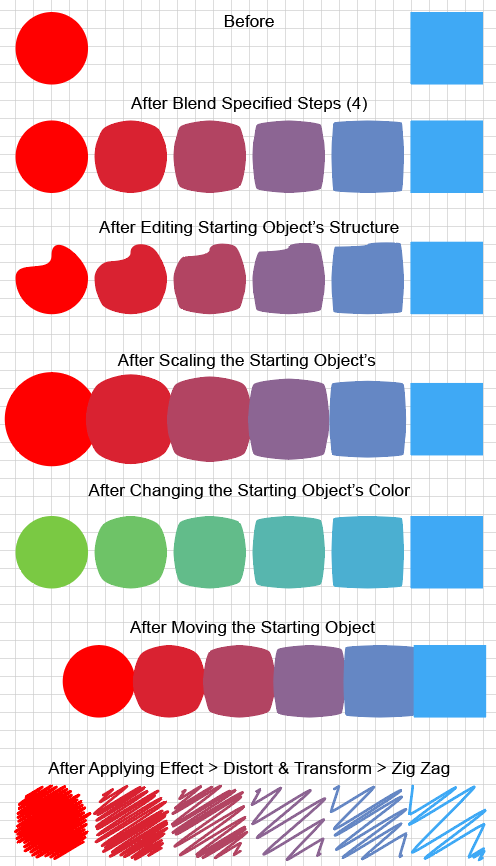
Edit a Blended Objects
Examples of Edits to Blended Objects
To edit any of the original, real objects in the Blend containerin Adobe Illustrator:
Ensure that the Preview checkbox is checked in the Object > Blend > Blend Options dialog.
Double click one of the real objects to enter Isolation mode. Ai will launch the Blend Options dialog.
With the object selected in Isolation mode, do any of the following:
Update the object's structure (Anchor Points or Control Handles).
Move or Transform the object with any of the Transformation tools.
Apply an Effect. To get a proper Blend, you must apply the same Effect to both the starting and ending object in each pair.
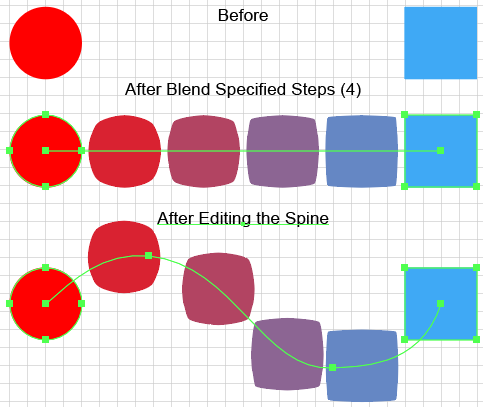
Edit the Spine of a Blend Object
Directly Editing the Spine of a Blend Object
To directly edit the Spine of a Blend Object in Adobe Illustrator:
Double click the Spine to enter Isolation mode and select the Spine.
With the Pen tool or the Curvature tool, add Anchor Points along the Spine and move them to give the Spine the desired curvature.
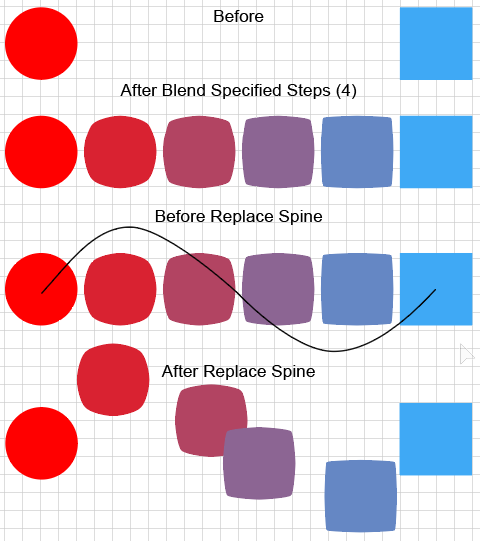
Replace the Spine of a Blend Object
Steps in replacing the Spine of a Blend Object
To replace the spine of a Blend object with another open path e.g. to make objects morph along a curved path, do the following in Adobe Illustrator:
Create the Blend object.
Draw the path for the replacement Spine. The spine must be an open path. That is, you cannot make a Blend wrap around a circle without first cutting the circle at some point.
Place the replacement Spine path on top of the Blend Object in the Layers Panel stacking order.
Select both the original blend object and the replacement spine.
Execute the Object > Blend > Replace Spine command. Ai will delete the old Spine and make the Blend's virtual objects move along the replacement Spine.
Hint
Adding a Spine to Blended Objects that were created from open paths.
The Object > Blend > Replace Spine command works even with a Blend that is made up of open paths. As shown in the After Blend section of the accompanying figure, when you first create a Blend from open paths, Ai does not create a spine. However, as shown in the next two sections of the figure, if you create an open path for a "replacement spine," place it above an open-path Blend Object and then execute the Object > Blend > Replace Spine command, Ai will insert the path into the Blend Object as a Spine.
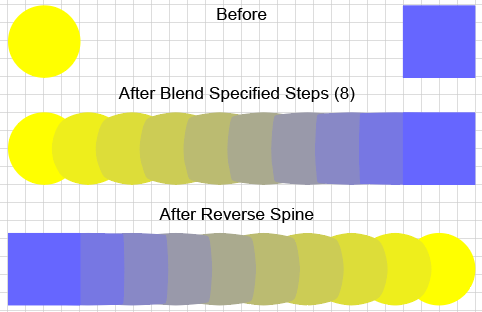
Reverse the Spine of a Blend Object
Example of the Reverse Spine command. The direction is reversed, but the stacking order (albeit back-to-front) is unchanged.
To reverse the direction of the virtual objects along the Spine of a Blend object in Adobe Illustrator:
Select the Spine in the Blend object.
Execute the Object > Blend > Reverse Spine command. The Blend will now start from what was the ending object, and end at what was the starting object.
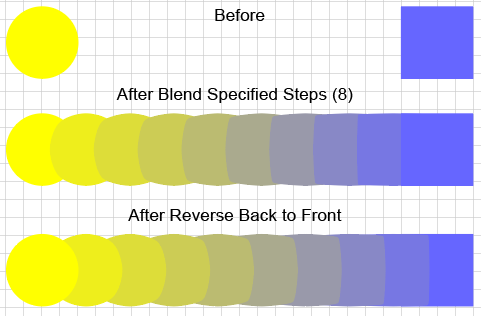
Reverse Back to Front
Example of the Reverse Back to Front command. The stacking order is reversed, but the direction of the Blend is unchanged.
To reverse the stacking order of a Blend Object in Adobe Illustrator:
Select the object.
Execute the Object > Blend > Reverse Back to Front command. Ai will invert the stacking order so that the object that was at the top will be at the bottom and vice versa.
Expand a Blend
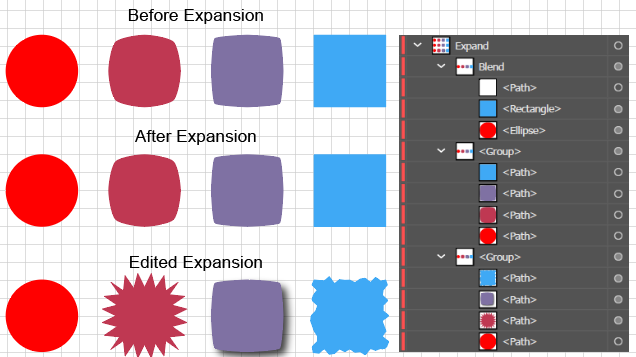
Expanding and Editing a Blend
To Expand a Blend in Adobe Illustrator:
Select the Blend Object.
Execute the Object > Expand Appearance command.
Execute the Object > Expand command. Ai will:
Remove the Spine.
Convert the Blend into an ordinary Group.
Convert each virtual path into a real path.
You can now select any path in the Group and edit it in isolation mode as you would any other path.
Undo a Blend
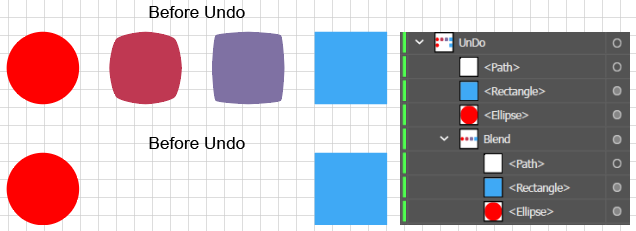
Undo or Release a Blend
To undo a Blend and retrieve the original, real paths in Adobe Illustrator:
Select the Blend.
Execute the Object > Blend > Release Blend. command. Ai will:
Remove the original, real paths from the Blend container.
Delete the empty Blend container, leaving only the original paths and the Spine.